The Ordinary Cook

Coffee and hazelnut cake

coffee and hazelnut cake

I made this cake for a friend. A few weeks ago she was taking her dog for an early morning walk, slipped and managed to break her ankle in three places and dislocate it. She now has a bionic ankle made good with more pins than a pin cushion on the British Sewing Bee. She is on the mend but still has a good few weeks of recovery to go.

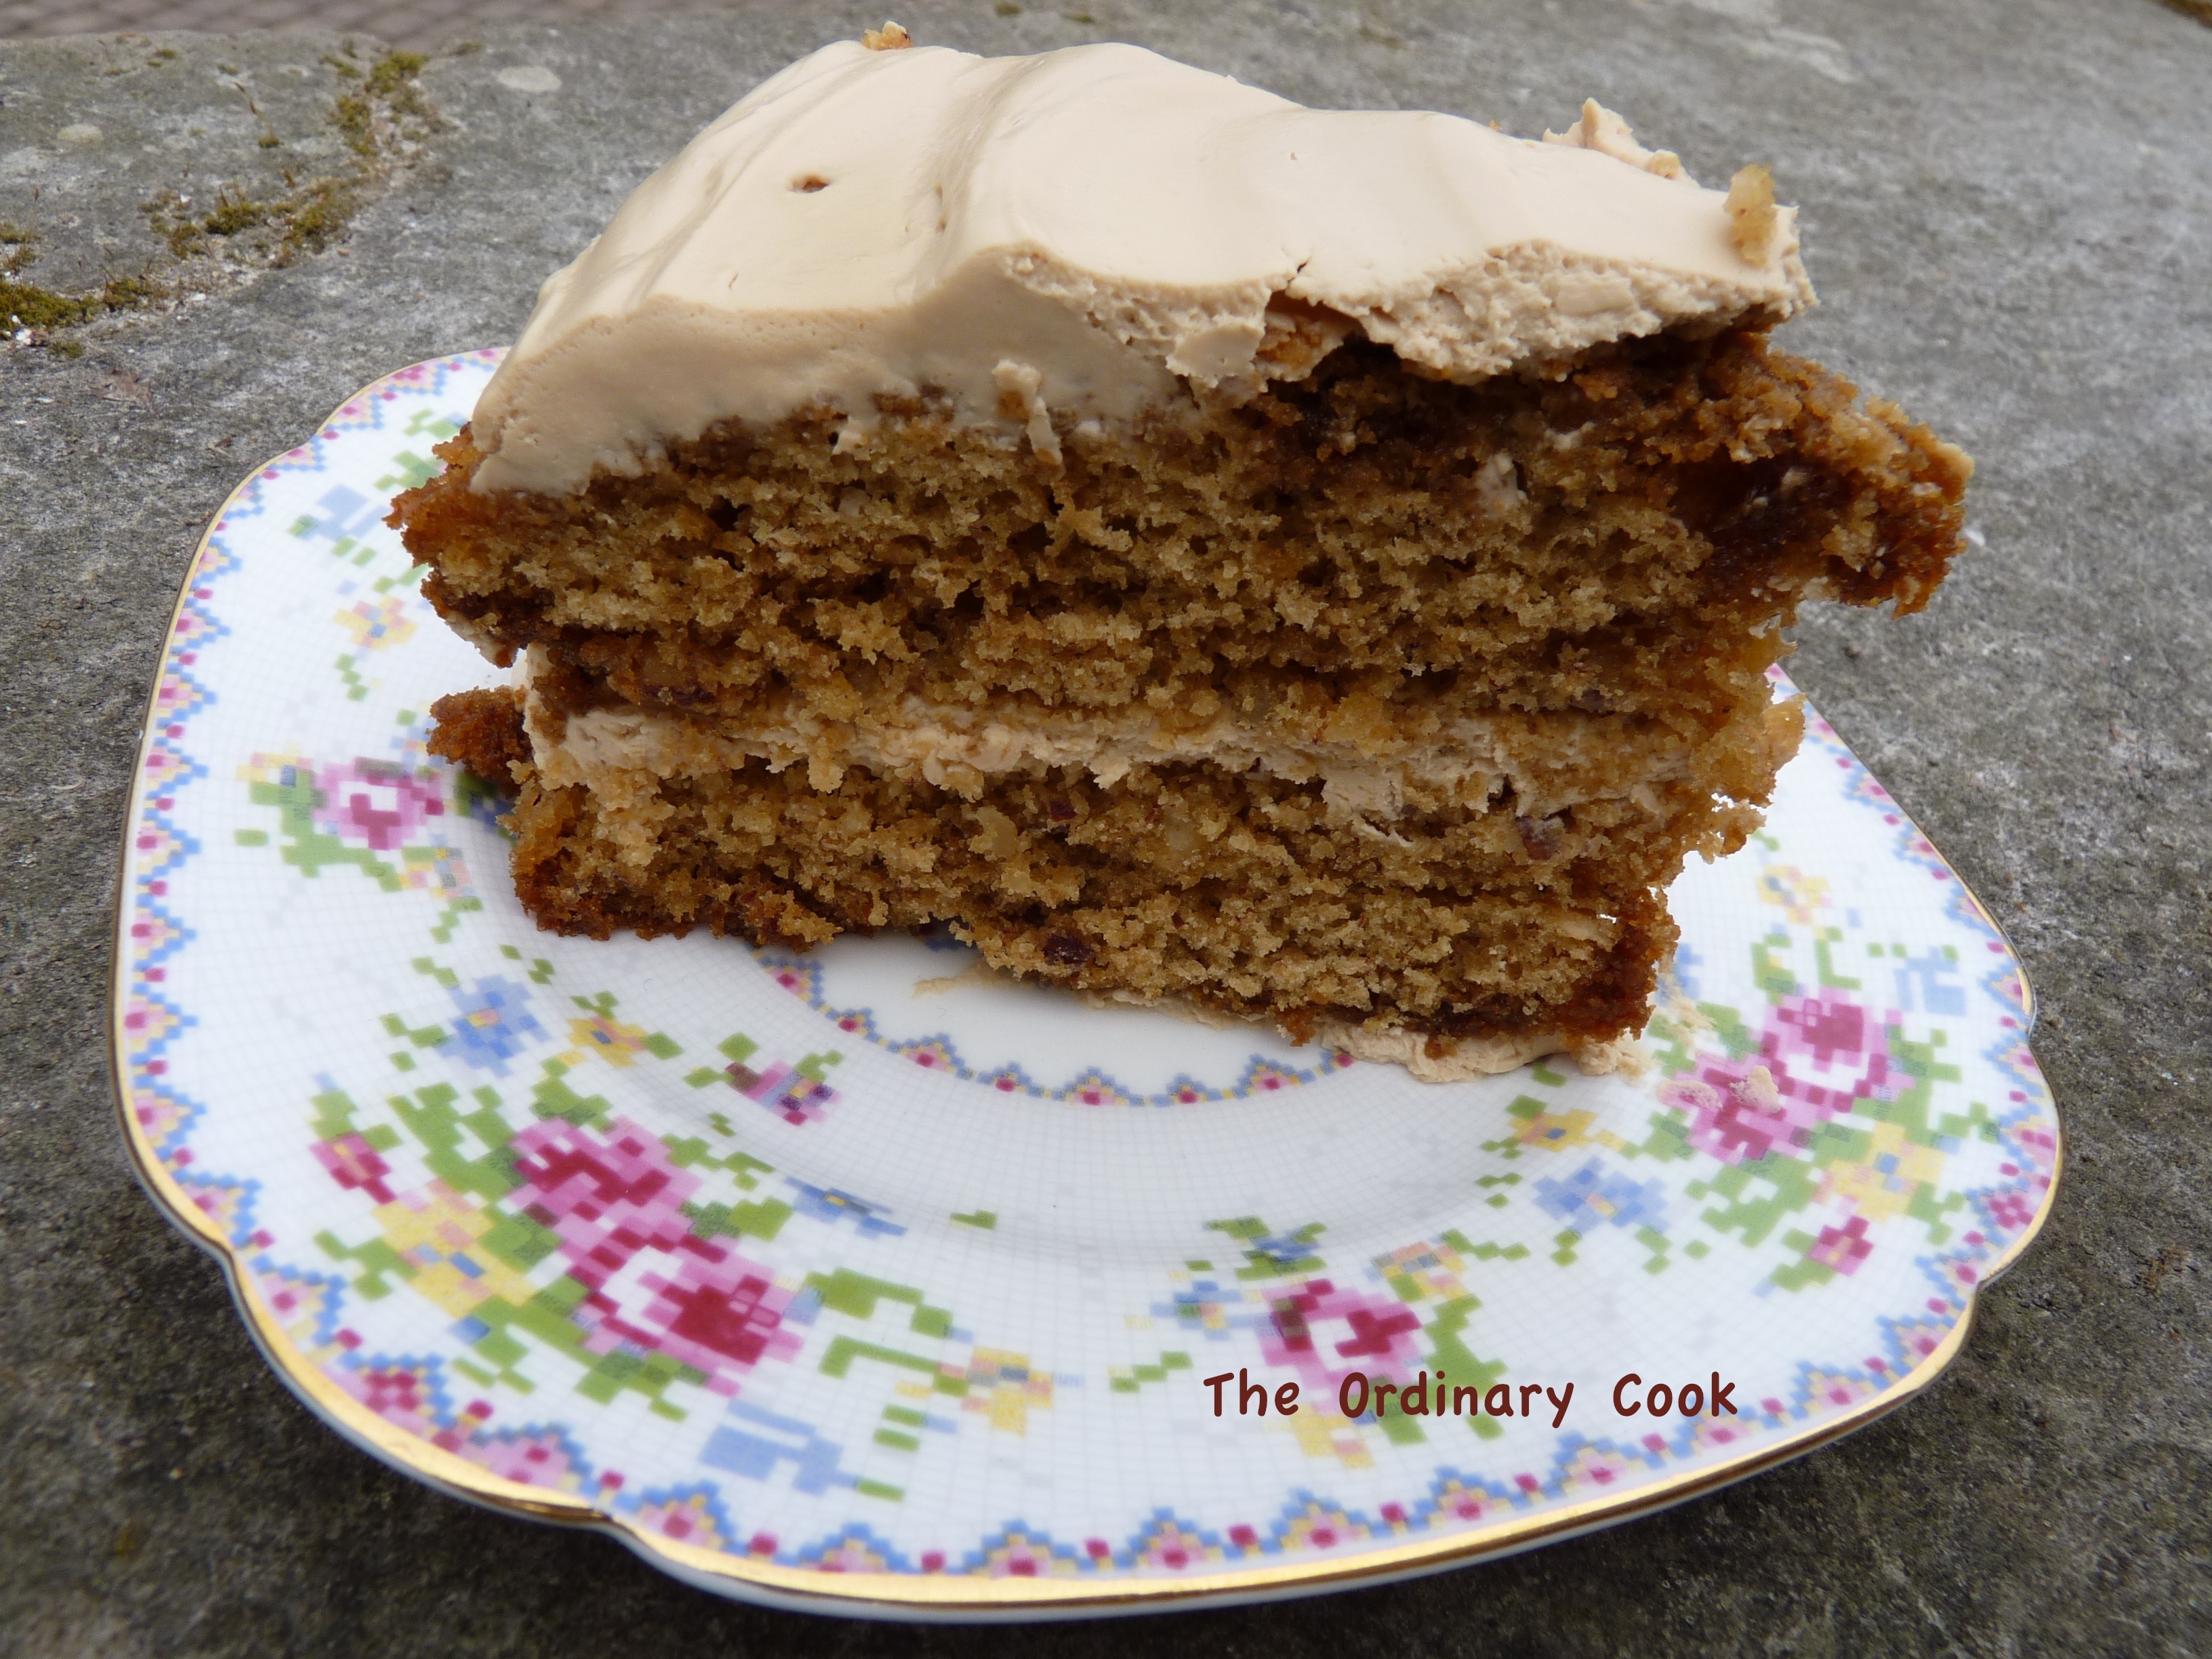
This cake was made to make her feel loved. I have known her since we were 11, (so that is quite a few years), and I consider her as one of my closest friends, and yet I had managed to never notice that she doesn’t like coffee. How did that happen? However, (and I’m not sure if she was just being polite at this point) she did eat a rather hearty slice and asked me to leave her a couple of slices for the next day. Mr OC, who adores coffee, loved this cake. It is drenched with a coffee syrup as soon as it comes out of the oven which makes it deliciously moist. The topping is not your normal sweet buttercream but offers an excellent contrast of creaminess with just an edge of sourness from the quark. You could add more sugar if you were after something a bit sweeter but I liked the contrast very much.

Michele from Cooking at Home recently posted about her coffee cake which never lets her down and everyone loves. I will be making her version next time as I like the idea of the crunchy topping very much.

For the sponge:

1 tbsp instant coffee
scant tbsp hot water
175g (60z) self-raising flour
1 tsp baking powder
175g (6oz) softened butter (room temperature)
175g (6oz) caster sugar (I used golden)
3 eggs
50g (2oz) hazelnuts, finely chopped (I whizzed whole hazelnuts them in the food processor for a few seconds)

For the syrup:
1 tbsp instant espresso powder
50g (2oz) demerara sugar
50ml (2floz) boiling water

For the filling and topping:
250g (9oz) mascarpone
200g (7oz) Quark or fromage frais
1 tbsp reserved coffee syrup
1 tbsp of dark soft brown sugar (or more according to your taste)

You will need two sandwich tins (mine are 7½ inch or 19 cms) greased and the bases lined with baking paper. Preheat the oven to 170°c, gas mark 3 or use the centre of the baking oven of the four oven Aga.

Method

First mix the coffee powder with the hot water for the cake and allow to cool a little.

Then place all the ingredients, including the coffee mixture into a bowl and mix well until everything is well combined and the batter is a soft dropping consistency. Add a tablespoon of milk if you think it needs to be a little softer. Divide the mixture between the sandwich tins. Place the tins in the centre of the oven and cook for 25-30 minutes until the sponges are beginning to shrink from the sides of the tin and are springy to the touch.

Whilst the cakes are cooking make the syrup. Place the coffee powder and the sugar in a heatproof jug and pour the boiling water over. Stir until the sugar has dissolved. This will take a minute or two.

As soon as the cakes come out of the oven pierce them all over with a skewer or cocktail stick and then spoon the syrup over as evenly as possible. Reserve a tablespoon of this syrup to add to the filling/topping.

To make the filling, place the mascarpone and quark into a bowl and mix until combined. Add the reserved coffee syrup and the sugar and mix until well combined. Add more sugar if you feel you need it  but bear in mind that a little sourness is a good contrast to the sweetness of the cake.

When the cakes are completely cold turn them out of the tins and place one onto the serving plate. Pile half the filling on top and then top with the second cake. Swirl the remaining filling over the top of the cake.

Take to a coffee-loving friend, or a friend that doesn’t like coffee – the choice is yours. (Sorry, H).

By the way, we had our holiday. A lovely, relaxing 10 day break on Madeira. We saw the sun again and let it warm our bones. What a pleasure. We came back refreshed and ready for action. Now let’s just hope the English sun peaks its head out from behind the clouds. Come on sun, don’t be shy.

Coffee and hazelnut cake Read More »

Puro Coffee – A Review

Puro coffeeThis is a review post. The above items were sent to me free of charge for the purposes of this review. However, the opinions in this post are entirely my own and are not influenced by Puro Coffee.

Puro Coffee contacted me to ask if I would review their coffee.  The ethical stance of Puro interested me and I do love a good cup of coffee. The package arrived beautifully presented in a rustic style.

Puro coffee sack

Puro Coffee is Fairtrade, which means that the coffee farmers get a better price for their produce. Puro also contribute 2% of turnover (rather than profits) to The World Land Trust. Their contribution has so far resulted in the purchase of 5,600 acres of exceptionally diverse rainforest. They also invest in social initiatives such as Trees4Schools in Africa which has planted trees and vegetable gardens helping to feed some of those most in need in Africa.

This is all great and a business that works so closely with charity to make the world a better place should be commended and supported.

If you are going to buy a coffee though you need to know that it tastes good. My review sample contained the three blends Noble, Organic and Fuerte. You can also get Noble as a decaffeinated coffee.

I make my coffee with a stove top espresso maker and like it made with half very strong coffee and half hot milk. What would you call this if you ordered it at a well known coffee house? A latte? A cafe au lait? A Flat White? I never know and I am too scared of the efficient barista to ask.

What I look for in a coffee is a dark roast with a kick of fieriness, a touch of bitterness and plenty of body. So my favourite of the Puro range is the Fuerte, made with half Arabica and half Robusta. The Organic blend is 100% Arabica  and the Noble is 80% Arabica and 20% Robusta. Having said that the Fuerte is my favourite, the other two are fine coffees. If you prefer a lighter roast then Organic is the blend for you.

Puro coffees are available in the UK at National Trust cafes, Leon and the Royal Parks among others. The range will also be available to buy online direct from the Puro At Home website soon.

If you would like to learn more about the social initiatives that Puro are involved with you can watch a video here.


Puro Coffee – A Review Read More »

Chicken Satay with Peanut Sauce

My eldest daughter is rather taken with the chicken satay sticks that you can buy from the supermarket deli. Now, I don’t mean to a food snob, but they are processed chicken with I don’t know what in the marinade. I do buy them for her if she happens to be with me and is mithering me for them. I mean, I feel bad enough that they were 6 and 4 years old when they asked me what the place with the big M outside was because their friends talked about it a lot. Oh, the guilt of parenthood.

So, I got some chicken breasts from the butcher and made these for her yesterday. She liked them, but although she didn’t say it, probably not as much as the ones from the supermarket. Well, her best friend likes the ones from the supermarket too, so I can’t really compete with that, can I?

Anyway, if you aren’t 8 years old and you would like some tasty chicken satay I can thoroughly recommend these. I like the consistency of the peanut sauce – it sticks to the roof of your mouth and is sweet, sour and hot – all good.

To serve 4 greedy people
4 chicken breasts
(NB. The photo above shows 2 chicken breasts)

For the marinade:
1 tsp finely chopped or grated root ginger
1 clove garlic, finely chopped or grated
1 tsp turmeric
1 tbsp lemon juice
1 tbsp soy sauce
1 tbsp honey

For the peanut sauce:

4 spring onions, sliced or 1 small onion, finely chopped
1 red chilli, finely chopped (I remove the seeds to reduce the heat)
1 tsp root ginger, finely chopped
1 clove garlic, finely chopped
3 tbsp crunchy peanut butter
1 tbsp lemon juice
2 tbsp soy sauce
1 tsp dark brown sugar
4 tbsp water (you can add more if you want a thinner sauce)

If you have some coriander leaves they would be very good sprinkled over the top of the chicken and the peanut sauce.

Method

If you are using wooden skewers, then soak them in water for at least 30 minutes before cooking with them to prevent them catching fire.

Prepare the chicken by removing the skin and cutting into cubes which will fit onto skewers easily.

Place all of the marinade ingredients in a glass or ceramic bowl and mix together well. Add the chicken cubes and cover with the marinade.  Cover with cling film. They need at least 30 minutes in the marinade, otherwise place in the fridge for 2 to 3 hours.

I served the peanut sauce at room temperature but you could serve it hot. To make the sauce, fry the onion, ginger, garlic and chilli in a tablespoon of vegetable oil over a high heat, stirring all the time until softened. Take off the heat and add the peanut butter, lemon juice, soy sauce and sugar. Stir well and place over a gentle heat and stir until everything has combined and the sugar has dissolved. Add enough water to get to the consistency that you like.

Thread the chicken cubes onto skewers and grill until cooked through. I cooked them in a griddle pan to sear them and then placed in the roasting oven of the Aga (about 200°c, gas mark 6) to finish off and cook through completely.

Serve with rice, noodles or salad and the peanut sauce.

Chicken Satay with Peanut Sauce Read More »

Happy 2013

Wishing all my lovely readers a very happy year ahead. May it bring you good health and happiness.

I haven’t been here very much recently. I am going to try to be here more often. It’s one of my goals for this year.

I have looked back on the goals I set myself for last year and was pleased to find that most of them were met. The losing a few inches off the waistline went a bit awry -they went and then crept back on. However, the plus side of this is all the lovely food I have enjoyed adding those inches.

This year’s goals are being formulated… I am going to finish a tapestry that I started when I was 17 (that’s  nearly twenty-one years ago – I know a sorry state of affairs if ever there was one).  I am going to make another dress. I am going to try to shift a couple of those inches again. The rest of the list is to be decided, but I am going to try to blog more.

So Happy New Year.

Kath x

I hope that you have a few goals of your own


Happy 2013 Read More »

Leeks in an orange sauce

I really hope the old adage “a picture tells a thousand words” is not true in this case, as this photo really does no justice to how good these leeks are. But if you know a better way of presenting these babies on a cold dark night in England then suggestions are very welcome.

The recipe is from Sophie Grigson’s Eat Your Greens and can be found here so I won’t rewrite it for you. I do, however, urge you to try it. Even if you, or someone you are feeding does not like leeks then minds will be changed after trying these.

Leeks lend themselves to sliminess I find. This is rarely a good thing when it comes to something you want to put into your mouth. But by cooking them in this orange flavoured béchamel any potential slipperiness is coated in smooth unctuousness. This is always a good thing. The orange adds a sweetness which makes these the perfect partner for any roast meat and the silky sauce provides an excellent contrast to a crunchy roast potato. Make this as a side on Christmas Day and I promise you it will be perfect (even if the photo isn’t).


Leeks in an orange sauce Read More »

Blackberry and apple muffins

With all my talk of things that have not been good in the garden this year, (and then reeling off a list of the things that have done well and caused envy in several of you – sorry),  I can report that blackberries have done really well this year. We have several blackberry brambles in our hedge – which says a lot for my weeding skills.

It has been lovely to watch the girls crouching by the hedge feasting off the goodies. Although, this has occasioned me to stand over them a few times reminding them that they must only eat the berries that look like purple raspberries and not to eat any that are single purple berries (again my lack of weeding skills and the habit of deadly nightshade liking to grow in hedges). Am I coming across as paranoid? If I am, then it’s because I am.

I formed a bad habit of giving the girls something to eat when I meet them from school. This means a trip to the shop next to their school for a mint choc chip ice cream a couple of times a week, or a chocolate bar fetched out of my bag. But I do try to cook them something once a week. I was inspired by Michele’s recent post about bran muffins. The ones I cooked in the end are roughly based on my mini chocolate muffins  but are probably healthier. I wondered how they would be received by the girls, as they can be fussy little blighters. I am pleased to report that they really enjoyed them and ate several.

This recipe makes 12 mini muffins (fairy cake size) and would make 6 normal sized muffins.

60g wholemeal flour
60g plain flour
30g oatbran
1 tsp baking powder
½ tsp ground cinnamon

100ml milk
1 egg
25g melted butter
50g muscovado sugar
1 eating apple, peeled, cored and cut into chunks
50g blackberries (frozen, if that is what you have)

2- 3 tsp of demerara sugar for the topping

Method

Measure the flours, oatbran, baking powder and cinnamon into a bowl and mix well.

Put the milk, egg, melted butter, sugar, apple and blackberries in a large bowl and mix these well. Pour the dry ingredients into the wet and mix lightly. Do not overmix. Divide the mixture into 12 fairy cake cases. Sprinkle each one with demerara sugar.

Bake in a preheated oven at 180°c, gas mark 4 for 15 -20 minutes until golden and firm on top.


Blackberry and apple muffins Read More »

Roasted tomato sauce

My last post was a tale of woe about the lack of damsons on the trees this year, compared to last. This summer has been a wash out here in the UK. We had a few  days which were beautifully sunny but they were few and far between. Nevertheless, the garden has performed quite well this year, despite the lack of summer or perhaps because of it. The runner beans have flourished and we tried a purple bean this year, which has been lovely, although it loses its colour when cooked and looks like a green bean. Sweetcorn has been a great success, last year it was hopeless, and it is hard to describe how sweet and delicious corn is when cooked within minutes of picking. We have pumpkins in abundance. So many, I am not sure what we will do with them all. I have so many cucumbers, from just the one plant, that I could supply the local supermarket.

Our tomatoes though have not been as successful as previous years. We tried several varieties and a yellow and a cherry variety have been the most successful. However, the woodlice really like the yellow variety and have been enjoying themselves no end once they were finished with the strawberries. As a result, no woodlice were spared when I was splitting a load of logs the other week. No longer do I have any sympathy with the wood louse! Despite all of this, we have still had enough tomatoes to make a few batches of this roasted tomato sauce. I have used it as a pizza sauce; mixed into a risotto to stuff a roasted pumpkin;  as a base for soup; and as a pasta sauce.

Roasting the tomatoes makes them sweeter and even more tomatoey. I add garlic cloves (unpeeled) and thyme or oregano, salt and pepper and plenty of extra virgin olive oil. Cook them in a moderate oven (180°c, gas mark 4, the baking oven of the Aga) for about 30 minutes. Allow to cool a little, pop the garlic out of its skin, and then blitz the whole lot in the processor (or you could use a food mill).  I don’t bother to strain through a sieve, but if you want a smooth, seed-free sauce then you should.

Roasted tomato sauce Read More »

A very good ham recipe

I cannot at all claim this recipe as my own. It comes from the wonderful book “Food in England” written in the 1950’s by Dorothy Hartley. If you are at all interested in the history of food or enjoy traditional recipes then I urge you to get this book. It is one that you will want to read whilst tucked up in bed on a winter’s night. It has many fantastic recipes and is packed full of historical facts and inspiration.

We had a party in the garden over the bank holiday weekend.  The August Bank Holiday marks the end of the British summer and as we have had a very disappointing summer this year, we thought “Hey, why not invite friends round to sit in our garden, drink , eat and be merry”.  Of course, this thought occurred to us when we were enjoying one of the rare warm days of early August. We had all our toes and fingers crossed for good weather, the Countryfile weather forecast said gales and torrential rain. But, the crossing of digits must have worked as Sunday was one of those rare fine, warm days, and, shockingly, Countryfile got it wrong.

Whenever we have friends round for a big bash I always cook ham. They must be well and truly fed up with seeing it. I usually make is to this recipe, but Dorothy had inspired me. She describes it thus, Even a “plain salted” ham comes up wonderfully in this bath, and for a rich home-cured it is the apotheosis. Who could resist?

I fiddled about with  her advice a little bit because I used what I had available in the garden. Which is, I think, what Dorothy would want. I also reduced the amount of black treacle from her advised 1lb to 3-4 tablespoons as I didn’t want the treacle to overpower with its sweetness.

You will need to ask the butcher how long your ham will need to soak for. I tend to soak my ham in cold water (enough to cover it) for at least 12 hours, changing the water twice.

This ham should be cooked the day before you need it so that it can cool in the cooking liquid overnight. So you will need to buy your ham three days before you want to serve it to allow for soaking, cooking and cooling.

You will need to find a pan that is large enough to easily take your ham with some room at the top.

You can do this recipe with any size ham. Bring the joint slowly to the boil, reduce to a simmer and use the following times as a guide:
900g – 1.5kg  simmer for 1 ½  to 2 hours
1.75kg – 2.5kg  for 2 to 2½ hours
2.75 -3kg for 2½ to 3 hours
3.5kg -4kg for 3½ to 4 hours
4.5kg – 5kg for 4½ to 5 hours
5.5kg to 6kg for 5 to 5½ hours
6.5kg – 6.75kg for 5½ to 6 hours
7kg for 6 hours

The ham will be ready when a skewer will easily go all the way through and the juices are running clear.

I made this recipe with a ham that weighed about 6kg.

Chop up an onion or two (including the skins, as Dorothy advises that they add a golden colour to the ham) and any vegetables that you may be using. I used an onion, carrot tops, a couple of carrots, three or four large parsnip leaves and two apples chopped roughly (with peel and core). Place these in the base of the pan.  Add whatever herbs and spices appeal to you. I added a couple of sprigs of fresh thyme, marjoram (oregano), sage and dill. I also added 3 cloves, 4 juniper berries, 1 teaspoon of szechuan peppercorns, 1 teaspoon black peppercorns (feel free to use whatever herbs and spices you prefer or have to hand). Pour in a can of cider (500ml), add 4 tablespoons of soft brown sugar and 4 tablespoons of black treacle. Place ham on top of the vegetables and add enough cold water to cover the ham. Cover with the pan lid or tented foil (try to avoid the foil touching the ham as the salt will eat through the foil).

Bring slowly to the boil and then reduce to a simmer and simmer for the time sufficient to cook you ham, based on the times above. If you are cooking on an Aga then place the pan into the simmering oven after bringing to the boil. Remove from the  heat and allow the ham to cool in the cooking liquid. This will keep the ham really moist and make sure that all the flavours permeate the meat. I left mine to cool overnight.

Take the ham out of the cooking liquid and cut off the rind, leaving behind plenty of fat if you can. Score the fat and cover with an equal mixture of dry mustard powder and demerara sugar, patting it well to make it stick. Place in a baking tray and bake in a preheated oven at 180°c, gas mark 4 or in the baking oven of the Aga for 20-30 minutes until the crust is golden and the ham is hot. Serve it hot, with lashings of parsley sauce (bechamel sauce with lots of fresh parsley added) or leave to cool to room temperature.

This joint was plenty for friends to enjoy and we have been enjoying sandwiches and I made a fidget pie. I will be making ham this way again.  Thank you Dorothy.


A very good ham recipe Read More »

Meet Mabel

Apologies to everybody visiting and expecting to read about my latest food adventures. This post is to show you some of the reason I have been so tardy with my blog posts lately.

Meet Mabel…

Isn’t she lovely?

She has lived with us since March. I think she likes it in our dining room – being privy to all the goings on in the Ordinary Cook household. It looks like she is trying to make a dash for it from the front door in this picture but I promise she isn’t. The heavens have opened today and the house has become as dark as November. The only place for Mabel to pose, in a suitable light to emphasise her best features, is by the front door. She came back in willingly enough.

Here she is wearing the dress I made. Yes, all by myself. It took me six months, but still…

I am ridiculously pleased with my efforts. It actually looks as if I hadn’t made it – if you know what I mean. It has had a few outings and I am sure there will be plenty more.

I have the material and the pattern for my next creation, it might just take another six months or so.

Meet Mabel Read More »