theordinarycook

The Ordinary Cook loves to cook. If I am not cooking or baking then the chances are I am thinking about cooking and baking. I love sharing recipes and ideas and my website is my space to do this.

Hotel Chocolat treats for Christmas

I have been holding off from using the word until at least November. I am the sort that starts to think about Christmas about mid November-ish. But I think about chocolate most of the time. Hotel Chocolat kindly sent me a selection of the gorgeous treats that they have available this Christmas. To be honest when I was asked which chocolate I would like to try I couldn’t make up my mind. My youngest had no such problem. Straight away she asked if we could try the marzipan and the mint selections. She is very different from me in many ways, as all children should be, but we have the exact same taste in chocolate. Here is what arrived in a beautifully presented gift bag.

Hotel Chocolat

The youngest dived straight in and she and I both agree that it would be hard to choose between the marzipan or the mint if we had to. The little solid Santas would also be lovely to find tucked under the tree come Christmas morning.

Hotel Chocolat

Which would you choose?

Disclosure: I was sent these items free of charge for the purposes of review. All opinions are my own and honest. 


Hotel Chocolat treats for Christmas Read More »

Crabapple and sloe jelly

Whilst I was picking my rosehips for the syrup I found a couple of heavily loaded sloe trees. I made my way back there a few days later and picked a kilo or two and popped them in the freezer. We are lucky enough to have a crabapple tree nearby too so I picked a couple of kilo of those too. The crabapples have sat in my kitchen looking at me accusingly for a couple of weeks, so yesterday I made myself get round to giving them a good swill and popped them in the preserving pan with some of the sloes. I cooked them slowly in just enough water to cover them until the apples were pulpy. I gave them a good mash and strained it overnight through a jelly bag. Today, I boiled them with sugar until the jelly wrinkled on a cold saucer. The finished jelly will be great with roast dinners and cold meats and stirred into gravies. I might even have it on toast like I do with my damson and rosehip jelly. This one though is a little sharper and has that sherbetty finish to it that you would expect from a jelly made with fruits that are sour before cooking.

Crabapples and sloes

The colours at the different stages are stunning. Starting with a rose pink and turning to a deep purple. It is worth making this jelly just for these colours.

Crabapple and sloe juice
The strained juice
Crabapple and sloe jelly boiling
The boiling stage

You can put in as many crabapples and sloes that you have, cover them with just enough water to almost cover and then strain the juice through a fine sieve of jelly bag. Measure out the juice and to every 600ml add 450g of granulated sugar. Here is what I did:

2kg crabapples
1kg sloes
water
1 kg granulated sugar

Method
Rinse the crabapples and the sloes well. Place in a large pan and cover with just enough water to almost cover. Cook over a gentle heat until the apples are pulpy. Mash with a potato masher and pour the purée into a jelly bag, a clean tea cloth (boil in a pan of water before use) or through a very fine sieve. Leave to strain overnight.

Measure the juice and for every 600ml add 450g of granulated sugar. I had 1,300 ml of juice so added 1 kg of sugar. Stir over a gentle heat until the sugar dissolves and then turn up the heat and boil the syrupy mixture until a teaspoonful of it wrinkles when placed onto a cold saucer and pushed with your finger. Remove any scum that rises to the surface. Pour the hot mixture into warm sterilised jars and seal.

You might also like to make crabapple jelly without the sloes or crabapple and rosehip jelly.

Crabapple and sloe jelly Read More »

Baked bean and ham pie

Branston bean and ham pie

Autumn is most definitely upon us, the nights and mornings are chillier, the gloves have been dug out from the back of the drawer and the lawn is more leaves than grass. It’s time for dinner to be warm and comforting once more. One of the comfort foods we always turn to in this house is baked beans so I was thrilled when Branston asked me to develop a recipe around their beans.

Branston baked beans

Branston launched their baked beans 10 years ago this month and they have been rated by the Good Housekeeping Institute as the best tasting beans of all the leading brands and in taste tests 4 out of 5 people prefer the taste of Branston’s beans. This might be something to do with Branston putting more tomatoes into their sauce.

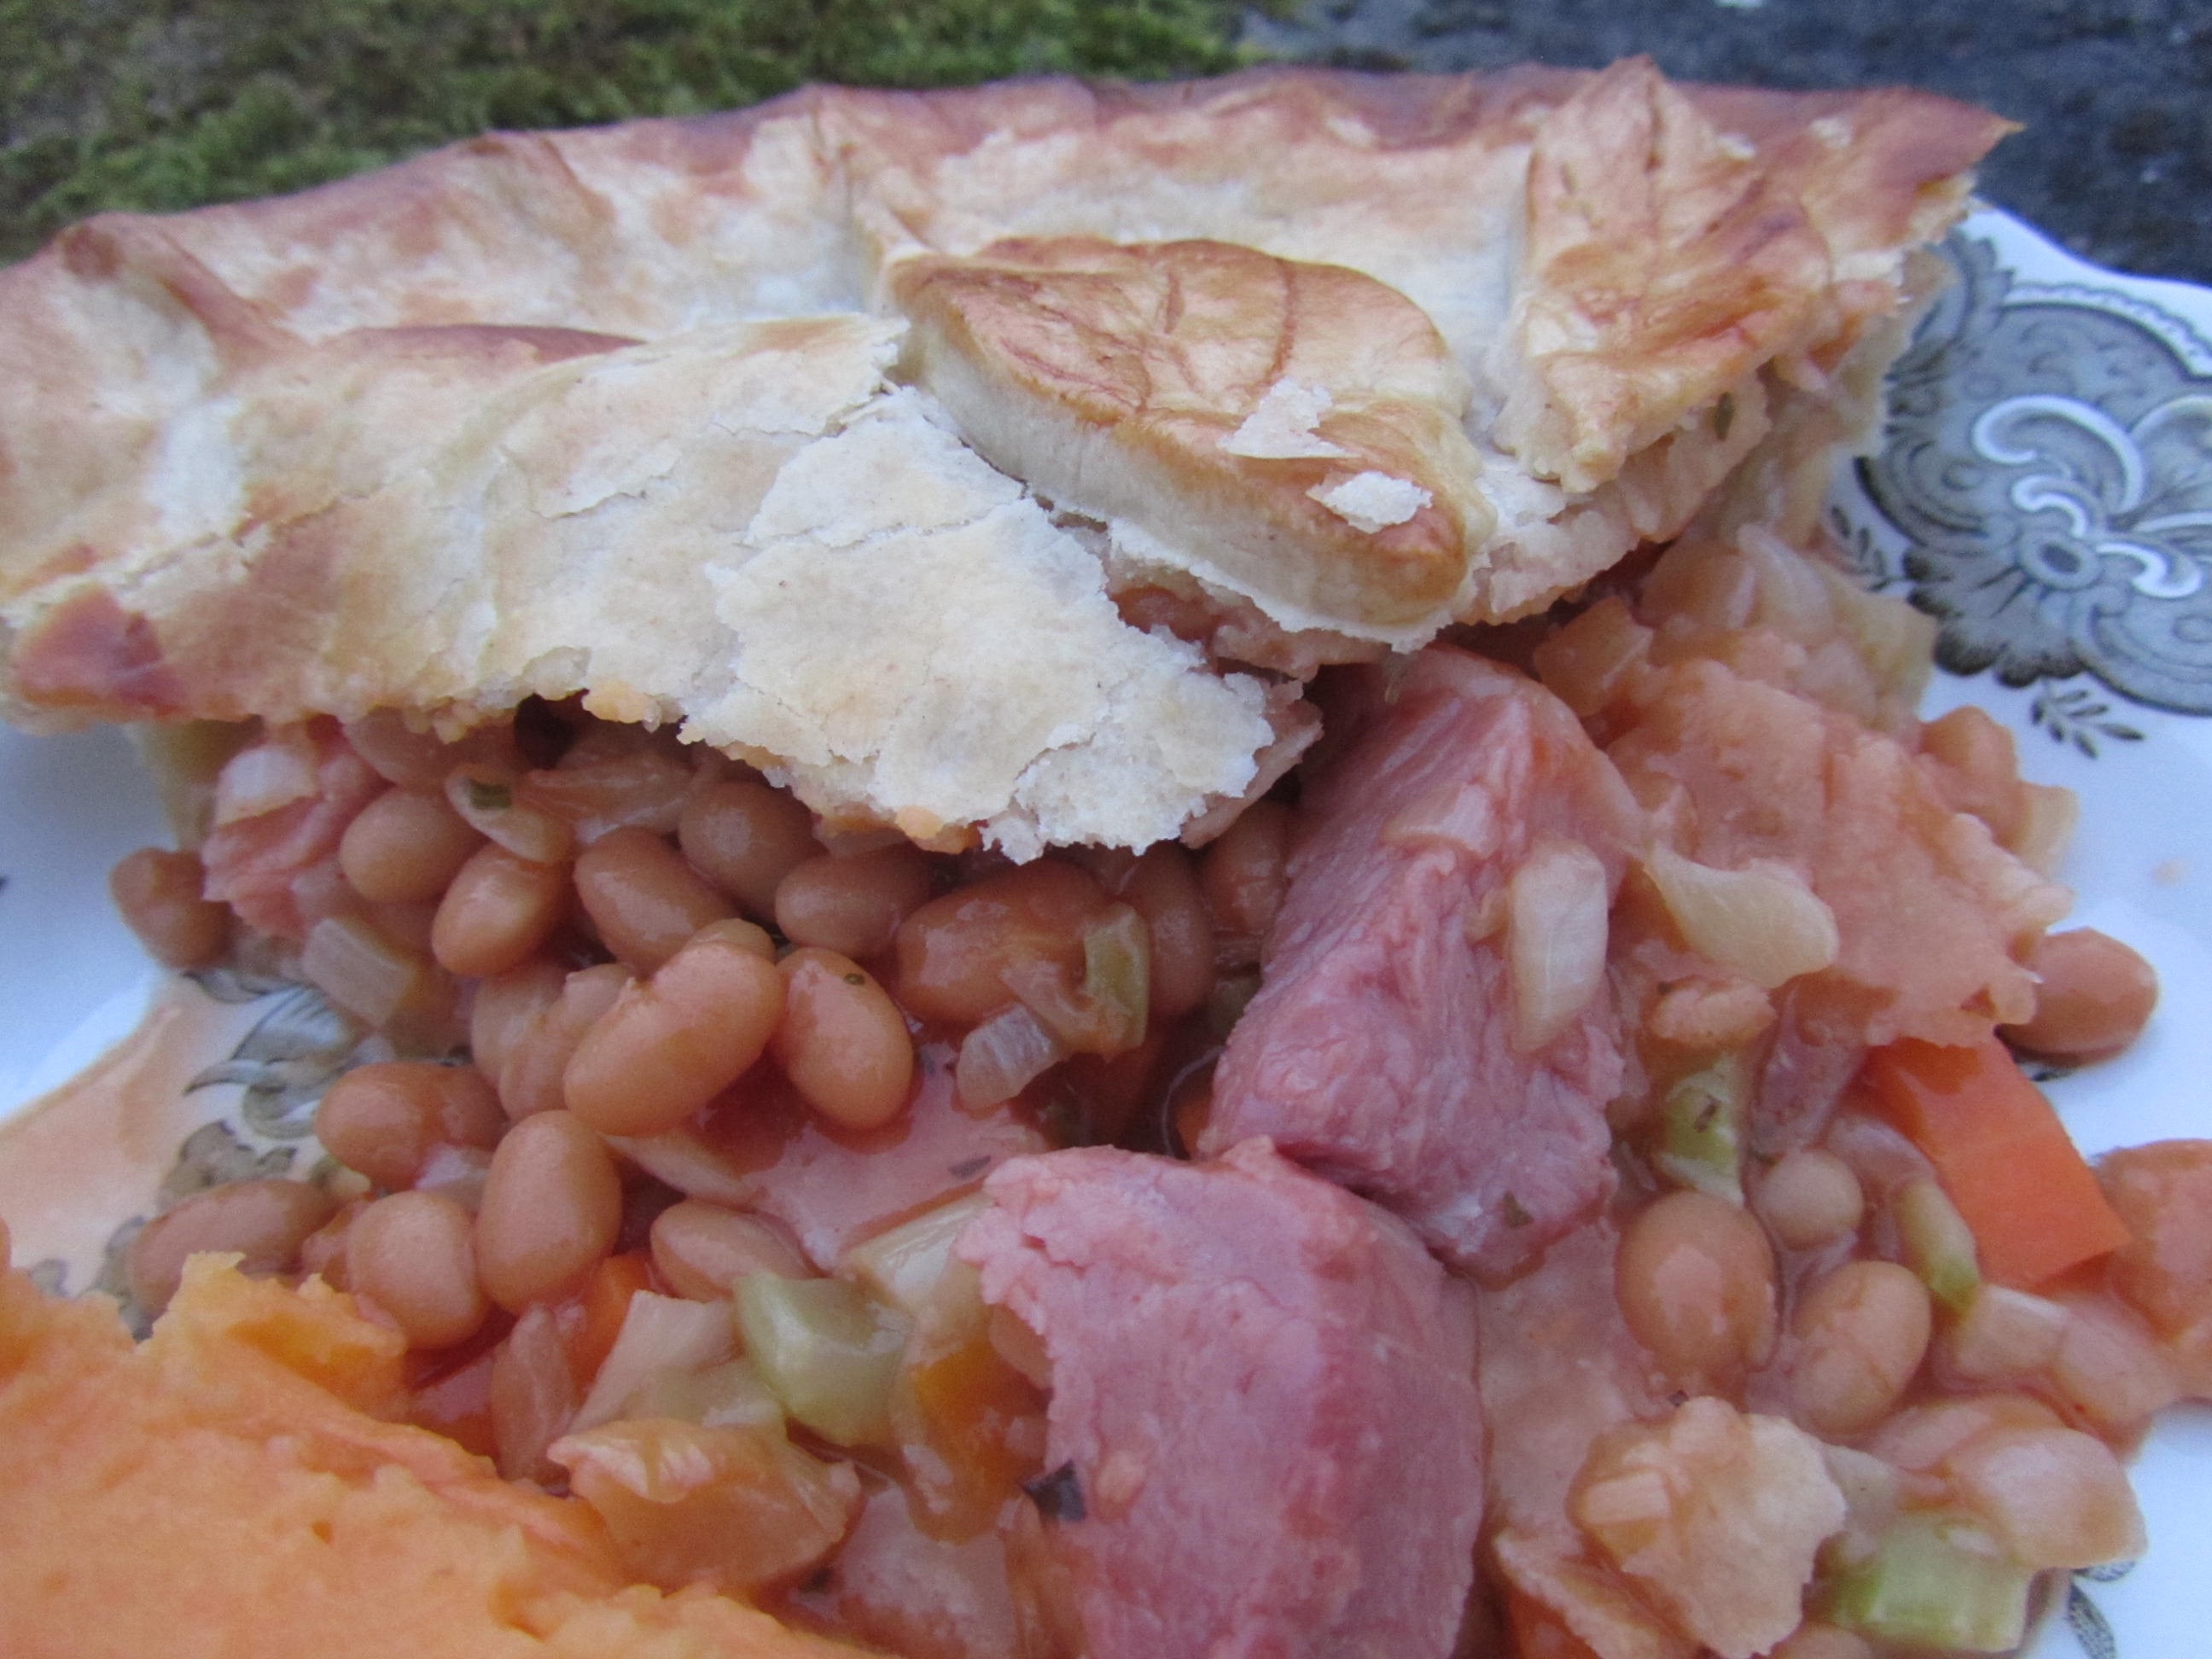
This pie makes a substantial family meal, with the beans as the star. The beans’ tomato sauce means that there is no need to make a gravy. I served it with a swede and sweet potato mash that was perfect to soak up the juices, but really all you need is the pie.

Branston beans and ham pie

If you would like the pie to be even more substantial you can crack a couple of eggs onto the filling before you put the pastry on top. I made it with the eggs when Granny came round for tea, but didn’t for last night’s tea as my eldest is away with school for the week and my youngest turns her nose up at eggs. The pie was well received both times with second helpings being devoured eagerly. Even Granny, who said she wasn’t keen on beans before she dug in, ate every last mouthful! A ringing endorsement, I’d say.

For the pastry
250g plain flour
125g cold butter, cut into cubes
7-8 tbsp cold water

For the filling
1 carrot, finely diced
1 stick of celery, finely diced
1 onion finely diced
350g cooked ham, diced (or you can use bacon rashers, cut into small pieces, or bacon lardons, just fry them with the vegetables)
1 x 410g tin Branston baked beans
½ tsp oregano
pepper to taste

1 egg and a splash of milk for egg wash

Method

Preheat the oven to 200°c, gas mark 6, or use the floor of the roasting oven of the Aga.

Make the pastry by placing the flour into a large bowl and adding the cubes of butter. Rub in using your fingertips until the butter is evenly distributed. Pour most of the water in (you might not need all of it) and draw a knife through the pastry until it starts to come together. If you need more water add it gradually.  Bring the dough together into a ball using your hands and wrap in clingfilm and place in the fridge for twenty minutes to chill. You can also make the pastry in a food processor by whizzing the flour and butter together briefly and then add most of the water and whizz until it all just starts to come together.

For the filling, sauté the carrot, celery and onion (and bacon if you are using that instead of ham) in a large frying pan with a tablespoon of oil until the vegetables are soft. This will take about ten minutes over a gentle heat. Take off the heat and leave to cool. Once cool, add the ham, the oregano, a touch of pepper and the baked beans and mix well.

Cut one-third of the pastry off the ball and put to one side. Roll the larger piece on a lightly floured work surface to the size of your pie dish. My pie dish in the photo above measures 20cm. Then line the pie dish with the pastry. Pour in the filling. If you want to add a few eggs then crack them on top of the filling at this point.

Lightly beat the egg for the egg wash in a small bowl or cup and add a splash of milk. Using a pastry brush, brush a little egg wash around the edge of the pastry where the lid will sit to help with the seal. Roll out the smaller piece of pastry  on a lightly floured work surface to fit. Place on top of the dish and, using your thumbs, press all along the edge to make a good seal.  Using a sharp knife  poke two holes in the top of the pie to let the steam escape and trim the excess pastry from the edge of the pie. If there is enough trimmings, re-roll and cut out a few leaves to decorate the top. Place these on top of the pie and brush the entire surface of the pie with the egg wash. Place in the centre of the oven or on the floor of the roasting oven of the Aga and cook for 25-30 minutes until the pastry is golden and the filling is piping hot. Leave to stand for a few minutes before serving.

#LoveBranstonBeans

Disclosure: I was commissioned to develop this recipe for Branston Baked Beans. All the opinions are my own and are honest. 


Baked bean and ham pie Read More »

Parsnip and honey cake

Parsnip and honey cake

I belong to a book club. Well, when I say book club… It started a couple of years ago with the intention of us reading a book and meeting to discuss it every month. After a couple of months the book club turned into what it is now; we gave up on the books and just enjoy meeting to have a proper catch up. A few times a year we have a clothes swap evening. Which is a brilliant idea for everyone but me. I don’t buy many new clothes and those that I do I tend to wear until holes appear. So, I never have anything to contribute to the clothes swap. For this reason I always take food instead. Last week I took this cake. It was a big success.

The cake in the photo above is only half the mixture. Because I hadn’t made it before I wanted to do a taste test to make sure it was good before I took it along. So I split the mixture into two loaf tins and me and Mr OC polished off the other half a little too easily. Your cake will, therefore, be bigger than the one in the pic.

The cake improves the next day. The first day, the taste is predominantly parsnip. The second day, the parsnip has mellowed and the other flavours are given a chance to shine through. It is a sweet, slightly spicy, moist and delicious cake.

NB: I added 25g of coconut flour in place of 50g of the plain flour, (you need less coconut flour) but I have not specified this in the recipe as you do not need it and I don’t want you to go out and buy it just to make this cake.

250g grated parsnip (from about 350 -400g of unprepared parsnip)
175ml olive oil (not extra virgin) or rapeseed oil or sunflower oil (whatever you have in the cupboard)
150g light brown sugar
100ml honey
3 eggs
100g wholemeal flour or spelt flour
150g plain flour
5g (1tsp) baking powder
1 tsp mixed spice
50g walnuts (optional)

Method

Grease and line a 20cm square or round tin or a 2lb loaf tin. Preheat the oven to 180°c, gas mark 4 or use the centre of the baking oven of the Aga.

Mix together the oil, sugar, honey and eggs in a large bowl until well combined. Add the grated parsnip and mix well.

In another bowl mix together the flours, baking powder, mixed spice and walnuts and then add them to the wet ingredients. Mix well.

Pour the batter into the prepared tin and level the surface. Place in the centre of the oven and bake for 45-60 minutes until the top is golden and a skewer comes out clean when pierced through the centre of the cake. Leave in the tin for 10 minutes then place on a wire rack to cool completely.

UPDATE* 7th October 2015

I made the cake again with a few more adaptations (well I can’t help myself) for our evening bread making  class last night. Here is a full sized version of the cake and how yours will look of you don’t split it between two pans.

parsnip and honey cake

The adaptations included using half grated parsnip and half grated carrot and adding 100g currants which I had warmed in a pan with the juice of ½ an orange to plump them up. I frosted the cake before serving with a cream cheese frosting, combining 250g icing sugar with 50g softened butter and 125g cream cheese and the grated zest of an orange. It was a big hit with the ladies on the course.

Parsnip and honey cake Read More »

Rosehip syrup

rosehip syrup
Rosehips and sugar, day 1

Update to this post (Sept 2016): My experiment did not work! Leaving them whole, as I did, meant that they just sat at the bottom of the sugar.  However, my friend made them at the same time and was much more diligent then I was and snipped off both ends of each hip. The sugar was then able to macerate the hip much more effectively. Hers did turn into a syrup. I will be trying to make it again this year with modifications to my method. 

Original post: This is an experiment. I have made rosehip syrup before (although I failed to blog about it) by using the boiling method, similar to making a jelly. When I made the crabapple and rosehip jelly Margaret wisely suggested that boiling rosehips probably defeats the object of the syrup. Rosehips are incredibly high in vitamin C and so a syrup can be very handy to have in the house during the winter months to stave off any nasty lurgies.

My wonderful friend A suggested this tactic for making the syrup. She had been to visit her Cornish uncle and he had bought out his rosehip syrup for her to try and had explained that he made it by layering the rosehips in sugar. We both wanted to give it a go.

It always makes me smile to think about my friendship with A. We have been friends since we were 17 and at college together. Back then our interests were mostly concerned with having fun and partying. Now when we get together, which is as often as we can manage, we mostly find ourselves strolling around the garden and discussing the finer points of growing vegetables and how best to cook them. How times have changed.

Anyway back to the rosehip syrup. This is not a recipe as such. You just pick as many rosehips as will fit into your jar. You give them a good wash and remove the old flower head. Dry the rosehips well. Now you pour a layer of sugar into the bottom of your jar, then a layer of rosehips, then sugar, then rosehips until the jar is full. Your rosehips should be entirely covered in sugar. As a guide I used about 400g rosehips and 450g of sugar to fill my kilner jar.

This is my jar after a week:

Rosehips and sugar Day 6

This is an experiment. I will report back in due course whether it has been successful. However, as you can see from the photo above it looks promising. I did not pierce the hips at all and the maceration has started. I am hopeful that we will have rosehip syrup for our porridge and to sweeten our mint tea in perhaps six weeks time. Watch this space.

UPDATE 13th October 2015

We are now about 16 days into the syrup making process. About 9 days in (a week ago) I noticed that as the sugar was liquefying the rosehips were becoming exposed at the top of the jar, so I added more sugar, enough to fill up the jar again. The photo below is one I took today. You can see that not all the sugar has liquified yet, but it is getting there. The rosehips are starting to wrinkle too.  One of my students at the bread making class last week gave me a great tip –  she keeps her damson gin in the car when it needs regular shaking. What a genius idea. This would work equally as well for your rosehip syrup. A plastic container might be more suited to that than a glass one though.

Rosehip syrup day 16
Rosehip Syrup Day 16

Rosehip syrup Read More »

Harvest Bread

On Sunday we had a little trip out to Acton Scott Historic Farm. It’s a wonderful place, not least because the Bailiff’s Cottage has the traditional bread oven still in place and still in use. They were having their harvest festival on Sunday and using the oven to bake their harvest loaves. I was very excited to talk to the Bailiff about his use of faggots to get the oven up to temperature and to find out that you can cook up to 18 loaves in the capacious oven.  Whilst I was in heaven talking to the Bailiff about his oven, our 11 year old was doing what 11 year old’s do best; muttering under her breath wondering how her mother could possibly find any of this interesting. One day, she will understand. The nearly 9 year old though still has a year or so before the proper disdain for her mother’s interests sets in, so she was quite interested. On Monday she asked me to make a dough the following day so that she could make a harvest loaf when she got home. I was more than happy to oblige. I have always been a bit put off from making one as they look like you might need an artistic eye and patience, neither of which describe me. But in we ploughed.

It took us about an hour and a half to put together. I was ridiculously pleased with the result of our work and kept taking pictures and telling the youngest how brilliant it was.

For the instructions on how to a make the harvest loaf take a look at Daniel’s brilliant blog Bread, Cakes and Ale. He has made one too and has given detailed instructions as to its construction. Even if you don’t want to make the loaf pop over to his blog anyway for a good read.

And here is a picture of the loaf I was so proud of.

Harvest Loaf

Harvest Bread Read More »

Damson and rosehip jelly

damsons and rosehips

I think damsons might be my favourite fruit. Not straight off the tree; that way they have a bitter edge which makes you purse your lips. But when they are cooked with sugar they are rich, perfumed and glorious. One of the most lovely things about them is their purplish bloom which imprints itself on your fingers when you pick it from the tree. I picked these beauties on Sunday and the tree stands next to a rose that due to my lazy gardening has suckers that have naturalised. My lazy gardening of course has its benefits, in this case the beautiful rosehips that are hanging heavy. I couldn’t resist picking some to add to my damsons.

I am not sure that the rosehips add anything in terms of taste to this jelly. The damsons overwhelm their delicate taste, but maybe some of their goodness will have hung in there through the boiling process. I am glad I added them for the photo above alone. Look at those colours! Autumn on a plate.

Damson and rosehip jelly

Makes about 3 jars

1kg damsons
300g rosehips
1 litre water
Granulated sugar

Method
Wash the rosehips well and remove the old flowers and check for insects. Chop these finely (wearing gloves if you do this by hand as the hairy seeds are an irritant, I use my food processor). Add to a large pan. Wash the damsons and add to the pan with 1 litre of water. Bring to the boil and simmer away until the fruit is soft. I mashed it with my potato masher. Strain the fruit through a jelly bag or large square of muslin tied at the top and hang over a bowl. The weight of the fruit and damson stones will mean that the majority of the juice will have strained through in 1 hour, but you can leave it overnight. Don’t be tempted to squeeze the bag though as this will make the jelly cloudy.

Pop a couple of saucers into the fridge to get cold.

Measure the juice and to every 600ml of juice add 450g of sugar. Return it all to a clean large pan and bring slowly to a simmer, stirring to dissolve the sugar. Once the sugar has dissolved increase the heat to bring it to a rolling boil. Check to see if it’s set by pouring a small amount onto a cold saucer. When it’s cooled push your finger through it and if it wrinkles it’s ready. Pour into warm sterilised jars and seal.

Use it like jam on your toast or as an accompaniment to meat, cheese or anything else that you fancy.

If you like this, then you might also like my pickled damsons, stewed damsons, damson ice cream, damson vodka or damson jam.

Damson and rosehip jelly Read More »

Lemon, poppy seed and almond cake

Lemon and poppy seed cake

I am baking this for tomorrow’s bread making evening class. I have been meaning to make a poppy-seed cake for ages and just not got round to it. I love the way the tiny black dots glisten amongst the soft cake. Poppy seeds always make me smile to myself. The first time I put a bread roll  adorned with poppy seeds in front of my eldest, she just stared at it for a long time. I wondered what she was thinking so I asked her if she was ok. “What are these mummy?” she asked pointing to the top of the roll. “Poppy seeds, darling”, “Oh, I thought they were beetles”.  I promise that no beetles were harmed in the making of this cake.

If you don’t want to use ground almonds then just use 175g of flour instead. You need four lemons for this cake. Don’t be fooled by it saying three lemons  in the first section. But if you only have three lemons in the house then no harm will come to the cake if you just use the zest of 2 lemons in the cake itself.

For the cake

175g softened butter
175g caster sugar
3 eggs
Zest of 3 lemons
Juice of 1 lemon
125g self-raising flour
50g ground almonds
2 tbsp poppy seeds

For the syrup

Juice of 2 lemons
Zest of 1 lemon
50g granulated sugar
50g icing sugar
1 generous teaspoon poppy seeds

Method
Grease or line a 2lb loaf tin. Preheat the oven to 180°c, gas mark 4 or bake in the middle of the baking oven of the Aga.

Beat together the butter and the caster sugar until fluffy and lighter in colour. I find that if I use an electric whisk to get things started and then go in with my hand like a claw I get a much fluffier mixture. The heat of your hands makes the difference. Add the eggs one at a time and beat thoroughly between additions. Add the lemon zest, juice, flour, ground almonds and poppy seeds and fold in with a large spoon until evenly combined. Spoon the mixture evenly into the tin and bake in the preheated oven for 25-30 minutes until the cake is golden and a skewer comes out clean.

Whilst the cake is baking, mix together the ingredients for the syrup.

As soon as the cake comes out of the oven use a skewer to pierce all over and deeply into the cake. Spoon the syrup evenly over the cake. Leave to cool completely in the tin.

Lemon, poppy seed and almond cake Read More »

Six years of discoveries

WordPress tells me that it has been six years since I wrote my very first post on these pages. I am very grateful for this blog for lots of reasons.

I set up this food blog for lots of reasons too. It was at a time when I had to make a decision about my future and that of my children. I was working in a job which I loved and which consumed a lot of my day. It was one of those brilliant jobs that really only comes along once in a while. I worked from home most of time, thanks to this marvellous thing called the internet. I was passionate about the project that I worked for – I had spent five years writing a PhD about it. I got to travel and speak to policy makers and at conferences. I loved it. But I also loved my girls who were three and five years old at the time. I had worked through both pregnancies, taking only a couple of weeks off for each birth and getting back to it as soon as I could. I was freelance and self-employed. I needed to work and I enjoyed my job. My employer was very accommodating, understanding and kind. One memorable occasion saw me sitting in an ante-room listening to a meeting in the next room feeding my three-week old and shouting my responses to the discussion happening next door; then taking my three-week old to change her nappy and lifting her up, to have her throw up the entire feed down my blouse. Thankfully the bag I had with me was the one which we had taken to hospital and it still had one of my husband’s t-shirts in there. What was I thinking? Five years on from this messy meeting and six years ago this month there came an opportunity to reassess what I was doing. Did I continue with my career? Or did I take a break and spend more time with the girls? After much hand wringing and into the night discussions we decided I should take a career break. It has been a decision that I have wrangled with ever since.

I have loved every minute of being with the girls, taking them to and picking them up from school, being there for every holiday. But, my oh my, I have felt guilty about not being at work, not earning money and not using that PhD that I sweated over for five long years.

I set up the blog to keep my hand in, teach myself new skills and to share my love of cooking and baking. It has delivered on all of those fronts and more. It has, more than once, saved my mental health by giving me something to focus on; to work towards. It has introduced me to new friends in the UK and abroad. Our friendships may be virtual but they are no less important for that. Each positive comment sends a buzz through my brain. The thought that someone out there baking that cake or making that jam with the process and the result making them happy makes me very happy.  The blog has made me push myself with my cooking skills and knowledge.  I have become a more imaginative and skilled cook.  I have certainly acquired quite a library of non-virtual books, as my heaving shelves can testify. I have become obsessed with bread making and the science of it all; it appeals to the researcher who loves to read in me. And perhaps most importantly of all, this blog has set me on a new career path and one that I am equally, if not more passionate about than the last – teaching others to bake and cook, both through this blog and by setting up Veg Patch Kitchen. I hope that this blog pushes me as much in the next six years as it has in the first six.

A big thank you to everyone that reads or has read this blog, and to those that have commented, over the last six years, you have been my saviours.

Kath x

Six years of discoveries Read More »

My Family Kitchen – Book Review

Sophie Thompson Family Cookbook

I was kindly sent an advance copy of Celebrity Masterchef 2014 winner and actor  Sophie Thompson’s new cookbook ‘My Family Kitchen’ to review. Released today, the book shares recipes from four generations of Sophie’s family. Every recipe has an introduction written in a friendly style explaining where or who the recipe comes from. She makes her Uncle James’s remote Scottish cafe sound very appealing with the paddles of the mixer forever beating chocolate or orange cake. I have an image of a steamy room filled with the scent of baking cakes and a comforting cups of tea on tap. Lovely.

IMG_3188

The book is full of pictures of Sophie’s family and photos of passed down hand- written recipes. It is a comforting book, making for a good read on a rainy day. The recipes are all easy to follow and there are lots that appeal. My youngest was really taken with the book and read through it on the first day making selections for us to get cooking. We made the brandy snaps that very day.

Brandy snapsAnd we have made them again since.

We made the courgette fritters too, using yellow pattypans, a very good way of using up the glut.

courgette fritters

Another recipe that appealed to the youngest is the one for Coconut Boobie Cakes ( I have no idea why!). We haven’t made them yet, but I am sure we will.

coconut boobie cakes
Coconut Boobie Cakes

Sophie’s book is one which I am sure we will dip into again and again when we are cooking together as a family.

I was sent a free copy of the book for review purposes. All opinions are my own and are honest. 

My Family Kitchen – Book Review Read More »