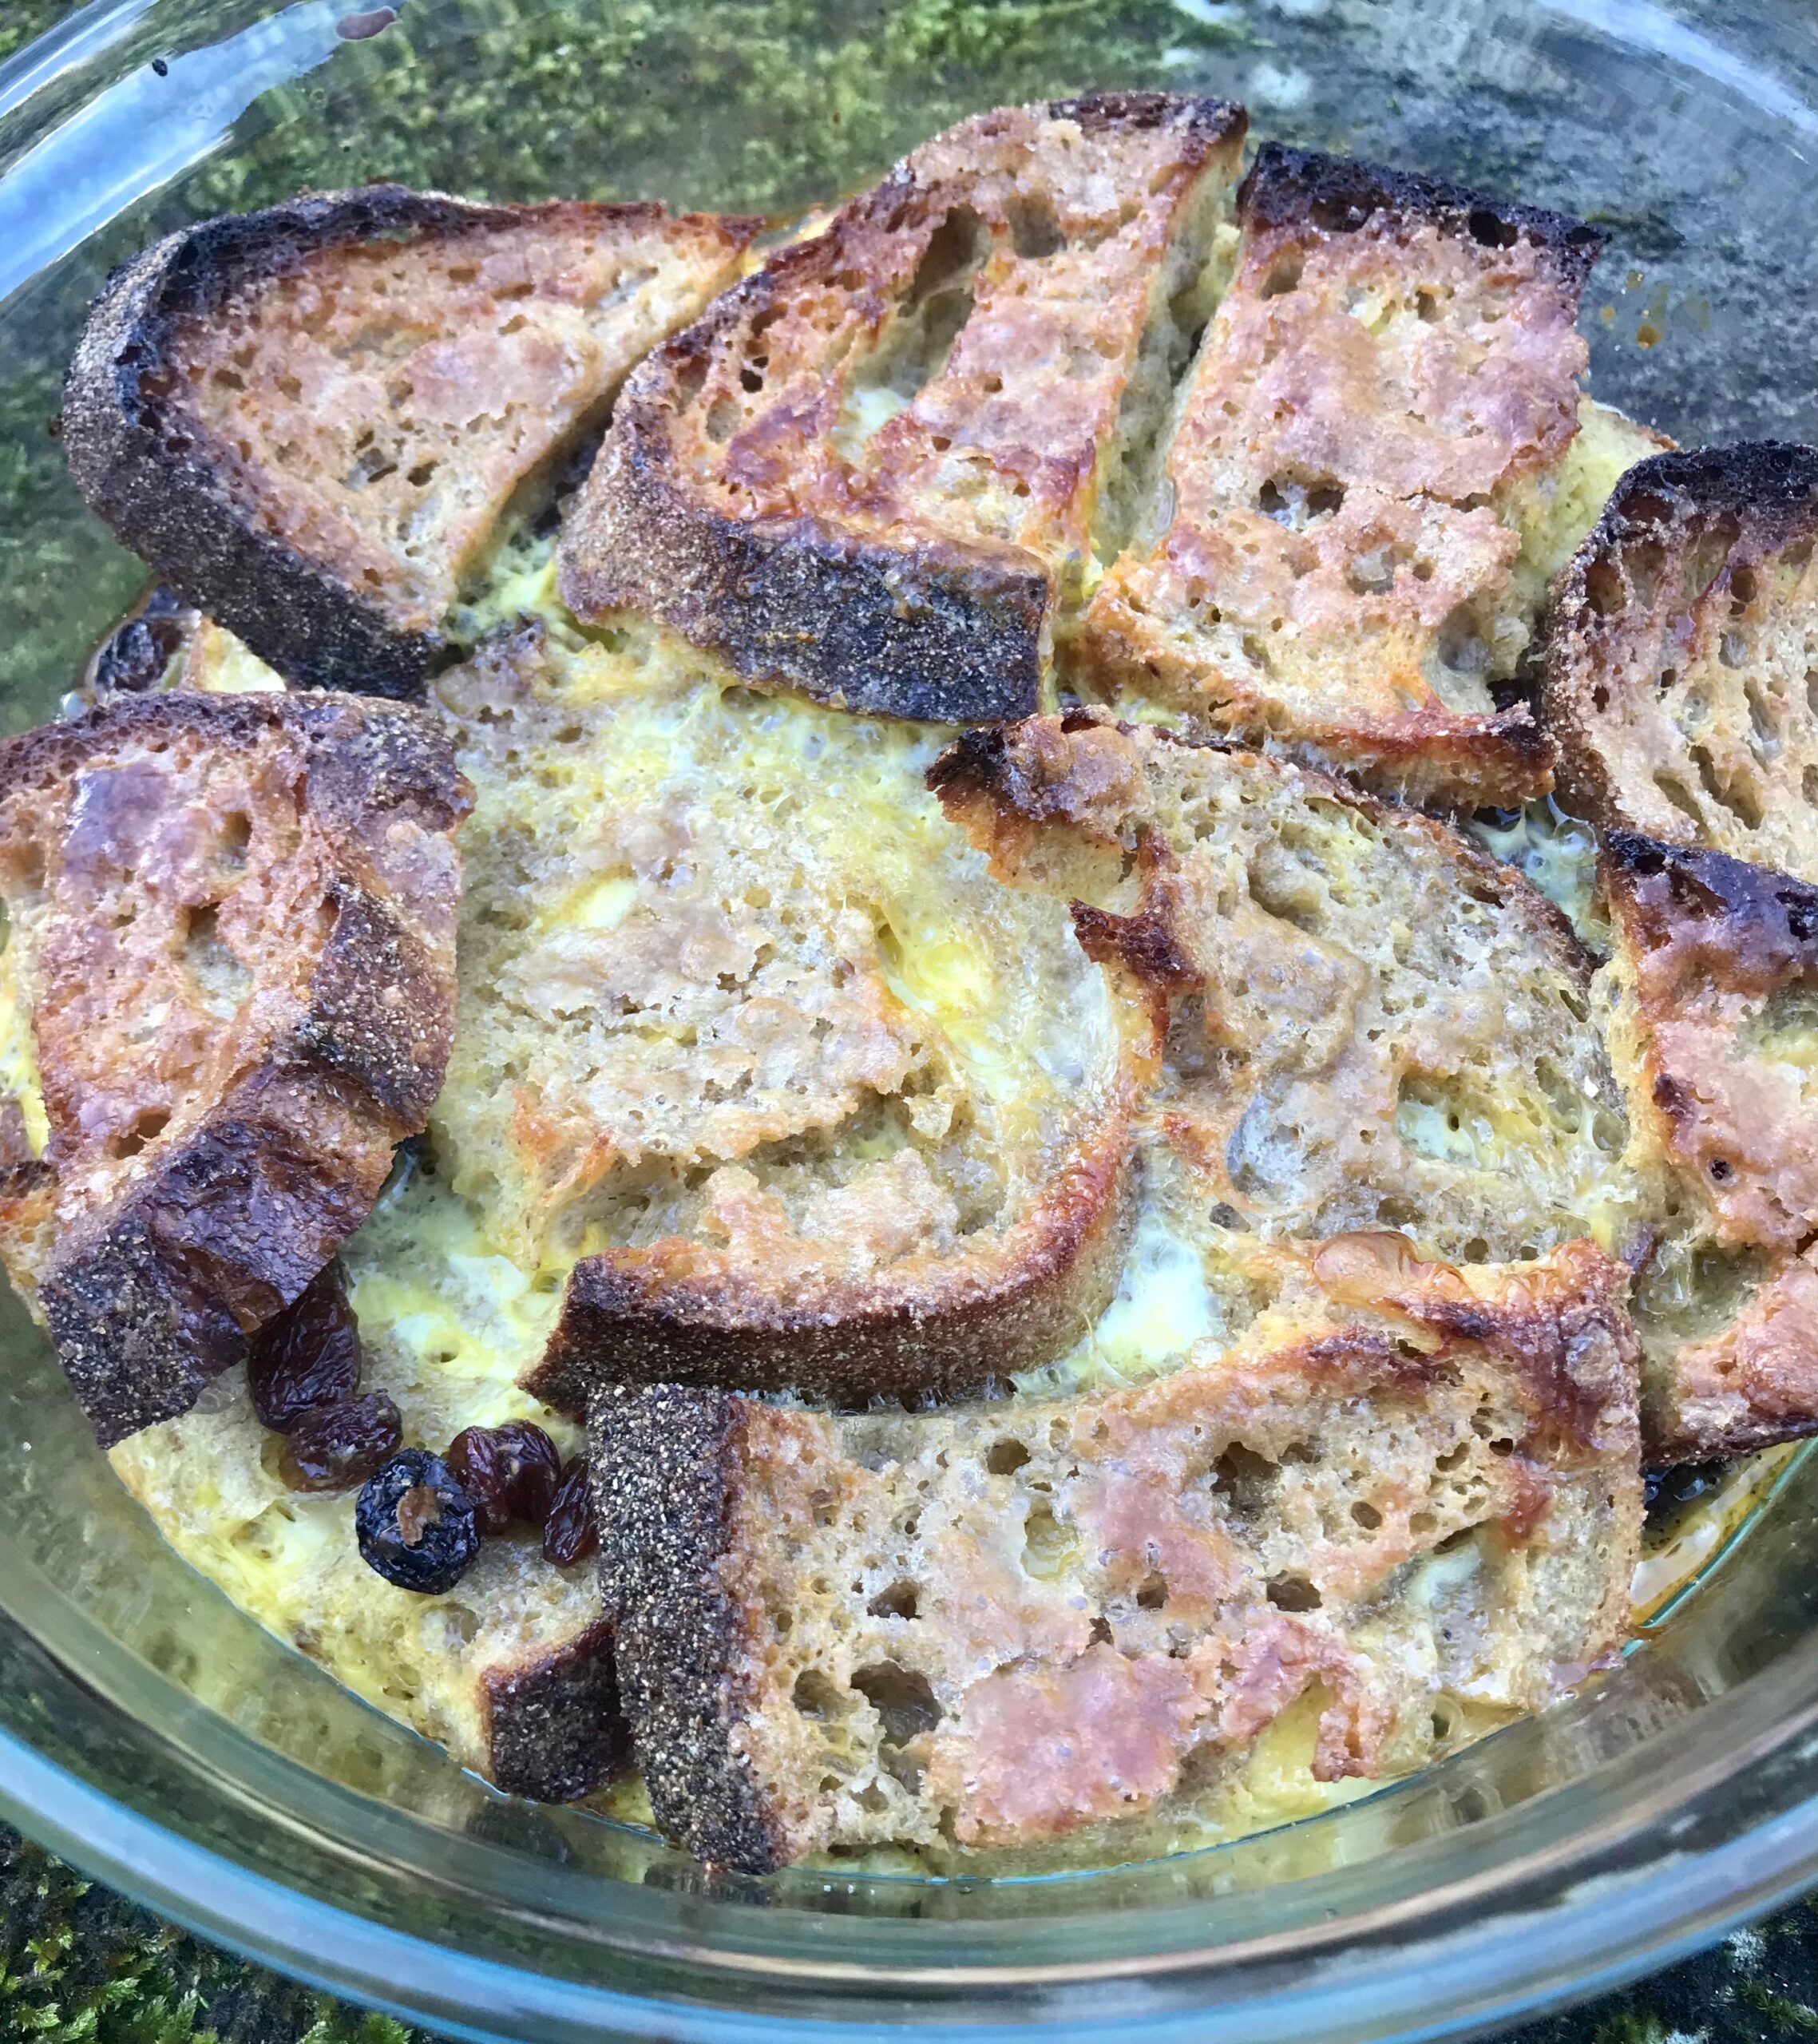
This was one of the first recipes I wrote on this blog, way back when I started in September 2009. I think this might be a reflection of how much I love bread and butter pudding. It is a fantastic way to use up that staling loaf. With my bread courses I tend to have quite a bit of bread staling on the bread board so I am always thinking up new ways to use leftover bread.
There is lots of potential for varying this recipe. You can spread jam or marmalade on the slices or add some frozen (or fresh) berries or chocolate chunks instead of the dried fruit, but this is the recipe that I used to love as a child. You don’t need to be precise about the amount of bread you use, this recipe is all about using whatever you have leftover. If you use more or less than in this recipe then you may need to add or take away an egg in the custard. I have made bread pudding with left over croissants, brioche, fruit bread, walnut bread – basically any bread that you may have left over.
Ingredients
6-7 slices of stale bread Approx 50g softened butter 3-4 tablespoons of light brown sugar 50-100g dried fruit (depending on how much you like in your pudding) 3 large eggs 500ml full fat milk
You will need an oven proof dish that will comfortably hold the slices of bread with room for the custard.
Method
Butter the slices of bread generously with butter. Lay half the slices in the ovenproof dish. Sprinkle two tablespoons of sugar and the dried fruit over the bread. Top with the remaining slices of bread. Beat the eggs and milk together in a jug. Pour the custard over the bread. Sprinkle more sugar over the top of the pudding.
Allow the pudding to sit for at least 30 minutes so that the custard can soak into the bread.
Preheat the oven to 180C, 350f, gas mark 4. Bake the pudding for 30-40 minutes until the custard is set and the top is golden brown.
Ready to learn more?
I have an online course that shows you other ways to use up your leftover bread. So, if you are as obsessed with bread as I am and end up with a staling loaf at the same time as you are fetching a fresh loaf out of the oven then this might be the course for you.
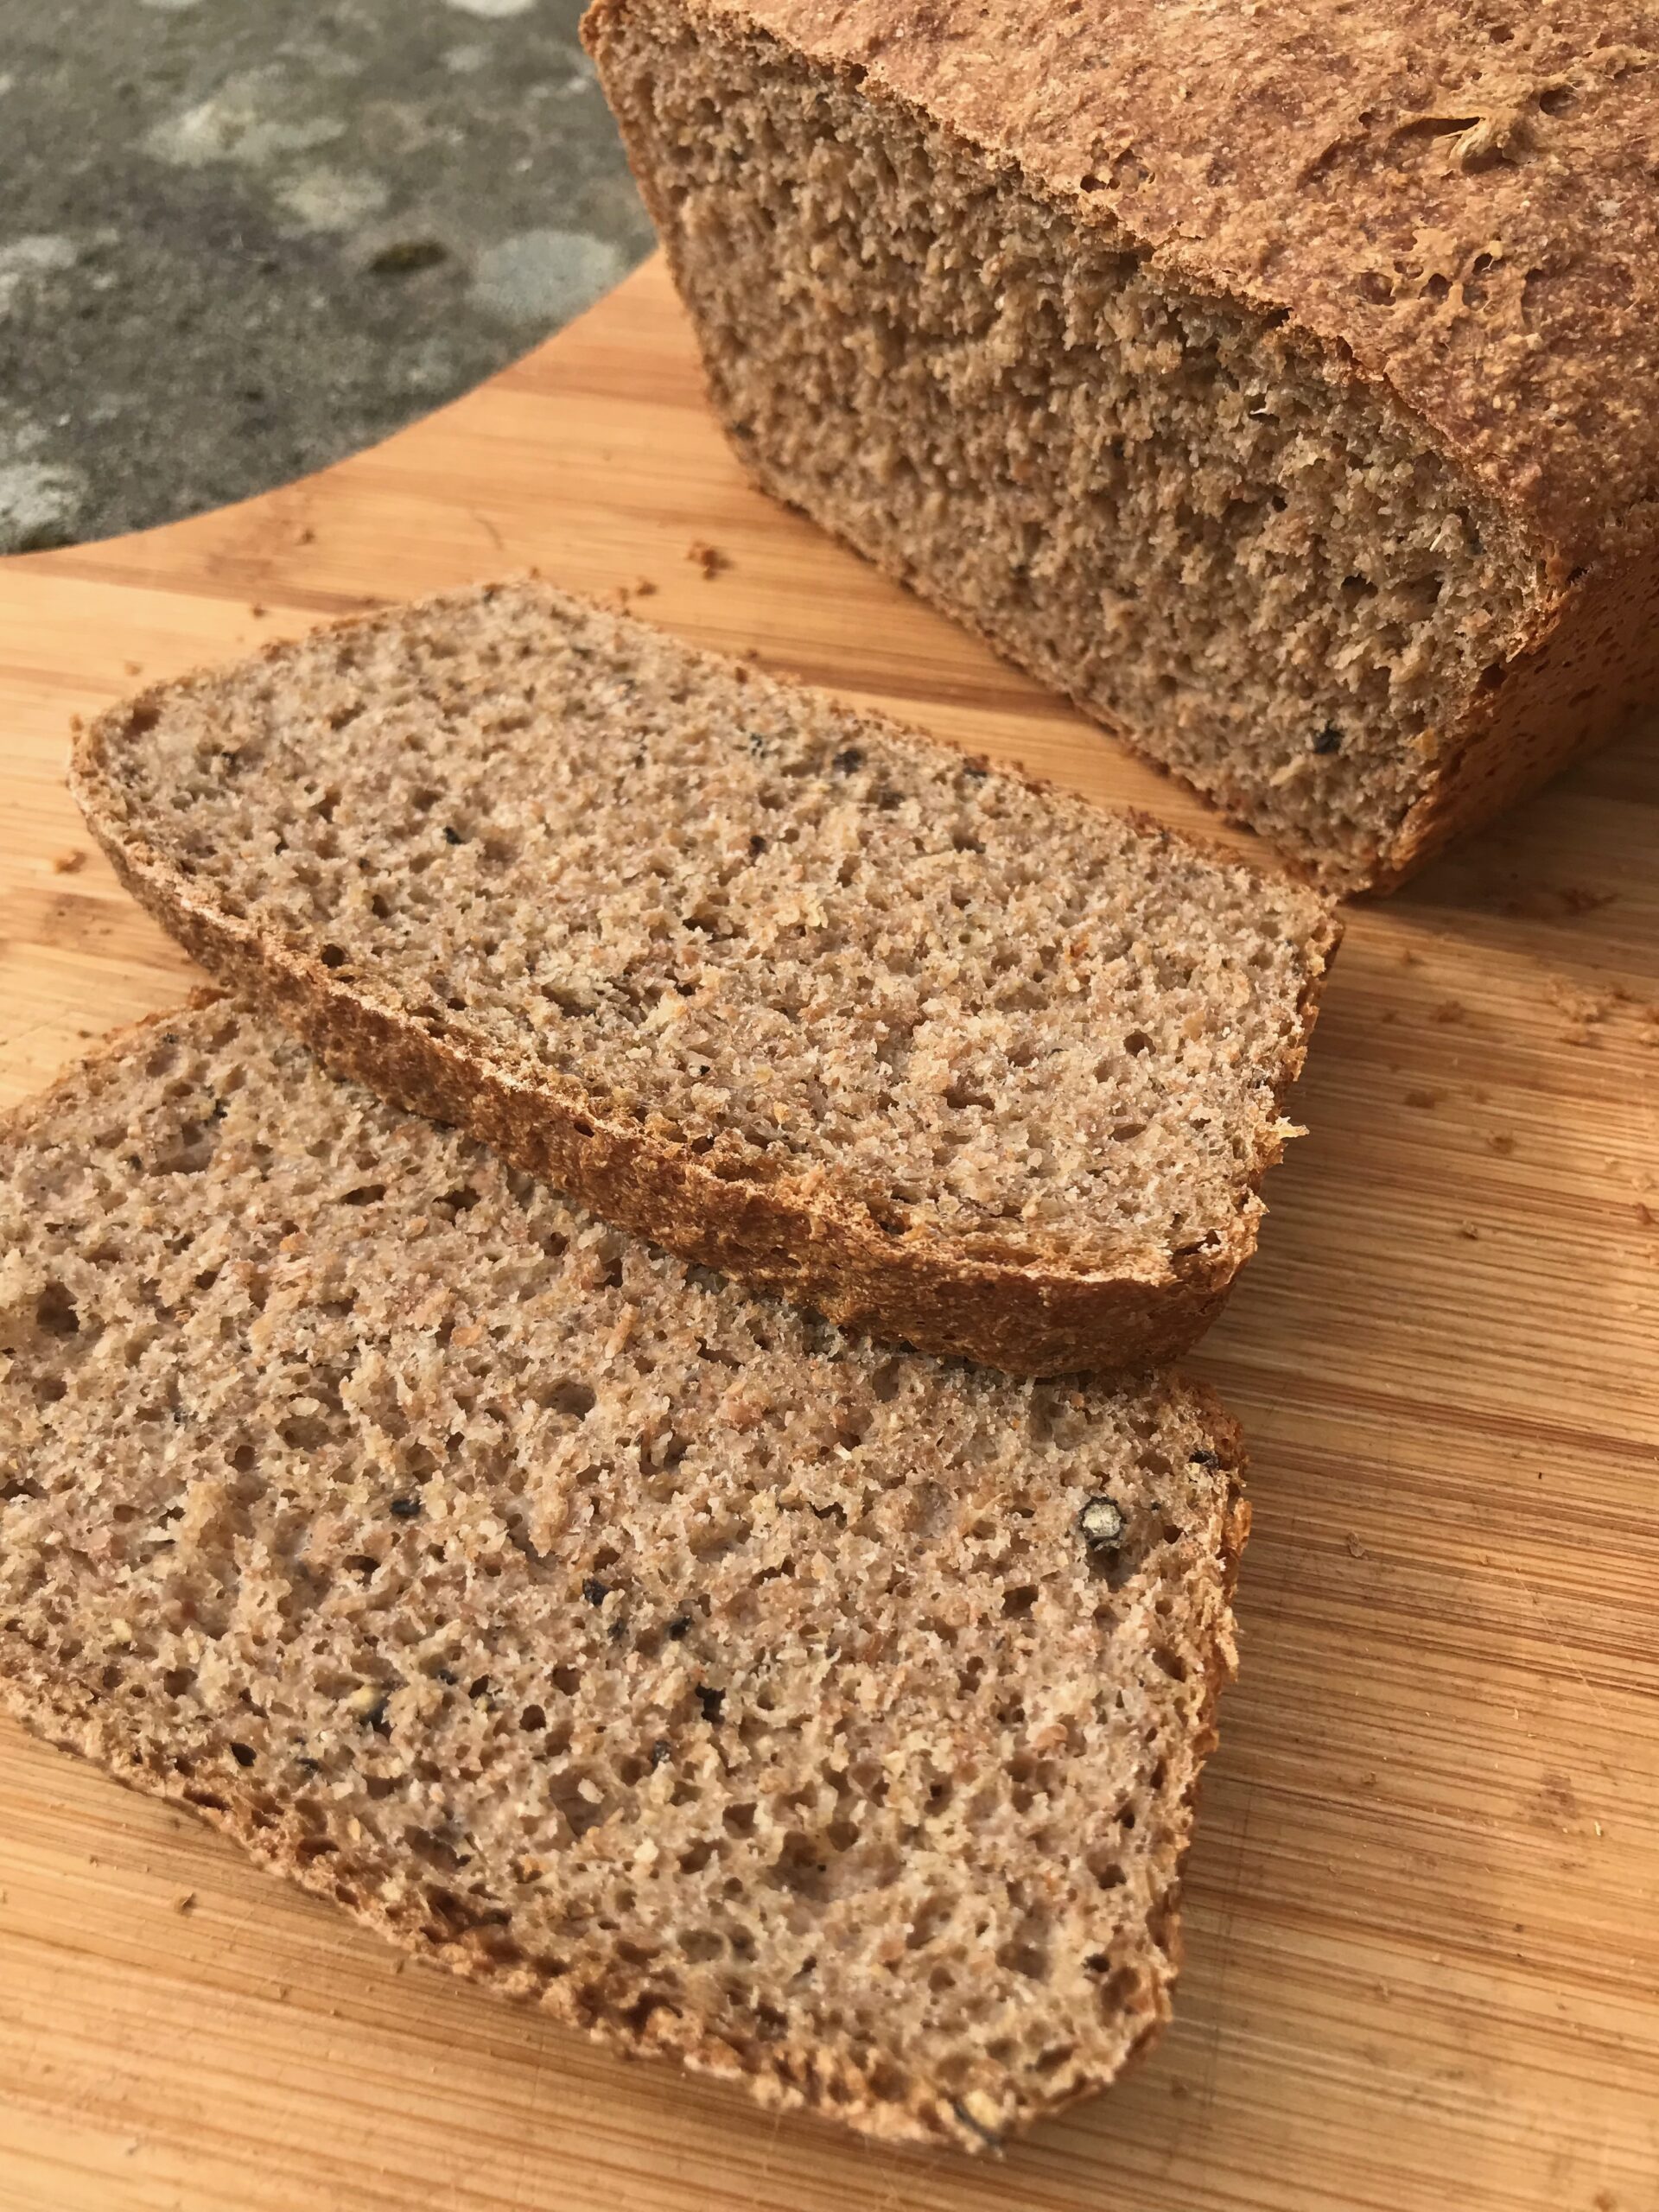
I have been meaning to make this bread for a long time. I was prompted to do it this week after researching cracker recipes for my live online demo for my membership. One of the cracker recipes contained a healthy amount of freshly ground black pepper and they tasted great. They reminded me that I wanted to try freshly ground black pepper in a loaf.
The result is zingy and hot. You experience lots of little explosions in your mouth as you bite into the tiny lumps of fiery-hot peppercorns. It’s a great bread for those that love a spicy kick to their food. We enjoyed it with a pasta bean bake and again with marmalade for this morning’s breakfast.
You can add the peppercorns to any bread recipe that happens to be your favourite – white, wholemeal, focaccia etc. I used 10g for 500g of flour and this gives the loaf a good dose of heat. I also ground them in a pestle and mortar to get an uneven grind. That way the very finely ground pepper mixes well with the flour and you have the occasional bite of a larger piece, like the one in the photo below.
Ingredients
500g wholemeal flour 5g easy bake/ instant/ fast action yeast or 15g fresh yeast 5-10g fine sea salt 5-10g freshly ground black pepper between 380-420g water
Method
Place the flour, yeast, pepper and salt in a bowl and mix through. Pour in 340g water and start to mix. You will need more water. As the dough starts to come together splash in small amounts of water and mix until the dough has a soft, slightly sticky consistency and there are no dry bits. Keep on squeezing the dough for another minute or so to make sure the flour is fully hydrated.
Cover with a proving cloth or shower cap and leave to rest for at least 10 minutes, up to an hour. Uncover and do the first round of stretch and fold. Leave to rest again for at least ten minutes. Do a second round of stretch and fold.
Cover and leave to ferment for at least an hour to get light and filled with air. You could put it in the fridge overnight at this stage.
When airy and light, shape and leave to ferment again. You could place it in the fridge for several hours or overnight.
Preheat the oven to 220C, 425F, gas mark 7. When the loaf is fully proofed (see video) bake for 30-40 minutes depending on your oven. Check that it is fully baked by placing an internal thermometer in the centre of the loaf. It should read at least 88C for the loaf to be fully baked. The loaf should be golden all over and feel light.
Leave to cool on a wire rack for at least an hour before slicing.
The video below shows you how to make a wholemeal loaf.
Ready to learn more?
Subscribe to my membership to learn more about bread. Click on the image below to find out more.
If you haven’t made flour tortillas at home yet you are missing out on a treat. They taste so much better than anything you will be able to buy in the shops. Whilst we are on the subject why and how do packaged tortillas have such a long use by date? It’s scary.
These are also great if you find you could do with some bread but you haven’t got any. They are quick and easy to rustle up.
Ingredients
250 plain (all purpose) white flour 5g fine sea salt 25g oil 130g water
Method
Place all of the ingredients in a bowl and mix well. Knead in the bowl for 1-2 minutes. Cover and then leave to rest for at least thirty minutes.
Divide into 6-8 pieces and roll out very thinly on a lightly floured surface until they are almost translucent.
Heat a pan until hot. Cook the tortilla. When it starts to change colour to a golden yellow and starts to puff, hold a ruched up clean cloth on the surface of the dough to force it to fill with air.
Flip the tortilla and cook on the other side for a few seconds. Place onto a plate and cover with a clean cloth to steam and stay soft.
These freeze well. To reheat either wrap in foil and heat in an oven or place in a covered pan over a warm heat.
They make the most delicious tortilla chips.
You can watch me make these in the video below. If you want to learn how to make the tortilla chips or about how to make other flatbreads scroll down to find out more about my online course.
Ready to learn more?
You can subscribe to my Bread Made Easy membership to learn how to make a variety of Flatbreads plus a whole lot more about bread.
Or you can buy my online Flatbreads course as an individual course
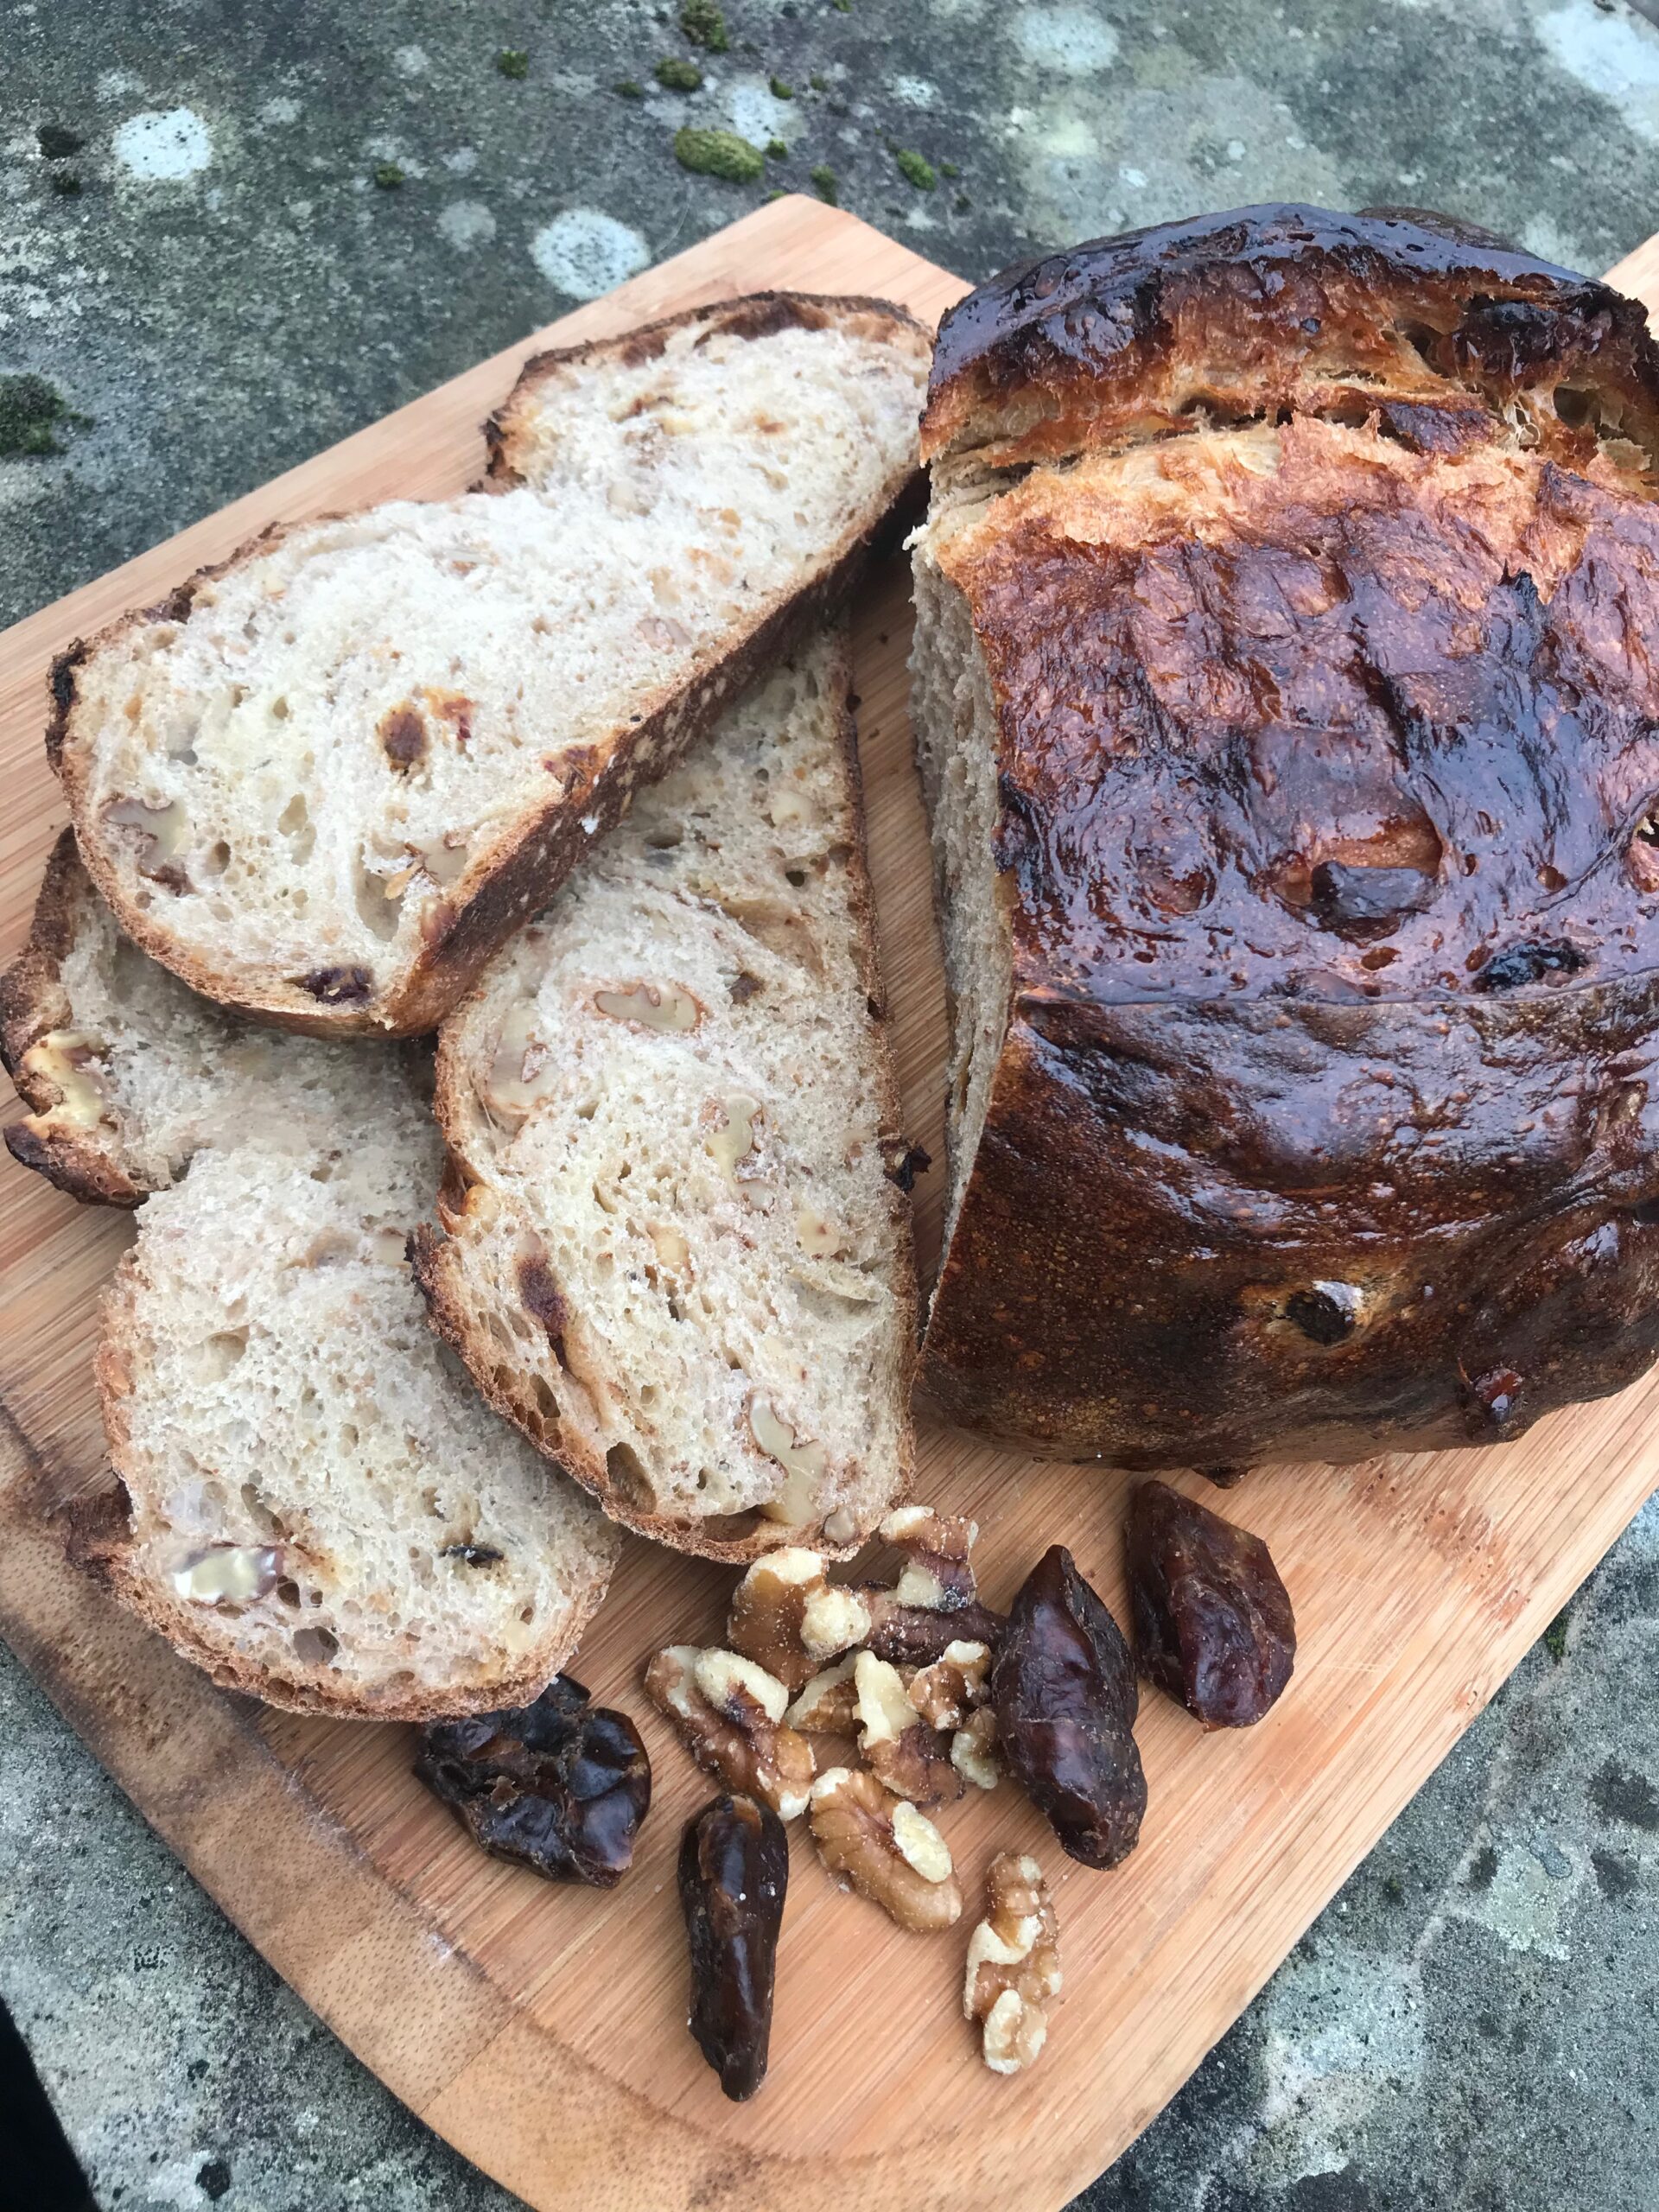
This is a favourite in our house and a recipe that I teach on my Bread Basics course at my cookery school Veg Patch Kitchen. I have been filming how to make it for my new online Sweet Dough course and want to share it with you so that it can become a favourite in your household too.
It is a simple white dough with added dates, walnuts and honey and is delicious toasted for breakfast. It stays good for toasting for several day.
Date & walnut loaf
Ingredients
500g strong white flour or 250g white bread flour and 250g wholemeal bread flour 100g walnuts 100g dates 20g runny honey 10g salt 1 sachet of easy bake yeast or 5-10g fresh yeast 320-340g water (in total, add 100g with the dates and 220-240g later)
Equipment:
3 bowls, scales, knife, chopping board, proving cloth or shower cap, loaf tin or baking tray, cooling rack
Method:
Finely chop 25g of the walnuts and coarsely chop the rest. Chop the dates and cover with 100g of boiling water. Leave to stand until the water is tepid.
Place the flour, salt and yeast (keep the salt and yeast separate) in a large bowl. If using fresh yeast crumble it into the flour. Add the walnuts and honey. Drain the dates but reserve the soaking water. Place the soaked dates in the bowl with the rest of the ingredients. Measure the reserved water into the bowl and then add more water until you have 320g of water in the bowl.
Using a clawed hand mix well, the dough should be on the sticky side. If it still feels dry add a bit more water until it feels softly sticky. Leave to rest and use the stretch and fold method as described in this video.
Once you have done all of the stretch and folds, leave to prove until light and airy. Preheat your oven to 200℃, gas mark 6, placing a solid tray on the shelf to heat up. Tip the dough out of the bowl onto a lightly floured surface, shape and leave to rise again until ready for the oven. Place your bread onto the solid tray and bake for 30-40 minutes until a rich brown and sounds hollow when tapped or has an internal temperature of at least 88℃. Leave to cool on a wire tray.
If you like you can glaze this loaf with a simple sugar syrup as soon as it comes out of the oven. This gives it a lovely shine. Place 25g sugar and 25g water in a small pan and bring to a simmer. Simmer for a few minutes. Brush this all over the top of the loaf as soon as you turn it onto the cooling rack. (You may want to place some kitchen roll or baking parchment underneath to catch the drips).
Ready to learn more?
If you would like to learn more about making sweet breads my online course can help. I show you how to master making an enriched dough and turn it into Shropshire butter buns, Chelsea buns, babka and cinnamon knots. You will also learn how to make buttery brioche and fruity spiced teacakes.
Long time readers will know that this blog is a bit of a neglected spot because I run a cookery school teaching people how to make bread.
So, if you have ever felt frustrated with your lack of success with making bread then let me help you. I can also reassure you that I was once exactly the same. When I first tried to make bread I was hopeless at it. In fact, that is recorded in one of my first blog posts that I shared on here. You can read all about my first attempts at making a reasonable loaf here. I wrote then that I thought practice helped and I can confirm that it definitely does. If you had told me back then that I would have started to teach other people to make bread in 2015 setting up my own cookery school I would have looked at you as if you were a fool. It’s funny how life turns out.
If you would like to banish your own fears about bread making then taking my online masterclass will do exactly that. It takes you through the bread making process step by step and because it is pre-recorded videos, text based lessons and a workbook you do at your own pace and in the comfort of your own home. You can refresh your memory by going back and revisiting it as often as you like.
Here are a few of my videos from YouTube to get you started.
I hope these help you to start to conquer your bread fears.
Hands down my most popular recipe is for Shropshire Butter Buns and for very good reason. A butter bun is a fine, fine thing. A sweet dough filled with buttery goodness and with a delicious sticky toffee bottom. Back in 2015 when I posted the original recipe it was one that I had cobbled together from memories and snippets on the internet and it’s a recipe that I am pretty pleased with.
I teach people how to make butter buns on my sweet dough course and either they swoon immediately or look at me with an impassive face as they have yet to experience one. Once they have experienced one though I haven’t known anyone fail to be impressed.
Last week, Edward Aston contacted me. Edward had been an apprentice baker some seventy years ago at a bakery in a local town just a few miles away from here at Tom Wedge’s bakery. Edward tells me that Tom Wedge was the son-in-law of Mr Rhodes of Rhodes Bakery in Market Drayton where the recipe for the butter bun originated. Being keen to pass the recipe on Edward has very kindly sent me the recipe that he still bakes regularly for his children and grandchildren.
So here is what Edward wrote to me:
“I have just read your piece on Shropshire butter buns and thoroughly enjoyed it. The café you refer to in Shrewsbury would be Sidolis if memory serves me well. I believe the original recipe came from Market Drayton, Rhodes bakery I believe but sadly no longer trading. Some seventy years ago I was an apprentice baker to the son in law of Mr Rhodes a brilliant baker named Tom Wedge who had his own bakery in Broseley, Shropshire. That bakery is also sadly no longer trading and none of his family is involved in the trade. In view of this I now feel that it is time to make sure his original recipe should be preserved and I can think of no one better to share it with. Your dough and method are absolutely fine but the filling and construction is not authentic. So here goes for what it is worth. For the filling use equal weights of butter and light soft brown sugar. Beat them together until light and very fluffy now add about 20% of the butter sugar mixture total weight of lemon curd and beat well again. You should now have a cream like spreadable mixture. Now to construct the buns, place the dough circle flat and spread the mixture thinly on half of the circle, fold to make a half circle and then spread half of that and fold again to make a quarter circle. To bake place the buns in groups of four to form a circle on the baking tray. This was the traditional way of selling butter buns, in rings of four. I hope this is of use to you and will help to keep this beautiful confection alive. I like you am a great fan of the butter bun.”
How wonderful is that? I was so pleased and felt very honoured to have received such an email. I have spent a very happy morning today filming myself making the buns so that you can all see how I have translated Edward’s note to me and hopefully make the authentic Shropshire Butter Bun for yourself. I agree very much with Edward that we should keep the butter bun alive.
Learn to make Shropshire butter buns and other delicious sweet treats on my online course
If you would like to watch the video of me making these beauties you can do on my YouTube channel.
Ingredients:
For the dough: 300g strong white flour (bread flour) 250g plain white flour 10g fine salt 7g easy bake yeast (instant yeast) or 10g fresh yeast (the fresh yeast can be dissolved in a little of the warm water that you will be using for the recipe) 50g caster sugar 150ml milk 150ml warm water 50g butter 1 egg
For the filling: 150g unsalted softened butter 150g light soft brown sugar 60g lemon curd
For the glaze: 50g caster or granulated sugar 50g water
Method:
Warm the milk and the butter together in a pan over a gentle heat. Yeast dies at 55C so you don’t want the water to get too hot.
Place the flours, sugar, salt and yeast in a large bowl. Keep the salt and yeast separate as salt can kill yeast. If you are using fresh yeast dissolve in a small amount of the water that you are using for the recipe before adding it to the flour.
Add the egg, warm milk and warm water and mix well. You can now use a stand mixer to mix the dough, knead for 10 minutes or use the stretch and fold method to develop the gluten in the dough. Leave the dough to ferment until it has become light and airy and has doubled in size. This can be at room temperature and take 1-2 hours or in the fridge overnight.
Meanwhile make the filling. Beat the sugar and butter together until soft and fluffy. Add the lemon curd and mix to combine. Set aside.
Make the glaze by placing the sugar and water in a small pan over a gentle heat. Stir until the sugar has dissolved and then simmer for a couple of minutes.
When the dough has become light and airy turn it out of the bowl onto a lightly floured surface. Cut the dough into 8 large pieces or 12 smaller pieces. I like the bigger bun but you might prefer the smaller size.
Roll each piece into a circle. Place a teaspoon of the filling not each circle. Fold the circle over and seal the edges. Place another teaspoon of filling onto the half moon shapes and fold in half again so that you now have a triangular shape.
Place four of the triangles onto a baking tray (you can use baking parchment on the tray to save the washing up effort) to make a circle and repeat with the remaining triangles.
Leave in a warm place to prove or place in the fridge for several hours or overnight.
When the buns have risen by about half preheat the oven to 200C, gas mark 6, 400F or use the roasting oven of the Aga and bake for 20-25 minutes. depending on your oven.
As soon as they come out of the oven brush them with the simple syrup glaze generously and leave them on the tray for 10 minutes to soak up any excess butter and allow the treacly toffee to stick to the bun. Finish cooling on a wire rack and eat the toffee bits stuck to the tray as a cook’s bonus.
Try both this recipe and my version and let me know which one you prefer or which one brings back happy memories of enjoying butter buns.
Edit: Edward has been in touch to give additional information “Just two small points I would like to offer to make things easier. First, after making the dough balls cover them with a cloth and give them about 10 minutes bench rest. This will make them easier to roll and prevent pull back. The second is the glaze which is improved by the addition of a spoonful of golden syrup which makes the glaze more viscous and offers better coverage with less risk of the glaze being absorbed. Finally a sprinkle of caster sugar used to be added for presentation.”
In the comments section Neil Jones mentions a recipe he was given by the son of a baker. Please see the image of the recipe he has shared with us:
I have already published this on my blog at Veg Patch Kitchen, but I wanted to make sure I shared it here too as it is too good not to. This recipe was inspired by James Morton from his book Brilliant Bread, now of my favourite books on the subject (you can read about my other favourites here) and is a bread that people can choose to make on my full-day Bread Basics course. Obviously, the very idea of Marmite bread makes some people shudder with horror. If this includes you I urge you to try it at least once, you can reduce the Marmite to 30g for a more subtle flavour that just lends a delicious savoury edge to your loaf which is wonderful with soups and stews and then for an extra bonus it makes wonderful toast, that you can spread with extra Marmite.
Note of caution though – Marmite is salty so reduce the salt that you would normally add otherwise the loaf will be too salty. Also, don’t do what I did once and overdo it on the marmite front. I got cocky in a class one day and added two spoonfuls instead of my usual one spoonful and whilst everyone else’s loaves rose beautifully mine remained as flat as a pancake. The saltiness of the Marmite will kill the yeast if you go overboard. Lesson, well and truly learned.
500g strong white flour or you could replace 100g with 100g wholemeal or 50g rye & 50g wholemeal 5g easy bake/ instant yeast or 15g fresh yeast (remember that you can reduce the yeast and allow the bread to rise longer) 5g fine salt 40g Marmite 340-380g water (depending on flour choice)
Place the flour, salt and yeast in a large bowl and mix together. Weigh the Marmite out in a jug and pour over 100g hot water and stir to dissolve. Allow to cool a little and then add to the flour. Add another 200g of warm or cool water (if you use cool water your dough will take longer to prove which improves the texture and flavour). Start to mix, adding splashes of water in until you get a dough that is soft and slightly sticky. Make sure that there are no dry bits in your dough. Leave to rest for at least ten minutes or up to an hour depending on how your day is going.
Cover well and leave to prove until airy, remember it will take longer for it to prove if you used less yeast or cooler water. You can also pop it in the fridge at this point for several hours or overnight if that fits better into your day.
Shape your dough. I show you how to shape for a loaf tin or as a batard/ bloomer in this video.
Cover with clingfilm or similar, remember to oil it well so it doesn’t stick to the loaf and deflate it. Allow to prove, again this can happen overnight in the fridge if it suits you.
Preheat the oven to 220 degrees centigrade, gas mark 7 or use the floor of the roasting oven of the Aga. Steam the oven well as you put your loaf in, I like to use a plant mister to do this, spraying several times (avoiding the glass door and light). Bake for 30 minutes, check that it is baked by tapping on the bottom, it should sound hollow or insert a temperature probe and check that it reaches 90 degrees centigrade. Leave to cool completely on a wire rack and I promise you will love it even if you hate Marmite.
Regular readers will know that the other hat I wear that’s not The Ordinary Cook one is my Veg Patch Kitchen Cookery School hat. I teach people how to make bread in my lovely little kitchen we built in an outbuilding in our garden. Of course, my classes came to a grinding halt on 20th March this year and, because the kitchen is small, social distancing will not be easy. The school will reopen as soon as it is safe to do so, but this has meant that I have had to think of different ways to help people with their bread making in the meantime. I created a YouTube channel three years ago with the intention of filming bread making videos but a combination of lack of time and huge fear of committing myself to camera meant that I successfully put it off, until now. I have finally forced myself to learn the technical skills of filming and editing and, more importantly, gritted my teeth to commit my face and voice to camera. I uploaded the first two videos this week. It took many hours of listening to my own voice before I was happy with the editing!
The first video shows you how to mix and develop a basic white dough using the stretch and fold method. This is the method we use in all of my classes because it makes bread making so wonderfully easy and you can make it fit into your routine really easily. The second video shows you how to shape, slash and bake your loaf and how to check that it is baked properly. If you have a spare 20 minutes (each video is about 10 minutes), make yourself a cup of tea and have a watch. I hope they inspire you to give bread making a go or if you already make your own bread I hope it will provide you with a few new tips. More videos will be coming soon.
Now that the wild garlic season is in full swing we have been having this bread quite a bit. It is very garlicky and buttery, with each ball of dough filled with garlic butter. If you are looking for something less buttery then have a look at my other wild garlic loaf which just makes use of the garlic leaves in the dough.
We have a lot of wild garlic in our garden and the surrounding area. It is fairly easy to identify and the smell of garlic gives it away but if you are unsure what you are looking for check out the Woodland Trust’s page to make sure you know what you are picking.
These loaves are destined for today’s local community lunch along with a seeded spelt and a white loaf for those that prefer their breath not tainted by garlic at lunchtime.
You only need a generous handful of garlic leaves for this recipe. Make sure they aren’t picked from the side of paths where a passing dog might have, well you know, passed. Because there is so much of the stuff near here I am not shy about picking it as close to the ground as possible and pulling up 1 or two cloves as well. The garlic fragrance is stronger nearer the base of the plant and in the clove. You can control the garlic-y-ness of your loaf by choosing to include more green leaves for a more delicate taste or including more white stem for a more knock-out taste. I also include the flowers because they bring another taste dimension to it as well. I add a bit of garlic to the bread dough because the garlic taste transfers during fermentation. You can miss this step out if you prefer.
Always wash your wild garlic well before using.
To make one pull-apart loaf:
For the bread:
500g white strong bread flour
1 sachet of easy bake yeast or 15g fresh yeast
5-10g of fine sea salt
320-350g water (it will depend on your flour how much you need so add 320g to begin with and then add more carefully as you mix. You want to have a softly sticky dough rather than a dry dough or a wet dough.)
20g wild garlic chopped finely (optional)
For the garlic butter
A large handful of wild garlic, finely chopped (how much you use is up to you taste wise)
50g softened unsalted butter
a large pinch of flaked sea salt
Method
Make the garlic butter by combining all of the ingredients and then popping it in the fridge.
For the bread, place the flour, yeast (if using fresh yeast crumble it into the flour until the pieces are fairly small), salt (keep the yeast and salt separate as salt will kill yeast on contact) and chopped wild garlic in a large bowl. Add 320g of water and using one hand start to mix and squeeze the dough. Carefully add more water until the dough comes cleanly away from the bowl, there are no dry bits, and the dough feels on the wetter side. I describe it as softly sticky. Cover with clingfilm (or a large inflated bag) and allow to rest for at least ten minutes.
Remove clingfilm. Keep the dough in the bowl and grab the bit furthest away from you, stretch up and fold over the remaining dough. Turn the bowl a quarter turn and repeat the stretch and fold. Repeat this about 6-10 times until you feel the dough starts to resist you. Cover with clingfilm again and leave to rest for at least ten minutes. You will need to repeat the stretch and fold procedure and then rest period in full as described above at least twice more. You can go for a third if you have the time. Once you have completed the stretches and folds cover your dough and you can either place in the fridge overnight or leave at room temperature for the dough to get airy and double in size.
Take the dough and turn it onto a lightly floured work surface. Cut the dough into about 20 pieces. Take each piece, flatten slightly, place a large knob of garlic butter in the centre and wrap the dough around the butter to encase it completely to make a small roll of dough. Place each roll into a 2lb loaf tin.
The rolls ready to prove
Cover the loaf tin with cling film or a large inflated bag and leave to prove for about 30 minutes at room temperature, or longer in the fridge. In the meantime preheat your oven to its highest setting and place a baking tray on the centre shelf. Bread benefits from being placed onto a hot solid surface.
When the rolls have risen and look airy, place tin the oven. Mist the bread with water several times using a plant mister (avoid the light and glass door). This creates steam and helps the bread achieve maximum oven spring. Turn the oven down to 220°c, gas mark 6 and bake for about 30 minutes until the bread is golden. Turn onto a wire rack to cool.
This post is a re-post from my sister site www.vegpatchkitchen.co.uk, the home of my cookery school. I thought the project might interest readers of The Ordinary Cook too. You can read the original post here.
I have had the Veg Patch Loaf Project in my mind for the last year or so. The idea is that I will plant wheat in our veg patch next to our bread kitchen. This wheat will grow, (unfettered by bad weather, pest, disease or squirrel) and at the end of this year I will bake a loaf from home-grown wheat.
Well, I have finally managed to plant my wheat seeds today. I had hoped to plant some winter wheat seeds in the autumn last year, but with life being busy I didn’t get round to it somehow. I thought that perhaps I had missed the boat. Then, I was reading the latest copy of True Loaf magazine from The Real Bread Campaign and an article reminded me of The Brockwell Bake Association and their project to encourage allotmenteers, schools and community projects to grow heritage wheat. I visited their website and was very pleased to find that I could still order some spring wheat seeds from them. I know that I am far behind most farmers and growers but this is my first time attempting to grow wheat so even though I am really hoping I will get a small crop my expectations for success are fairly low. I am just going to give it a go and see what happens.
Brockwell Bake Association sent me 40g of April Bearded seed.
Here is the planted plot and how it looks today:
The wheat patch at Veg Patch Kitchen
The plot is roughly 3m x 2m with a path through the middle so I can get in and weed. I broadcast the seeds randomly, raked them in and then used a large piece of cardboard (a Shipton Mill delivery box as it happens) laid on the soil to tread the seed in. The canes and string are there as a collie disruption mechanism, in other words to stop our collie, Rascal, from digging up my seeds. For some reason his favourite game is to dig large holes in this particular patch.
I am an erratic gardener. I try my best every year to be better than the last. We always have a degree of success and a fair few meals from our garden every summer and autumn, but my gardening leaves a fair amount to be desired. Inevitably the weeds get the better of me. I hate pulling up self-seeded borage, nasturtiums and poppies because the bees and other pollinators love them so much. As a result our veg tends to be a little drowned out by these. Only the very strong wins through. I am going to try my hardest to be a diligent weeder of the wheat patch and I am hoping that the squirrels and pigeons give me a break when it comes to harvest time (if the crop survives that long). I will report the progress of the Veg Patch Loaf throughout the season. I very much hope I will be able to post a loaf that uses at least a bit of the wheat later in the year. Watch this space.
This website uses cookies to improve your experience. You can opt-out if you wish.AcceptRejectSettings
Privacy & Cookies Policy
Privacy Overview
This website uses cookies to improve your experience while you navigate through the website. Out of these, the cookies that are categorized as necessary are stored on your browser as they are essential for the working of basic functionalities of the website. We also use third-party cookies that help us analyze and understand how you use this website. These cookies will be stored in your browser only with your consent. You also have the option to opt-out of these cookies. But opting out of some of these cookies may affect your browsing experience.
Necessary cookies are absolutely essential for the website to function properly. This category only includes cookies that ensures basic functionalities and security features of the website. These cookies do not store any personal information.
Functional cookies help to perform certain functionalities like sharing the content of the website on social media platforms, collect feedbacks, and other third-party features.
Performance cookies are used to understand and analyze the key performance indexes of the website which helps in delivering a better user experience for the visitors.
Analytical cookies are used to understand how visitors interact with the website. These cookies help provide information on metrics the number of visitors, bounce rate, traffic source, etc.
Cookie
Duration
Description
_ga
2 years
The _ga cookie, installed by Google Analytics, calculates visitor, session and campaign data and also keeps track of site usage for the site's analytics report. The cookie stores information anonymously and assigns a randomly generated number to recognize unique visitors.
_gat_gtag_UA_11789200_1
1 minute
Set by Google to distinguish users.
_gid
1 day
Installed by Google Analytics, _gid cookie stores information on how visitors use a website, while also creating an analytics report of the website's performance. Some of the data that are collected include the number of visitors, their source, and the pages they visit anonymously.
CONSENT
2 years
YouTube sets this cookie via embedded youtube-videos and registers anonymous statistical data.
Advertisement cookies are used to provide visitors with relevant ads and marketing campaigns. These cookies track visitors across websites and collect information to provide customized ads.
Cookie
Duration
Description
VISITOR_INFO1_LIVE
5 months 27 days
A cookie set by YouTube to measure bandwidth that determines whether the user gets the new or old player interface.
YSC
session
YSC cookie is set by Youtube and is used to track the views of embedded videos on Youtube pages.