theordinarycook

The Ordinary Cook loves to cook. If I am not cooking or baking then the chances are I am thinking about cooking and baking. I love sharing recipes and ideas and my website is my space to do this.

Greek Tsoureki bread

Greek tsoureki

I am a very lucky woman.  I get to do something that I love for my job.  I fell in love with bread when I realised that it was a challenge and that I could keep on learning about it forever more. Then I decided I want to spread the bread love and set up my bread making classes. All of this is my way of explaining why I am making a Greek bread that is usually made at Easter when I have barely taken down the Christmas decorations. I have to plan ahead in this game and as I popped an Easter Baking Day in the calendar last week I thought it best that I get cracking with perfecting the Tsoureki.

Tsoureki is traditionally braided and has a dyed red egg, to symbolise the blood and rebirth of Jesus, popped in the dough before the second rise so that it is nestled within the dough.  The bread is enriched with butter, egg and milk and flavoured with mehlep and given a slightly stringy feel by the addition of mastic gum.

I already had the mastic gum and the mehlep seeds to hand because our lovely Cypriot Londoner friend Tony had bought some up for me when he visited. The mastic is the sap from an evergreen from the pistachio family grown only on the Greek  island of Chios.  It reminds me of the (very posh) sugar crystals my mum used to have  for guests back in the 80’s. But pop one of the mastic gum crystals in your mouth and you get a chewing gum that is lightly scented pine forests (I am chewing, vigorously, as I type). Mastic gum has been used for centuries as a breath freshener and has anti bacterial properties and is said to be good for indigestion and stomach complaints, amongst a long list of other things. In the case of Tsoureki, you grind a small amount (I used three crystals) to a fine consistency and it imparts a delicate spicy, pine flavour as well as a slight stringiness to the soft dough.

The mehlep (aka mahleb) seeds are from the kernel of a species of cherry and have an almond flavour and impart a wonderful smell to this bread.  Again you use them sparingly in this recipe. I ground five seeds along with the mastic and together they made about ¼ tsp (a pinch of each).

You can make the Tsoureki without the mastic and mehlep seeds, but it won’t have quite the right flavour or texture, so if you can get hold of them, then do. I think they are fairly easy to get online and if you are a keen cook can be used for other dishes.

550g strong white flour
1 sachet of easy bake yeast
10g fine sea salt
50g caster sugar
grated zest of 1 orange
3 pieces of mastic gum, finely ground to make a pinch
5 mehlep seeds, finely ground
150ml milk, warmed
50g butter, softened or melted with the warmed milk
150ml water
1 egg
Syrup glaze:
50g caster sugar
50g (or ml) water
flaked almonds to decorate (optional)
Dyed red egg (if you want to be proper and traditional) or mini eggs to decorate

Method
Place the flour, salt, yeast (keep the salt and yeast separate), sugar, orange zest, ground mastic and mehlep in a large bowl or the bowl of your stand mixer.

Warm the milk to hand hot, I add the butter to the pan to melt it but you can just add softened butter. Add the  cool water to the milk to bring the temperature down. Check it’s not too hot (too hot and it will kill the yeast) and add to the flour. Add the egg. Now you can mix by hand or use a stand mixer.

If you use a stand mixer, then mix until well combined, turn off, leave the dough to rest for ten minutes (covered with a large bag), then mix on speed 1 for 1 minute. Leave dough to rest for ten minutes and then mix again for 1 minute. Cover the dough with large bag and allow to double in size.

If you are mixing by hand you can either mix with a clawed hand until combined and then knead for ten minutes until the dough is satiny smooth and a small piece stretches thinly before breaking or you can mix until well combined and leave to rest for ten minutes.  Keep the dough in the bowl and take the half furthest away from you and stretch it over the half nearest you, turn the bowl a quarter turn and repeat the stretch and fold. Repeat this action 8-12 times until the dough starts to resist you.  Cover the bowl with a large plastic bag and leave for ten minutes. Then repeat the stretches and folds. Leave to rest again and then repeat the stretches and folds.  Cover the bowl and leave the dough to double in size.

Lightly flour your work surface and tip out the light and airy dough. Deflate slightly and separate into three even sized pieces. Roll each piece out into a long sausage and braid the loaf. I start from the centre and work to each end. Tuck each end underneath slightly. If you are using a dyed red egg place it in one end of the braid and the loaf will prove around it. 
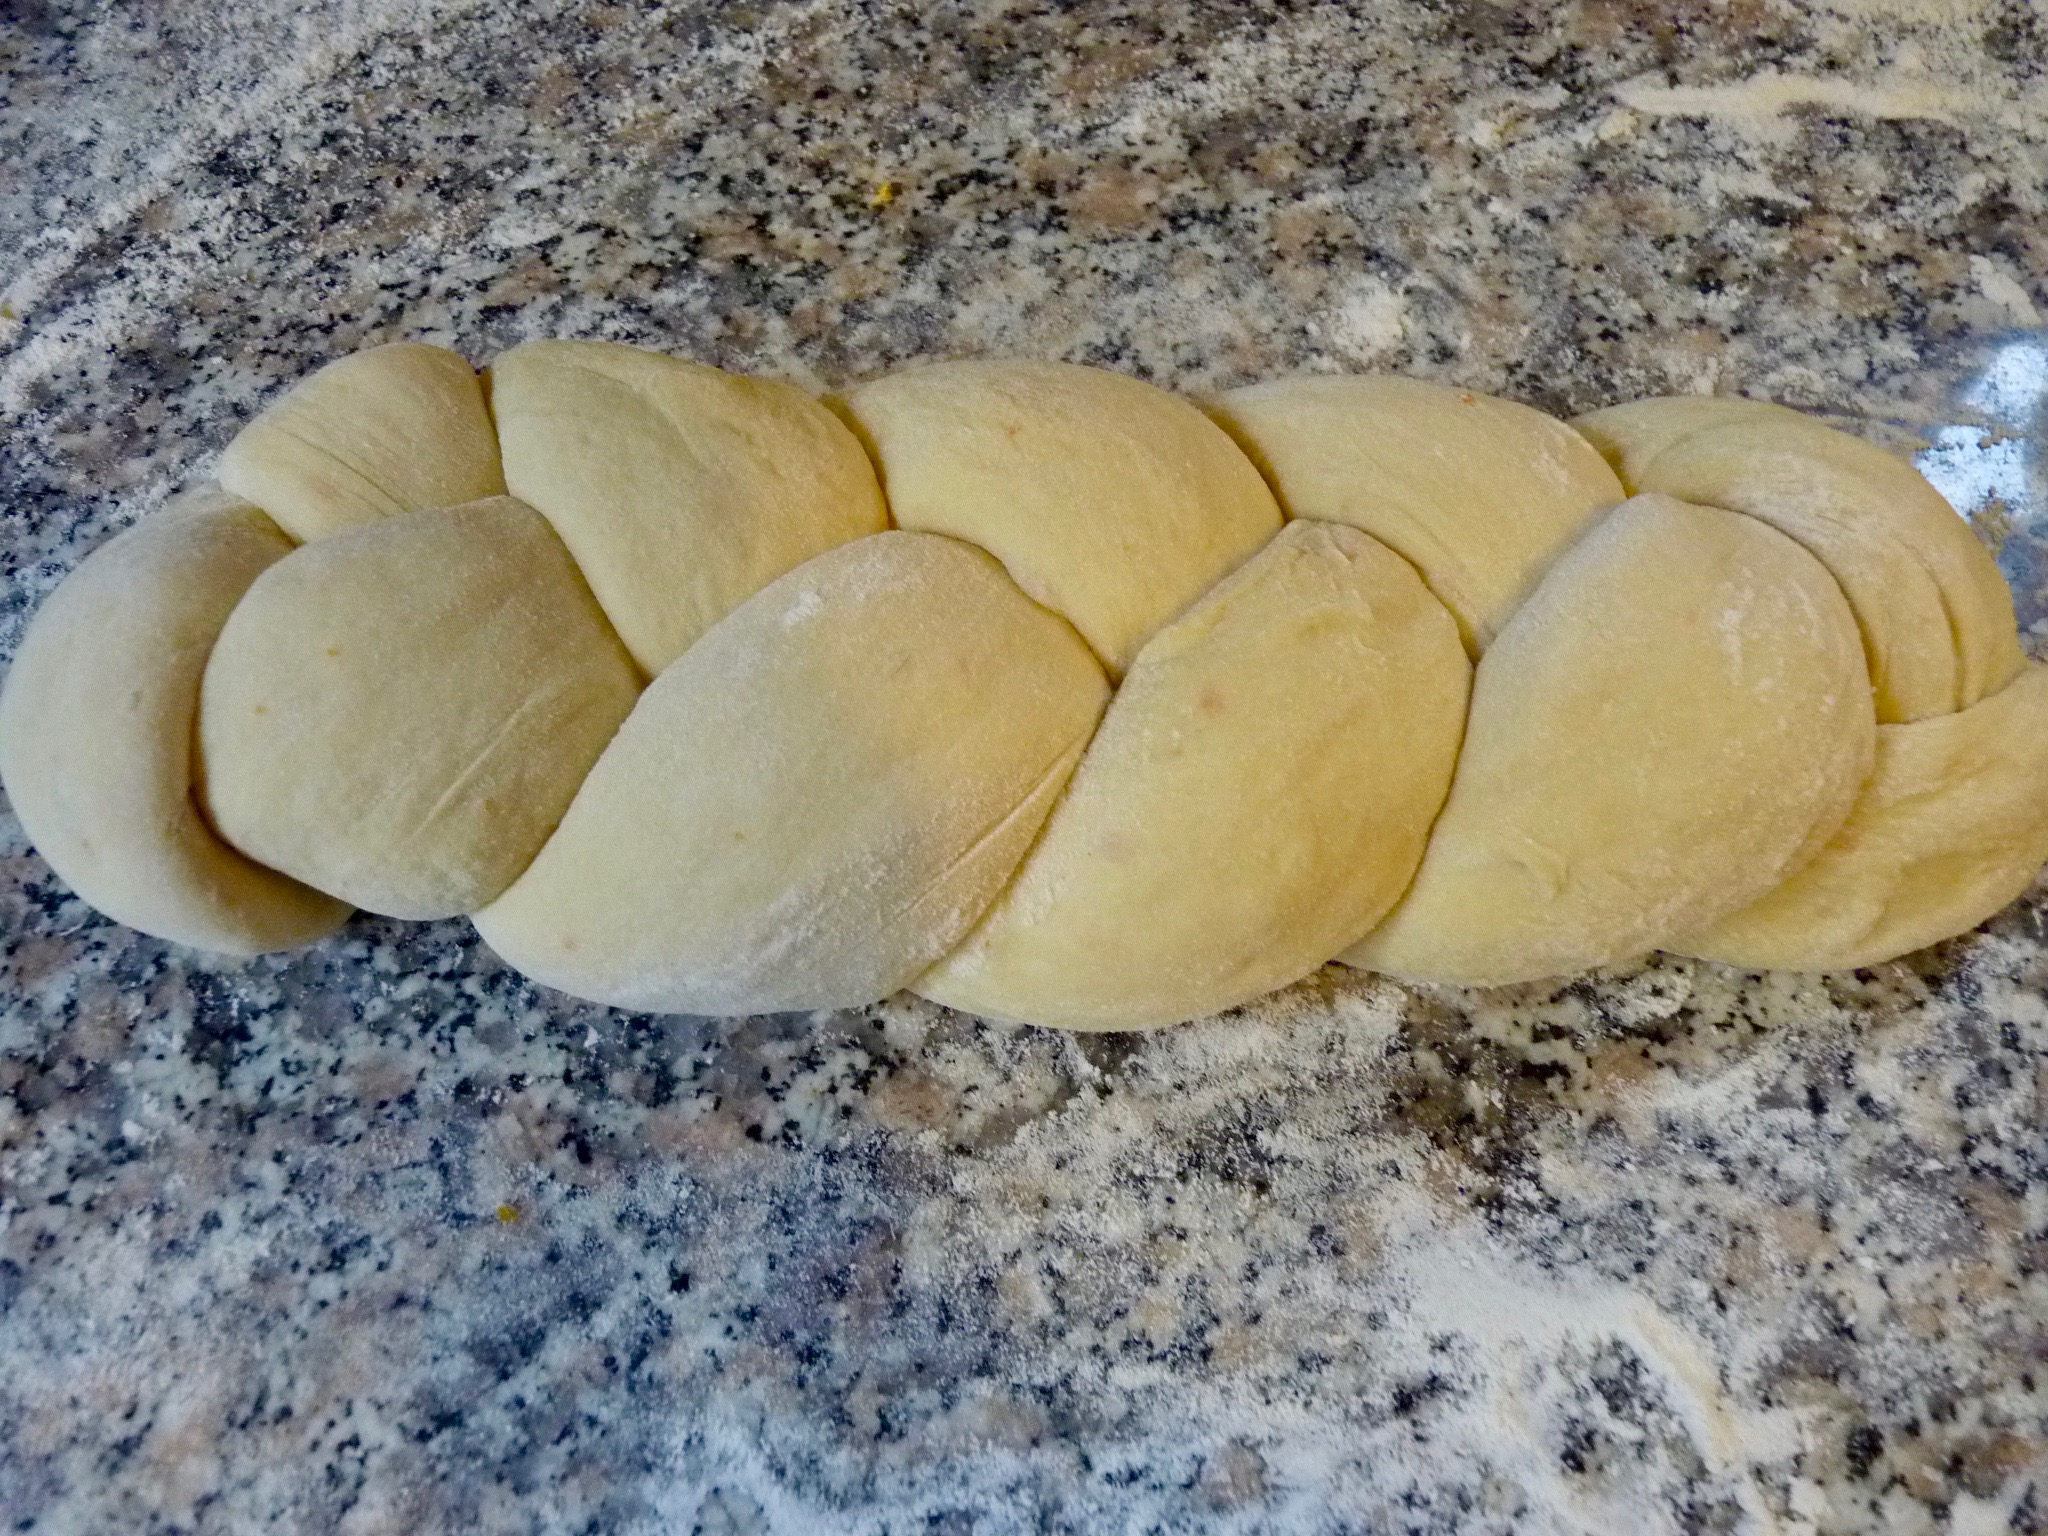
Place the braid on a tray, cover with a large inflated plastic bag and leave to prove for about 30 minutes, until it is light and airy and has increased in size. Preheat your oven to 190°c, gas mark 5, or use the top of the baking oven of the Aga. Place a baking tray onto the shelf to heat up so you can put the tray directly onto a hot tray. It will make a difference to the rise of the loaf.  Bake for 25 -30 minutes until dark golden and when pressed with a finger it resists your pressure.

In the last five minutes of baking prepare the sugar syrup by placing the sugar and water in a small pan and dissolving over a gentle heat, then turn the heat up and simmer for a couple of minutes.  Brush the Tsoureki with the sugar syrup as soon as it comes out of the oven. Decorate with flaked almonds, that you have toasted lightly and some mini eggs if wished.  Place on a cooling tray to cool completely. It is delicious with or without butter.

Greek Tsoureki bread Read More »

Merry Christmas

It’s Christmas Eve already.  I love this day, it’s probably my favourite, with the excitement and anticipation in the air, the cooking, baking and then a celebratory meal tonight playing cheesy Christmas tunes.

I am taking a moment in the middle of this madness to wish you all a very Merry Christmas and a wonderful 2018. May this next year bring you happiness and good health and plenty of opportunities to get into your kitchen and bake.

With love and best wishes,

Kath x

Merry Christmas Read More »

Mincemeat Swirls

Mincemeat swirl

I am running a Christmas Breads course in November at Acton Scott Farm and Museum so I have been planning which breads we will be cooking during the day.  I wanted to do a range of sweet and savoury so that there will be a bread to cover every occasion over the busy Christmas period.  I was thinking about sweet buns and which one we should make. At a Christmas breads course last year we made St Lucia buns, they were quite tasty and appealed because of the story about them being handed out whilst the girls in Scandinavian towns and villages dress in white with a candle crown and walk through the streets. But they are not buns that I would write home about.  I love a Chelsea bun and all of its fruity stickiness so I began to think about replacing the fruit, butter and sugar mixture with mincemeat and it works beautifully.  Whilst I was making them Mr OC commented on the Christmassy smells emanating from the kitchen – so they were deemed perfect for the Christmas breads course, along with a date and walnut loaf and a blue cheese focaccia. All suitably Christmassy and with the advantage of using up the bit of mincemeat left in the jar, the bowl of walnuts and the inevitable bit of cheese that escaped the crackers.

Mincemeat Swirls
For the enriched dough:
300g strong white flour
250g plain white flour
1 sachet of easy bake yeast or 10-15g of fresh yeast
10g fine sea salt
50g caster sugar
150ml whole milk
150ml water
50g unsalted butter
1 egg
For the filling:
5-6 tablespoons (about half a jar) of mincemeat
For the glaze:
50g caster sugar
50ml water
For the icing:
50g icing sugar
squeeze of orange juice 0r use water

Method
To make the dough:
Heat the milk  and butter in a small pan until the butter has melted, add in the tepid water and check with a clean finger that the liquid isn’t too hot. If it’s too hot it will kill the yeast, so leave it to cool for a while.

Measure the flours, salt, sugar and yeast (keeping the salt and yeast separate as the salt will kill the yeast too) into a large bowl, pour in the liquids and add the egg.

Using a clawed hand mix the ingredients together until they come together in a shaggy mass.  If the mixture has any dry bits of flour add a splash more water. You want it to feel on the wet side rather than the dry side. Cover with clingfilm, a large plastic bag or a shower cap and leave to stand for ten minutes.  Uncover and using one hand stretch half of the dough furthest away from you and fold it over the other half. Turn the bowl a quarter turn and repeat this stretching and folding. Repeat the action for a further 8-10 times. The dough should start to resist you as you do these stretch and folds. This is the gluten developing.  Cover the bowl again. Leave to rest for at least ten minutes and repeat the stretch and folds. Stop stretching and folding when the dough becomes difficult to pull. You will have done enough. Rest for at least another ten minutes and repeat the stretch and fold.  Cover and leave until the dough has doubled in size (about an hour in a warm kitchen).

Preheat your oven to 200°c, gas mark 6, or use the roasting oven of the Aga. Place a solid shelf or tray in the centre of the oven or use the floor of the roasting oven of the Aga. All bread benefits from being cooked on a solid tray rather than a wire shelf.

Lightly flour the work surface and tip the dough onto the flour.  Roll into an oblong roughly 40cm x 30cm. Spread spoonfuls of the mincemeat evenly over the surface. Mincemeat swirls

Roll up from the long end, like a Swiss roll.

Rolling up mincemeat swirls

Once fully rolled up cut into 8-9 pieces, depending on how big or small you want your buns to be. Place the buns, swirl facing up, in a square or round cake tin, that measures about 20cm. You want the buns to be touching slightly so that they batch bake (that way you get the lovely soft side when ripped apart).

Mincemeat swirls in tin

Flatten each bun slightly with the palm of your hand.  Cover with clingfilm, a large inflated plastic bag or a shower cap and leave to rise until they look nicely risen and slightly puffy (about half in a warm kitchen).

Place in the centre of the oven and bake for 20-25 minutes until golden and burnished.  If you poke the middle with your finger you should feel very little resistance.

Just before the buns are due to be ready place the sugar and water for the glaze in a small pan and bring to a simmer over a gentle heat. Simmer for about two minutes.

When cooked place the tin on a wire rack and brush the sugar glaze over the buns.  Leave them in the tin for about ten minutes and then remove and place on the wire rack to cool completely.

Mix the icing sugar and enough orange juice or water to make a pourable icing and decorate the top of your buns to your heart’s content.

Baked mincemeat swirls

Mincemeat Swirls Read More »

VonShef Stand Mixer – A review

VonShef Mixer
Photo courtesy of Domu

Domu sent me a stand mixer to put through its paces. The VonShef stand mixer has a 1260w motor and comes with a dough hook, whisk and paddle.  It has a similar styling to the KitchenAid with its curved body and stainless steel bowl.

I was interested to see how it would perform against my KitchenAid. I use my KitchenAid mixer daily, mixing bread doughs for the family, making cakes and occasionally I use it for students at my bread courses who want to learn how to mix their doughs in their stand mixers.

The Vonshef is a fraction of the price of the KitchenAid, but then it doesn’t have the sturdy workmanship that you expect of a stand mixer in the KitchenAid price range. The VonShef is made of plastic and so does not have the heavy, sturdy feel of the KitchenAid, but the benefit of this is its portability – the VonShef can easily be lifted in and out of cupboard if you don’t have the workspace to store your stand mixer on the worktop. The VonShef’s plastic is slightly more lightweight than the cheaper Kenwood Mixers on the market, but the VonShef is also cheaper than the cheapest Kenwood.

I have been thoroughly testing the VonShef over the past couple of weeks. It has made cakes and mixed the enriched doughs and pizza dough ahead of a bread class. I have been impressed with its performance.

It managed to mix five doughs consecutively (1 white pizza dough and 4 enriched doughs), using the mix and rest method, without any difficulty. The mix and rest method replicates the stretch and fold in the bowl by hand method that I use during the bread classes.  Both take advantage of allowing the gluten proteins time to develop (as soon as you add liquid to flour the two proteins that make up gluten, (glutenin and gliadin), start to form chains) and then giving them a helping hand by mixing (machine) or folding (hand), allowing to rest and then another mix or fold.  Both methods prove equally effective to a long knead by hand or running the mixer for 5-10 minutes.   The instructions for the VonShef mixer advises that you don’t run the mixer for longer than 5 minutes to avoid overheating the motor and the mix and rest method avoids this. Although, I think a five-minute knead at speed 2 is more than sufficient to develop the gluten of most doughs.

The VonShef has a few features that really stand out.  The splash guard fits well and makes adding ingredients mid-mix easy.  The pulse action is very quick and is great when you have added eggs to a cake mixture. They are mixed evenly and efficiently.  When I was making the cake, I found that I had to scrape down the bowl after each addition of a new ingredient, but I have to scrape down my KitchenAid too. The mixer worked perfectly well at mixing a light airy sponge.

It wasn’t just any cake either, but my eldest’s thirteenth birthday cake. A very important cake indeed.

Unicorn cake

So how do I rate the VonShef stand mixer? Well, it is noisier than my KitchenAid and nowhere near as sturdy or, let’s admit it, as beautiful, but for a mixer in the price range that it is in it is a great piece of equipment that makes great cakes and works perfectly well for mixing bread doughs. If you are looking for a budget mixer rather than a once-in-a-lifetime purchase then I can recommend the VonShef.

Disclaimer: I was sent a VonShef mixer free for the purposes of this review.  The opinions expressed are my own and honest after thoroughly testing the mixer. 


VonShef Stand Mixer – A review Read More »

Depressed Cake Shop

Depressed Cake Shop poster

I have been asked to bake a cake for Shrewsbury’s Depressed Cake Shop on Tuesday 10th October at Shrewsbury Museum and Art Gallery in partnership with the charity Shropshire Mind.  The Depressed Cake Shop is a chance for the community to come together and consider and discuss issues around depression.

All the cakes will contain an element of grey to symbolise the grey cloud that can hang over someone struggling with depression.

I have trialled my cake today to make sure I have the recipe spot on before baking it again for next week’s event.  I have chosen to make a chocolate orange cake based on Claudia Roden’s orange and almond cake, but with the added boost of chocolate. Nigella has a similar recipe but I have reduced the sugar by 50g and upped the treacly flavour of the sugar by using light soft brown rather than caster sugar.

Chocolate and orange cake

If you are in or near Shrewsbury next Tuesday then please pop into the museum between 11am and 2pm to support this very good cause.

Chocolate, orange and almond cake

2 oranges
200g light soft brown sugar
6 eggs
200g ground almonds
50g cocoa powder

Method
Place the oranges in a pan and cover with cold water.  Bring to the boil and simmer for 1½ hours until the oranges are soft. Drain and allow to cool. Cut the oranges in half and remove any pips. Place in a food processor and pulse until pureed. You can do this in a food mill or chop finely and push through a sieve if you don’t have a food processor.

Preheat your oven to 180°c or gas mark 4 or use the baking oven of the four oven Aga (or the roasting oven of the two oven Aga using a cake baker or cold shelf).

Break the eggs into a large bowl and beat until combined. Add all the other ingredients and stir well until the mixture is smooth. Pour the mixture into an 18cm cake tin lined with baking parchment.  Place in the centre of the oven and bake for 40-50 minutes until springy to the touch.  Cool on a wire rack in the tin for ten minutes and then remove from the tin and allow to cool completely.

I have decorated my cake with a grey cloud made out of fondant icing coloured grey and piped with a darker grey icing made with icing sugar, food colouring and a few drops of water.

Chocolate and orange cake slice

UPDATE (9/10/17): A lovely person called Chantal emailed me to remind me that we aren’t supposed to make cakes with nuts in, in case of allergy. I really should read things properly!  So, instead I have made rice crispie cakes, because who doesn’t love a crispie cake? They are always the first to sell on any cake stall. I hope they sell well tomorrow.


Depressed Cake Shop Read More »

Marinated peppers

marinated peppers

I am sharing these here as they are a staple of the lunch that I provide at my bread making courses. They are always a hit and I have been asked for the recipe more times than I can count. So here it is.  This is a simplified version (and in my opinion tastier) of one I have posted before. It’s very simple and can be jazzed up with a sprinkling of herbs, or capers, or sun dried tomatoes, depending on your mood. Try the peppers in the simple version first though and play around later.

I make them the day before I need them to give them time for the flavours to mingle, (but you could just eat them straight away if necessary), and they are good to eat for a few days, so they are handy to have in the fridge. I like the colours of the different peppers but if you prefer red peppers to green peppers feel free to make them with the colour that you prefer.

1 red pepper
1 yellow pepper
1 green pepper
salt & pepper
half a lemon
Extra virgin olive oil

Method
Preheat your oven to 220°c, gas mark 7, or use the floor of the roasting oven of the Aga. Line a baking tray with foil (not absolutely necessary but makes cleaning easier). Place the peppers on the tray (or if using an Aga just spread the foil directly on the floor of the roasting oven) and roast them, turning every ten minutes until they get nicely charred on all sides. This can take 30-40 minutes.  Once charred place them into a bowl large enough to hold them all and cover immediately with cling film.  Leave them to steam and get cool enough to handle. The steam helps the skin be easily peeled off.  Once cool enough to handle, peel away the skins, whilst holding the peppers over a bowl to catch the juices.  Remove the core and the seeds and rip the pepper flesh into strips. Place into a serving dish and pour over all the juices.  Season with salt and pepper.  Squeeze half a lemon over the top and be generous with the olive oil.


Marinated peppers Read More »

Elderflowers and feeling glad to be alive

This is more of a philosophical post than my normal recipe posts but I did just want to share with you my walk the other morning.  I have started to do a pilates class on a Thursday morning. For several years now, each time I get up from a chair I make an audible groan.  My back aches, my hips ache, I generally ache. I decided in March that I should finally tackle it head on, so I joined a pilates class. I drop my daughters off at their respective schools and then head up the road to pilates. If I park near my youngest’s school it’s a ten minute walk up the hill. I have started to really enjoy this walk. I take it at quite a pace, like I do most of my walking. I am not a stroller, I am more of a power walker. Slow walking frustrates me. But because I drop my daughter off at school at 8.45 and the class doesn’t start till 9.30 I normally have an extra half hour to kill. I love where we live, it is surrounded by woodlands and these all have public footpaths weaving through them maintained by a wonderful local charity. So I take a diversion. I can usually find somewhere or something new even though it is only a stone’s throw away from where I have lived for over twenty years.

So, this Thursday… The girls are on half term and so were at home with Dad. I left the car in the normal car park and walked up the hill. It’s a back road so only has a few cars passing me and this week not even that as there was no school run. I could wander at ease and even at my usual faster than normal pace I could properly appreciate my surroundings. What hit me was the fizz of elderflower. The smell of the elderflower was intoxicating. There had been a storm the previous evening and the air still had that post-storm humidity and atmosphere that was holding the scent close.  It was like wandering through a jar of lemon sherbet.  Then, a little further up the hill, the atmosphere changed and this time it was the dying wild garlic that filled my nostrils. This smell is powerful, it fills your nose and you begin to wonder if your clothes have taken on the smell. I don’t dislike this powerful stench though, it still smells good and seems to hold a promise of good things that will come again next year when it pushes up its new sweet smelling (and tasting) new growth.

The walk to pilates always manages to invigorate me and it warms me up ready for the powerful stretches the pilates teacher puts us through. I am pleased to report, as an aside, that I have stopped groaning at every move and feel much better, taller and stronger as a result of the last three months of the weekly pilates class. I can recommend it.

I left pilates refreshed and ready for the day ahead and I knew that as soon as I got home I would have to don my wellies and go foraging for enough lacy flower heads to make elderflower cordial. So that’s what me and the youngest did.  We now have 1.5 litres of cordial sitting in the fridge and we are enjoying its refreshing zing. Every time I pour some out I am taken back to my walk through the woods.  Mr OC says that the smell of it makes his nose tingle, I said that it was because it is like drinking pollen.

I urge you to find a quiet road with an elder hedgerow or take yourself off into the woods and breathe in the lemony fizz deeply and feel glad that you are alive.

Elderflowers and feeling glad to be alive Read More »

The Shropshire Cook Book

I have been sent a review copy of the latest cook book to feature Shropshire restaurants, cafes and producers, The Shropshire Cook Book.

Shropshire Cook Book

I love Shropshire. I was born and raised here and although I have tried to move away a couple of times (Cardiff for Uni and Broadstairs for love) Shropshire has always called me home (thankfully the man I moved to Broadstairs for is also Shropshire born and bred so I met with no argument). It’s an unassuming county, and there have been many times when people have asked me where I live and my response has been met with blank stares. It’s a county that hides its light under a bushel. The countryside is breathtaking, with its valleys, hills, meadows and farmland. It has some wonderful market towns with thriving independent shops and restaurants and the facilities on offer in Telford to growing families are second to none.  I doubt you will ever get me to move from Shropshire again.

This cook book is a treasure trove of local restaurants and producers, some of which I am familiar with and have tried and some which are now on my list of things to do. The book showcases the people behind the business, their background and ambitions and then gives one of their recipes, so that you can get a taste for their cooking style at home.  This book is more than a recipe book, (although there are 35 recipes within its pages) it’s also about encouraging you to venture away from your own kitchen and to try some of the restaurants on your doorstep or to incorporate some of the local produce available from the farm shops and the producers that are making the county proud.

What this has highlighted for me is how wonderful the food scene is in Shropshire. You can sometimes take these things for granted, but when you see all of these wonderful chefs and producers gathered together in one book it really proves that Shropshire has a wonderfully vibrant food culture that we can be very proud of and I know that there are many more out there that haven’t been included here. A comprehensive directory would run to many, many pages.

This is a great book for those that are planning a visit to the county as much as for the local that wants to explore more of the wonderful eating opportunities that are abound in this beautiful county of ours.

There are other books in the series too, covering other counties and cities, so it might be worth a look to see if your region has a similar book available to introduce you to some restaurants and producers that you aren’t yet familiar with.

The Shropshire Cook Book is available for £14.95 from the restaurants and producers featured in the book as well as selected gift shops and book shops. You can also get it direct from the publisher.

I was sent a review copy for the purposes of this blog post. All opinions are my own and are honest. 


The Shropshire Cook Book Read More »

Bara Brith – the yeasted version

Yeasted bara brith
Sliced whilst warm because I couldn’t resist (naughty!)

It’s funny how much life can change in four years. I last wrote about Bara Brith in 2013. In that post I said that I hadn’t enjoyed the yeasted version as much as the cake version of this traditional Welsh treat because of the denseness of the yeasted version.  The Bara Brith started life as a yeasted loaf, a treat that was made to cook in the dying heat of the traditional wood fired bread ovens. In latter years the cake version has become more prominent.

Since 2013 I have become obsessed with yeast cookery, to the extent of setting up a cookery school to teach others the joy of making your own bread at home. A friend mentioned Bara Brith to me in the school playground and it set my brain whirring with memories of that experiment that I staged back in 2013. I started to wonder why I hadn’t enjoyed the yeasted version as much as the cake.

I revisited the recipe that I used back in 2013 for the yeasted version and now with experience of baking wholemeal breads it occurred to me that it would benefit from being mixed a lot wetter than the original recipe specifies. Instead of the ¼ pint or 150ml of warm milk specified, I added ½ pint or 250ml milk to the flour. I also used a mix of wholemeal and white flour to lighten it up further. As an aside I used freshly milled Shropshire Soissons grain, because I am also obsessed with using my Komo mill at every opportunity, but I do realise that not everybody is as obsessed as me, so any wholemeal flour will be fine, although stoneground is always a better choice.

I am happy to report that this new experiment has proved that the yeasted Bara Brith can outclass the cake version every time. So, this recipe will get added to my Croissants and sweet dough class that I have on Saturday, I hope my students enjoy it as much as I do (NB. It’s even had the thumbs up from my girls!).

300g wholemeal flour (I used bread flour, but if you don’t have it then don’t worry)
250g white bread flour
1 sachet of easy bake yeast or 15g fresh yeast
8g (or 2 scant tsp) of fine sea salt
50g sugar (you can use caster or dark brown, whichever you have to hand, the dark brown sugar will make a richer loaf)
1 tsp mixed spice
25oml milk
75g butter
150g dried mixed fruit

Glaze:
40g caster sugar
40g water

Method
Place the flours in a large bowl. If using fresh yeast crumble it into the flour like you would butter into pastry. If using easy bake yeast just mix it in the flour. Add the sugar, salt and mixed spice and stir in.

Cut up the butter and add it to the milk in a small pan and warm to tepid, so that the butter is just melted.

Mix to a softly sticky dough. Cover with clingfilm and leave to stand for ten minutes.  Uncover and use the fold and stretch method to improve the gluten. To do this take half the dough, stretch it up and fold it over the top of the rest of the dough. Turn the bowl a quarter turn and repeat the stretch and fold. Keep repeating this until the dough starts to resist you or threatens to tear. Cover again and let rest for another ten minutes. Repeat the stretching  and folding. Cover and rest for ten minutes and then do one last round of stretching and folding. Also feel free to knead the dough however suits you best (but don’t flour the surface) or use a stand mixer.

Cover the dough and let rise until doubled in size.  Add the dried fruit and fold in until evenly distributed.

Butter a loaf tin. Turn the dough onto a floured surface and press gently into a rectangle with your fingers. Roll down from the longest edge, seaming the dough as you roll. Place the dough, seam side down, into the loaf tin. Cover with oiled clingfilm or a large inflated bag and leave to rise until it has proved. To test press a finger gently into the dough, if it comes back within two seconds it is ready for the oven.

Once you have shaped your loaf, preheat the oven, with a baking tray on the shelf to 200°c.

Place the loaf on the preheated baking sheet in the oven, mist with a few sprays of water (using a plant mister). Bake for 15 minutes, turn the oven down to  180°c and continue to bake for another 25-30 minutes until it sounds hollow when tapped on the base.

Whilst the loaf is cooking make the glaze. Put the sugar and water in a small pan and heat gently until the sugar is dissolved, then bring to the boil and simmer for three minutes until syrupy.

As soon as the loaf comes out of the oven, brush all over with the glaze. Leave the loaf to cool completely before enjoying spread with butter.


Bara Brith – the yeasted version Read More »

Wild Garlic Bread

Wild garlic bread

Wild garlic loaf sliced

We are lucky enough to be surrounded by wild garlic as far as the eye can see at this time of year. It has been whirring round my mind about how it might taste in a loaf. So we popped our wellies on and went a walk. We could have picked it out of our very own garden borders but we have two dogs… So I wanted to find a corner which might be unadulterated.  (I still gave it a good rinse though, just in case).

Wild garlic is fairly distinctive, so get yourself a field guide and if you are unsure then the strong garlic smell gives it away. Always follow the rules of foraging. Be sure what you are picking. Ask permission of the landowner. Only pick something that is prolific and not protected. Only take what you need for your personal use. Give it a good wash before eating it.

When I was mixing and handling the uncooked dough, the garlic smell was very strong and I was worried that I had perhaps overdone it a bit. However, once cooked the garlic had mellowed and imparts a subtle and surprisingly sweet hit of garlic. It makes a delicious loaf, that is very good with soup or, in fact, anything that you happen to have for your dinner.

Makes 1 loaf

500g white bread flour
5g easy bake yeast
8-10g sea salt
320g water
20g olive oil
a couple of handfuls of wild garlic, chopped

Method
Place the flour, yeast and salt in a large bowl (keeping the yeast and salt separate, as the salt will kill the yeast). Add the water and olive oil and mix with a clawed hand until well mixed. Cover with a large bag or clingfilm.  Leave to rest for twenty minutes. This allows the flour to absorb the liquid and start to make gluten before you have to get involved. The dough should be softly sticky, if it isn’t add a bit more water. Don’t be tempted to add more flour. A wetter dough is better than a dry dough.

Leave the dough in the bowl and holding the bowl with one hand, stretch some of the dough up and over the rest of the dough. Turn the bowl a quarter turn, and repeat the stretching and folding. Repeat this for about 10-12 folds.  Cover the bowl again and leave for another twenty minutes. Repeat the stretching and folding motion again.  If the dough starts to resist then stop stretching, if it starts to break then stop stretching. Leave to rest again for another twenty minutes and then fold again. It will need less folding this time and it will feel lovely and stretchy, smooth and satiny.  Cover and leave the dough to prove for at least an hour until it has risen, is domed and has plenty of aeration.

Lightly flour your work surface and turn your dough out of the bowl.  Add in the chopped garlic leaves and fold the dough over the leaves. Shape into a round and place on a floured tray or into a proving basket or if you prefer into a greased loaf tin. Cover with a large bag or oiled clingfilm and leave to prove again.  It might need twenty minutes, it might need an hour. It will depend on the temperature of your dough and the temperature of the room.

Preheat the oven to 230°c and place a baking tray on the oven shelf to heat up with the oven, or use the floor of the roasting oven of the Aga.

To test if your loaf is ready to bake, flour or oil your finger and press lightly onto the surface of the loaf. If it springs back slowly within 2 seconds it is ready to put in the oven.

Place the loaf on the hot baking tray, spray the oven walls with water using a plant mister (avoiding the glass door and light). This will create steam, so that the loaf has a chance to do its last rise before the crust forms. Bake for about 30-40 minutes until the loaf is dark golden and sounds hollow when tapped. Leave to cool completely on a wire tray before slicing and enjoying.

If you would like to perfect your bread making skills you could always join me for a bread making course at Veg Patch Kitchen.

Wild Garlic Bread Read More »