yeast cookery

Shropshire Butter Buns #2

Hands down my most popular recipe is for Shropshire Butter Buns and for very good reason. A butter bun is a fine, fine thing. A sweet dough filled with buttery goodness and with a delicious sticky toffee bottom. Back in 2015 when I posted the original recipe it was one that I had cobbled together from memories and snippets on the internet and it’s a recipe that I am pretty pleased with.

I teach people how to make butter buns on my sweet dough course and either they swoon immediately or look at me with an impassive face as they have yet to experience one. Once they have experienced one though I haven’t known anyone fail to be impressed.

Last week, Edward Aston contacted me. Edward had been an apprentice baker some seventy years ago at a bakery in a local town just a few miles away from here at Tom Wedge’s bakery. Edward tells me that Tom Wedge was the son-in-law of Mr Rhodes of Rhodes Bakery in Market Drayton where the recipe for the butter bun originated. Being keen to pass the recipe on Edward has very kindly sent me the recipe that he still bakes regularly for his children and grandchildren.

So here is what Edward wrote to me:

“I have just read your piece on Shropshire butter buns and thoroughly enjoyed it. The café you refer to in Shrewsbury would be Sidolis if memory serves me well. I believe the original recipe came from Market Drayton, Rhodes bakery I believe but sadly no longer trading. Some seventy years ago I was an apprentice baker to the son in law of Mr Rhodes a brilliant baker named Tom Wedge who had his own bakery in Broseley, Shropshire. That bakery is also sadly no longer trading and none of his family is involved in the trade. In view of this I now feel that it is time to make sure his original recipe should be preserved and I can think of no one better to share it with. Your dough and method are absolutely fine but the filling and construction is not authentic. So here goes for what it is worth. For the filling use equal weights of butter and light soft brown sugar. Beat them together until light and very fluffy now add about 20% of the butter sugar mixture total weight of lemon curd and beat well again. You should now have a cream like spreadable mixture. Now to construct the buns, place the dough circle flat and spread the mixture thinly on half of the circle, fold to make a half circle and then spread half of that and fold again to make a quarter circle. To bake place the buns in groups of four to form a circle on the baking tray. This was the traditional way of selling butter buns, in rings of four. I hope this is of use to you and will help to keep this beautiful confection alive. I like you am a great fan of the butter bun.”

How wonderful is that? I was so pleased and felt very honoured to have received such an email. I have spent a very happy morning today filming myself making the buns so that you can all see how I have translated Edward’s note to me and hopefully make the authentic Shropshire Butter Bun for yourself. I agree very much with Edward that we should keep the butter bun alive.

Learn to make Shropshire butter buns and other delicious sweet treats on my online course

If you would like to watch the video of me making these beauties you can do on my YouTube channel.

Ingredients:

For the dough:
300g strong white flour (bread flour)
250g plain white flour
10g fine salt
7g easy bake yeast (instant yeast) or 10g fresh yeast (the fresh yeast can be dissolved in a little of the warm water that you will be using for the recipe)
50g caster sugar
150ml milk
150ml warm water
50g butter
1 egg

For the filling:
150g unsalted softened butter
150g light soft brown sugar
60g lemon curd

For the glaze:
50g caster or granulated sugar
50g water

Method:

Warm the milk and the butter together in a pan over a gentle heat. Yeast dies at 55C so you don’t want the water to get too hot.

Place the flours, sugar, salt and yeast in a large bowl. Keep the salt and yeast separate as salt can kill yeast. If you are using fresh yeast dissolve in a small amount of the water that you are using for the recipe before adding it to the flour.

Add the egg, warm milk and warm water and mix well. You can now use a stand mixer to mix the dough, knead for 10 minutes or use the stretch and fold method to develop the gluten in the dough. Leave the dough to ferment until it has become light and airy and has doubled in size. This can be at room temperature and take 1-2 hours or in the fridge overnight.

Meanwhile make the filling. Beat the sugar and butter together until soft and fluffy. Add the lemon curd and mix to combine. Set aside.

Make the glaze by placing the sugar and water in a small pan over a gentle heat. Stir until the sugar has dissolved and then simmer for a couple of minutes.

When the dough has become light and airy turn it out of the bowl onto a lightly floured surface. Cut the dough into 8 large pieces or 12 smaller pieces. I like the bigger bun but you might prefer the smaller size.

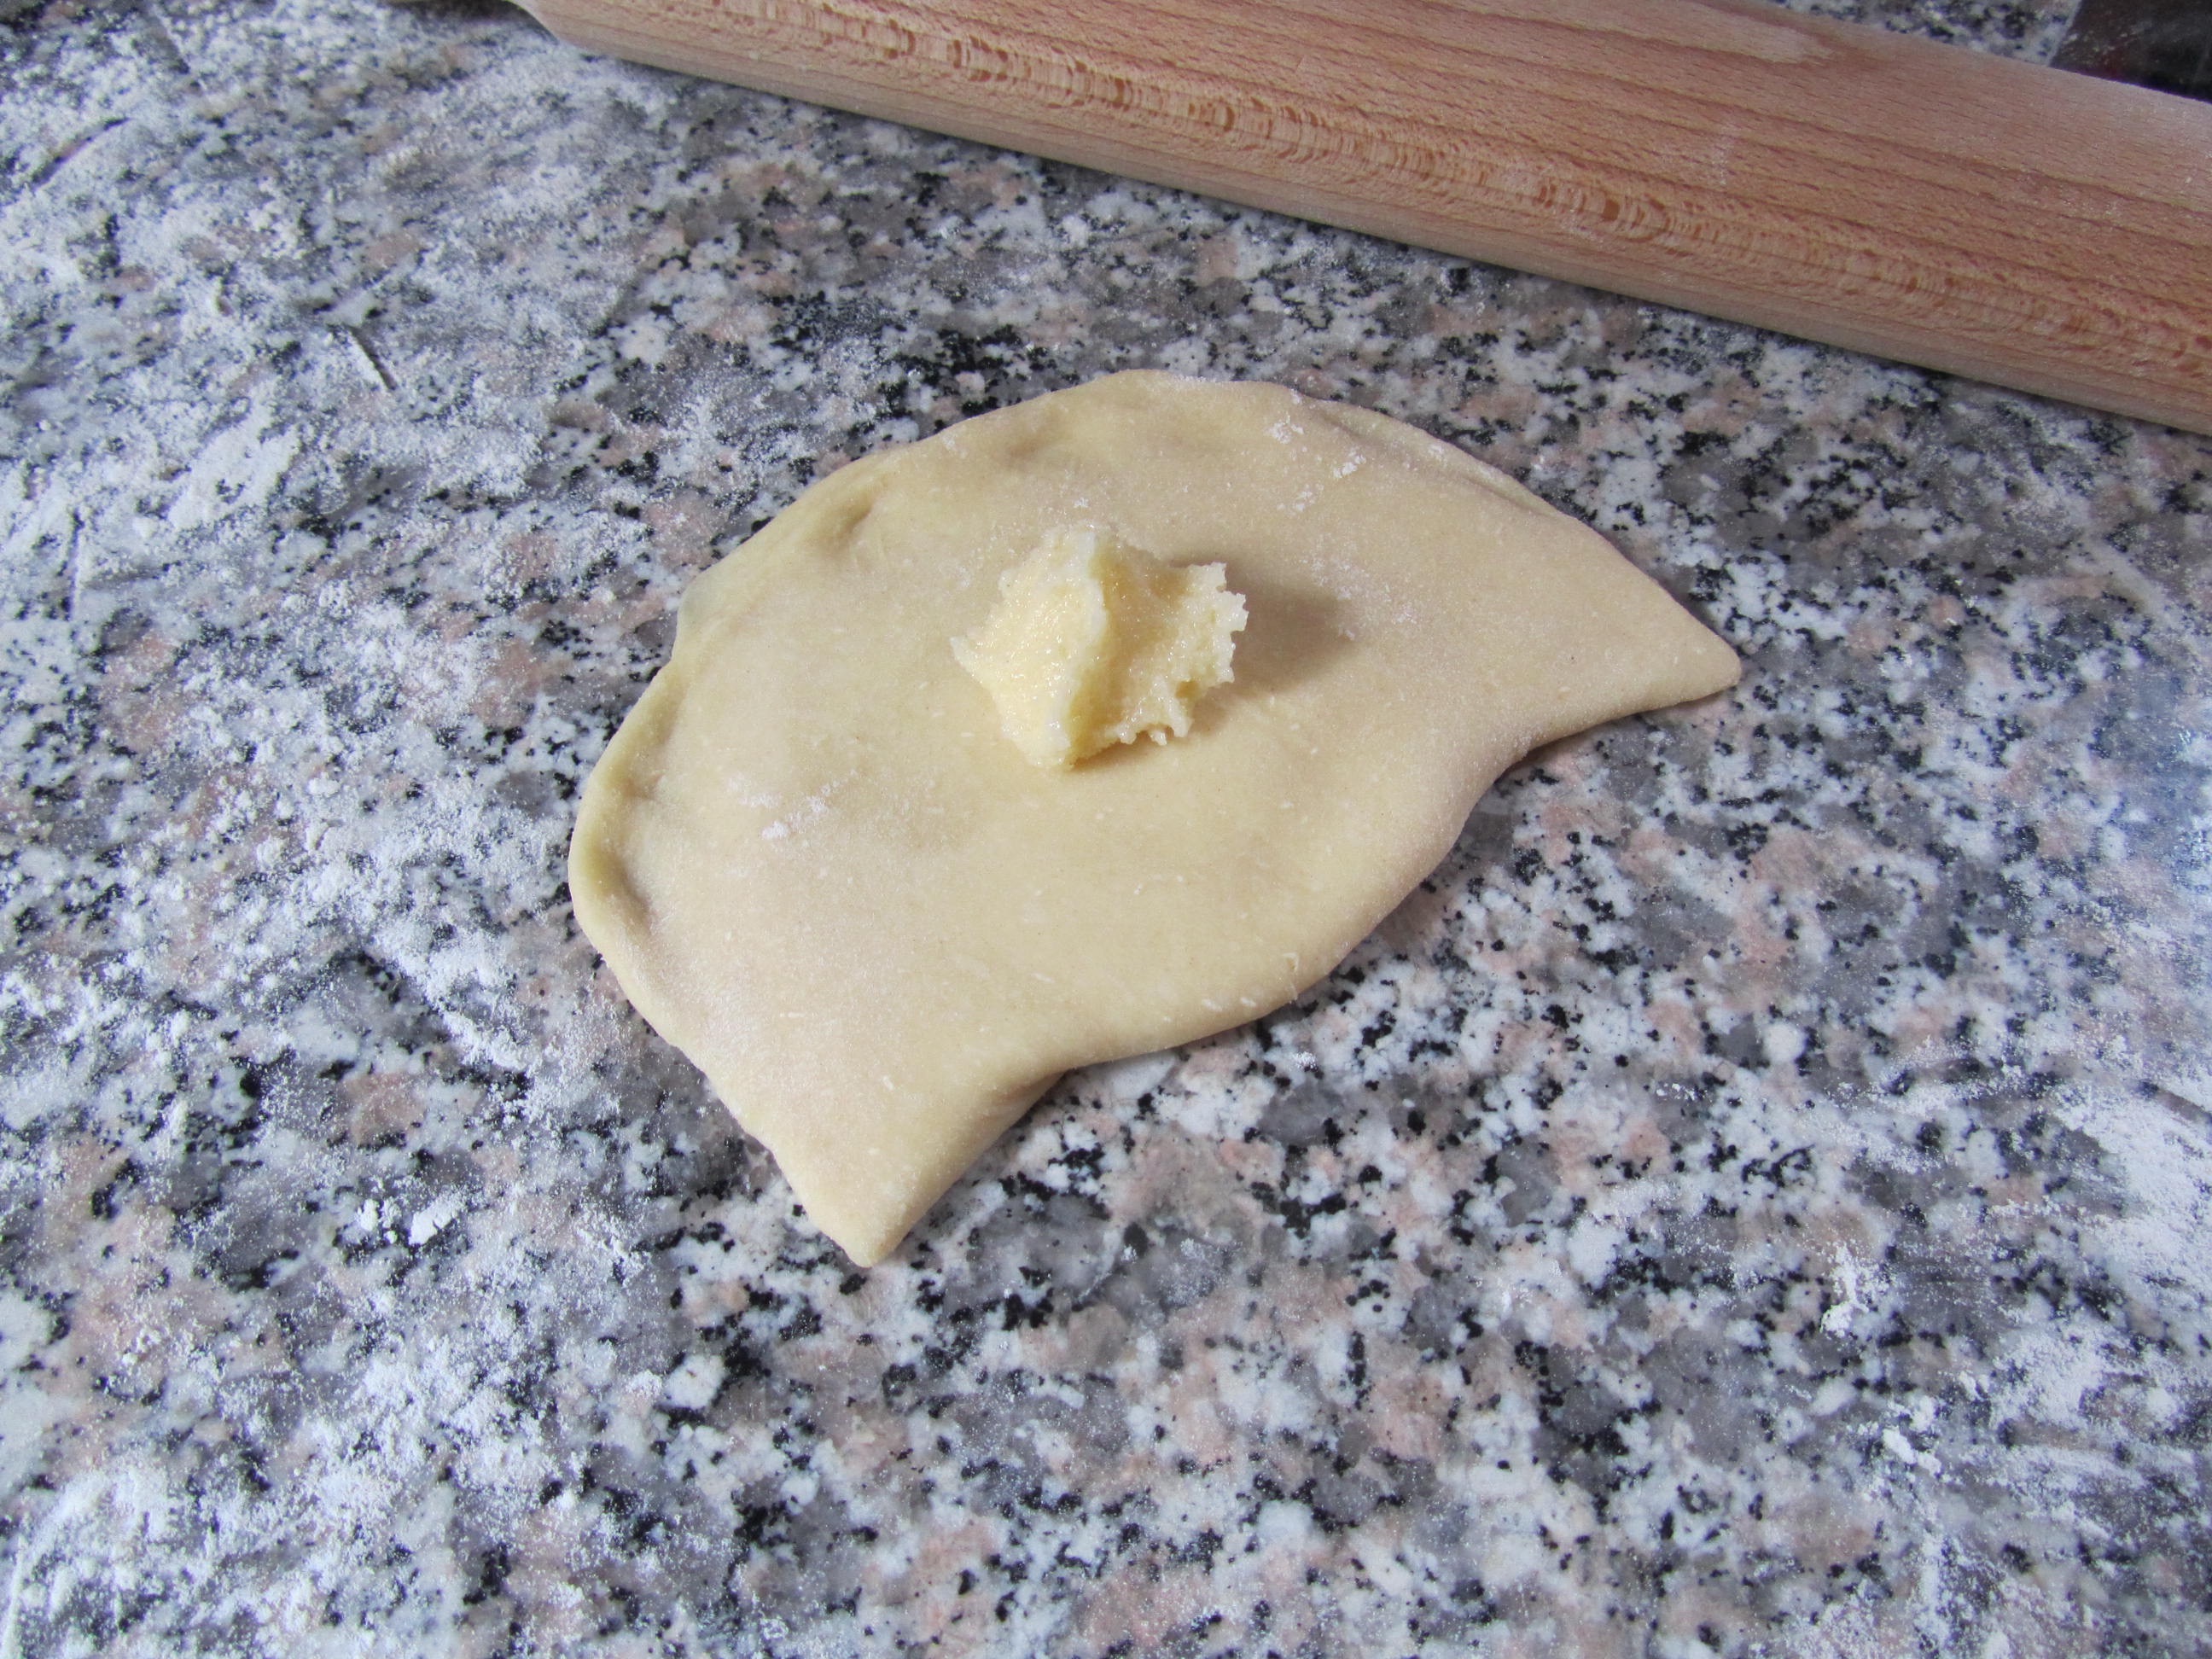
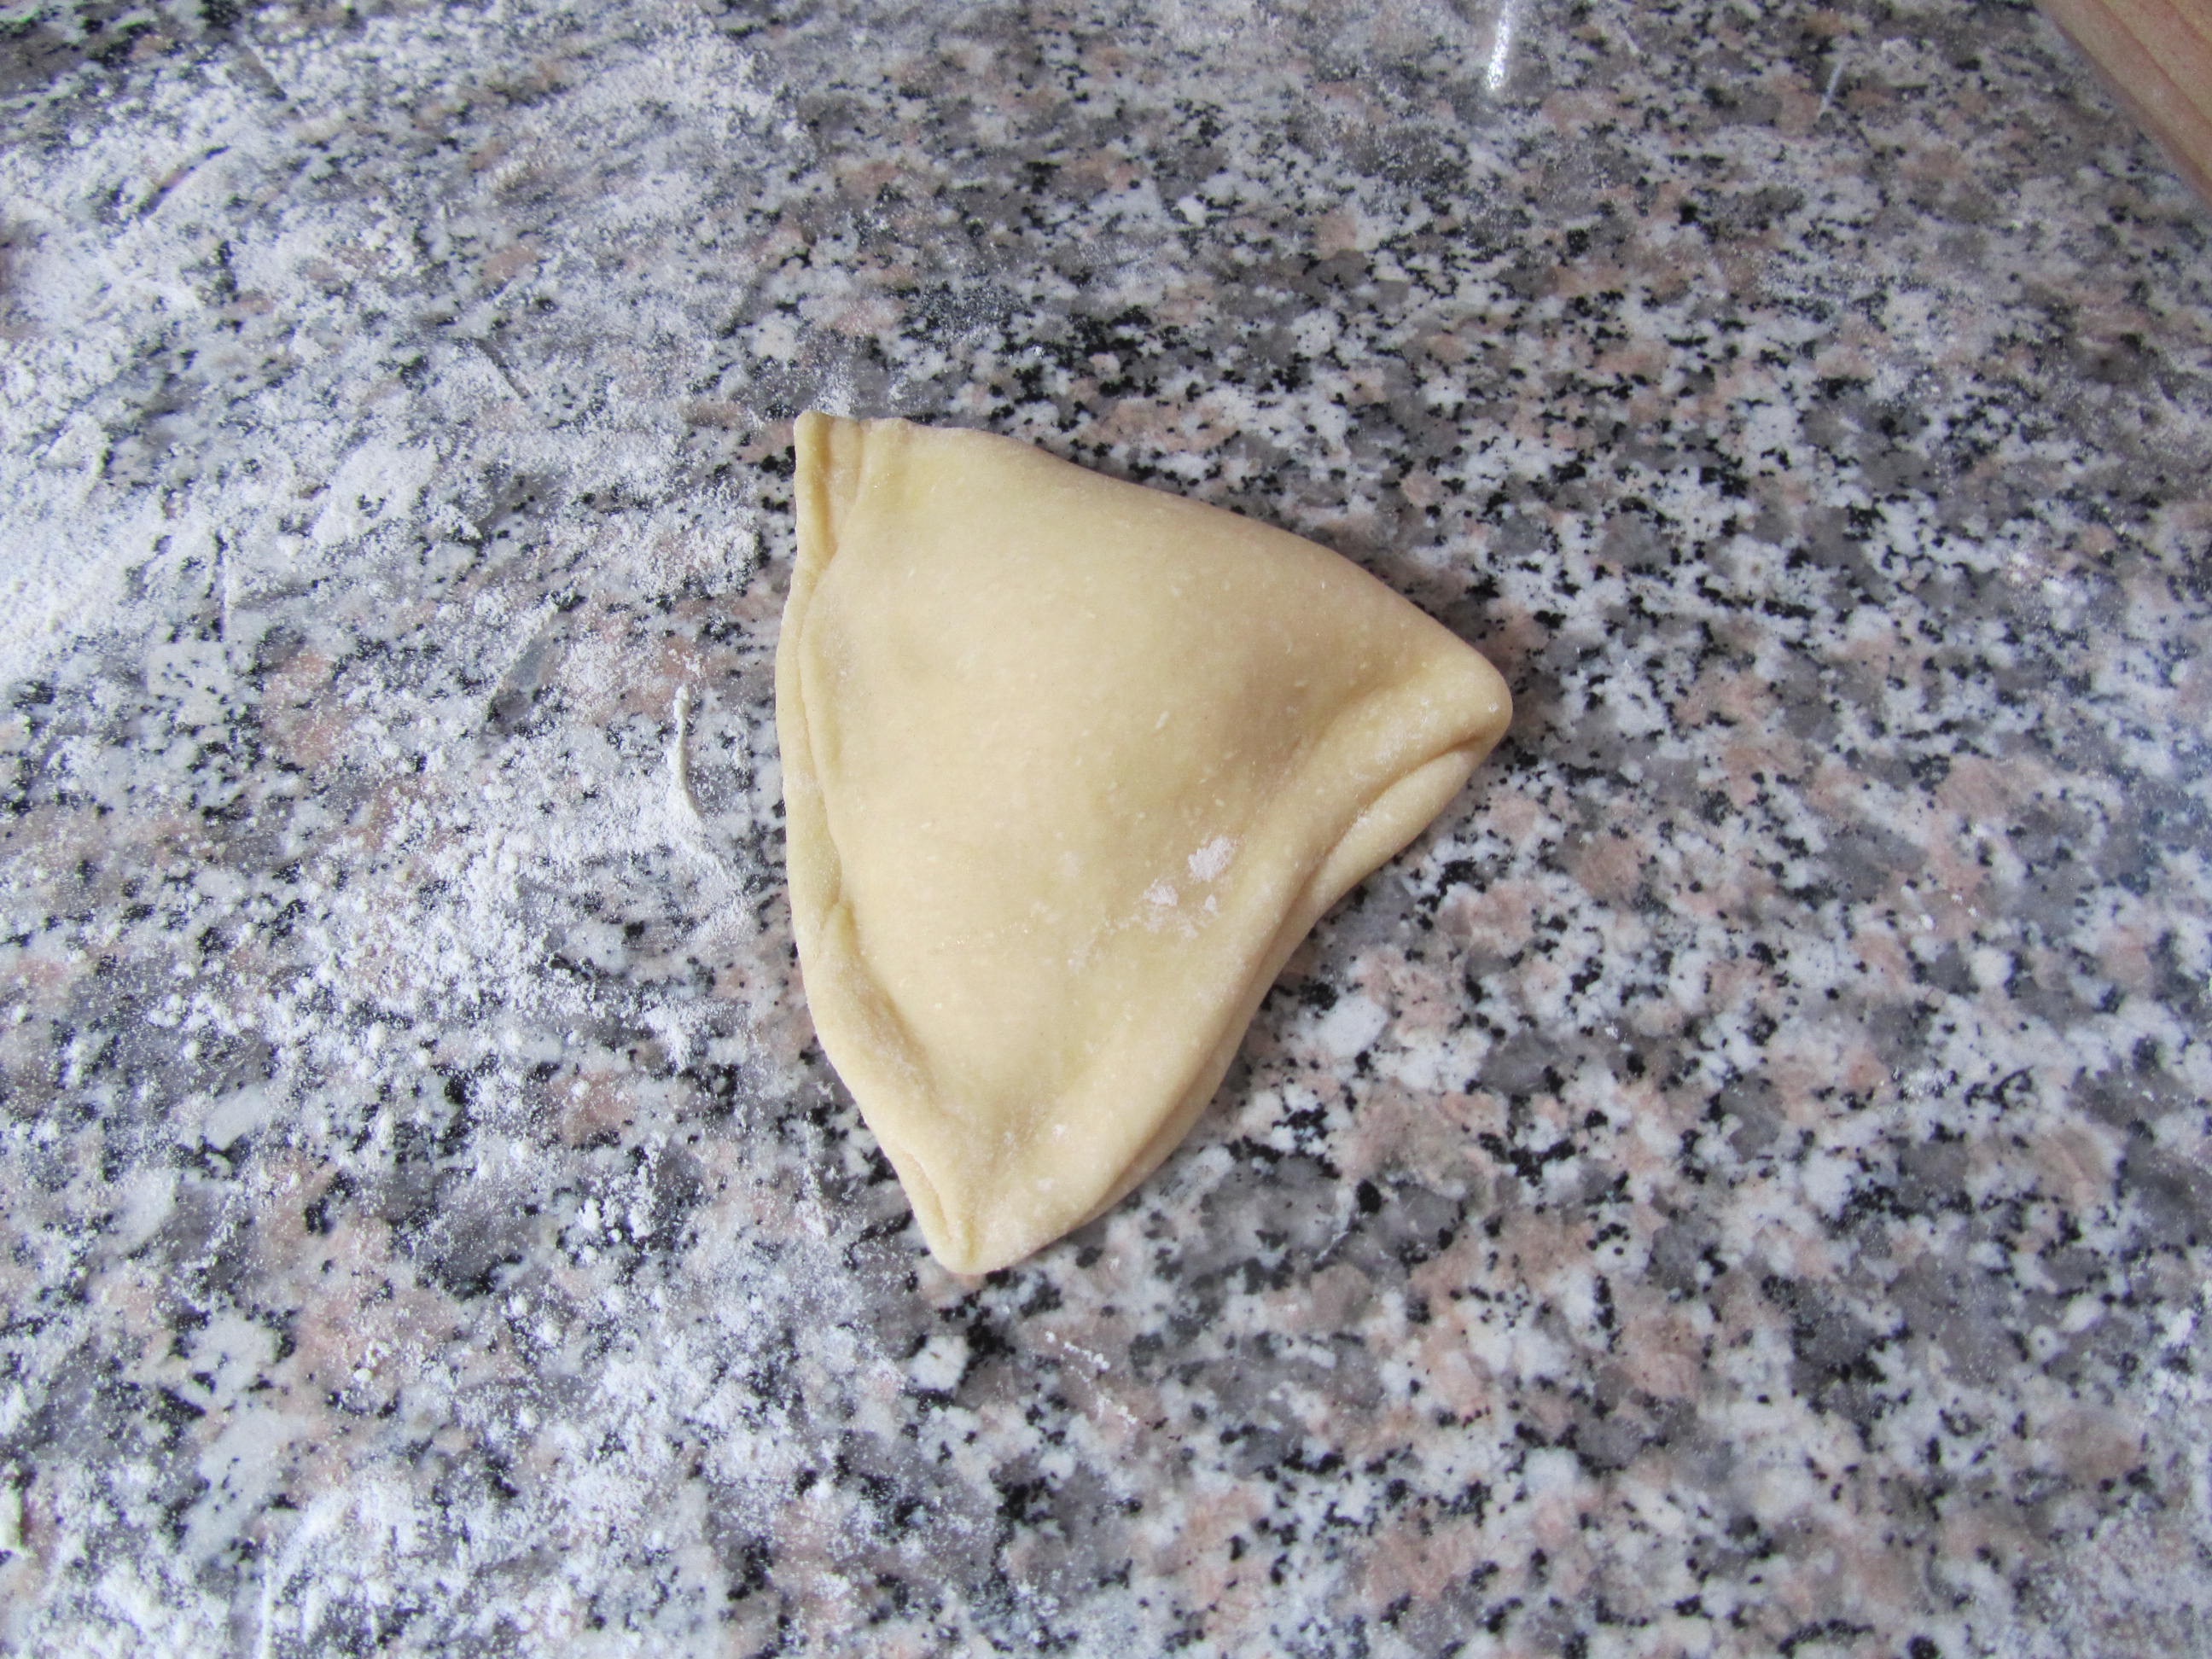
Roll each piece into a circle. Place a teaspoon of the filling not each circle. Fold the circle over and seal the edges. Place another teaspoon of filling onto the half moon shapes and fold in half again so that you now have a triangular shape.

Place four of the triangles onto a baking tray (you can use baking parchment on the tray to save the washing up effort) to make a circle and repeat with the remaining triangles.

Leave in a warm place to prove or place in the fridge for several hours or overnight.

When the buns have risen by about half preheat the oven to 200C, gas mark 6, 400F or use the roasting oven of the Aga and bake for 20-25 minutes. depending on your oven.

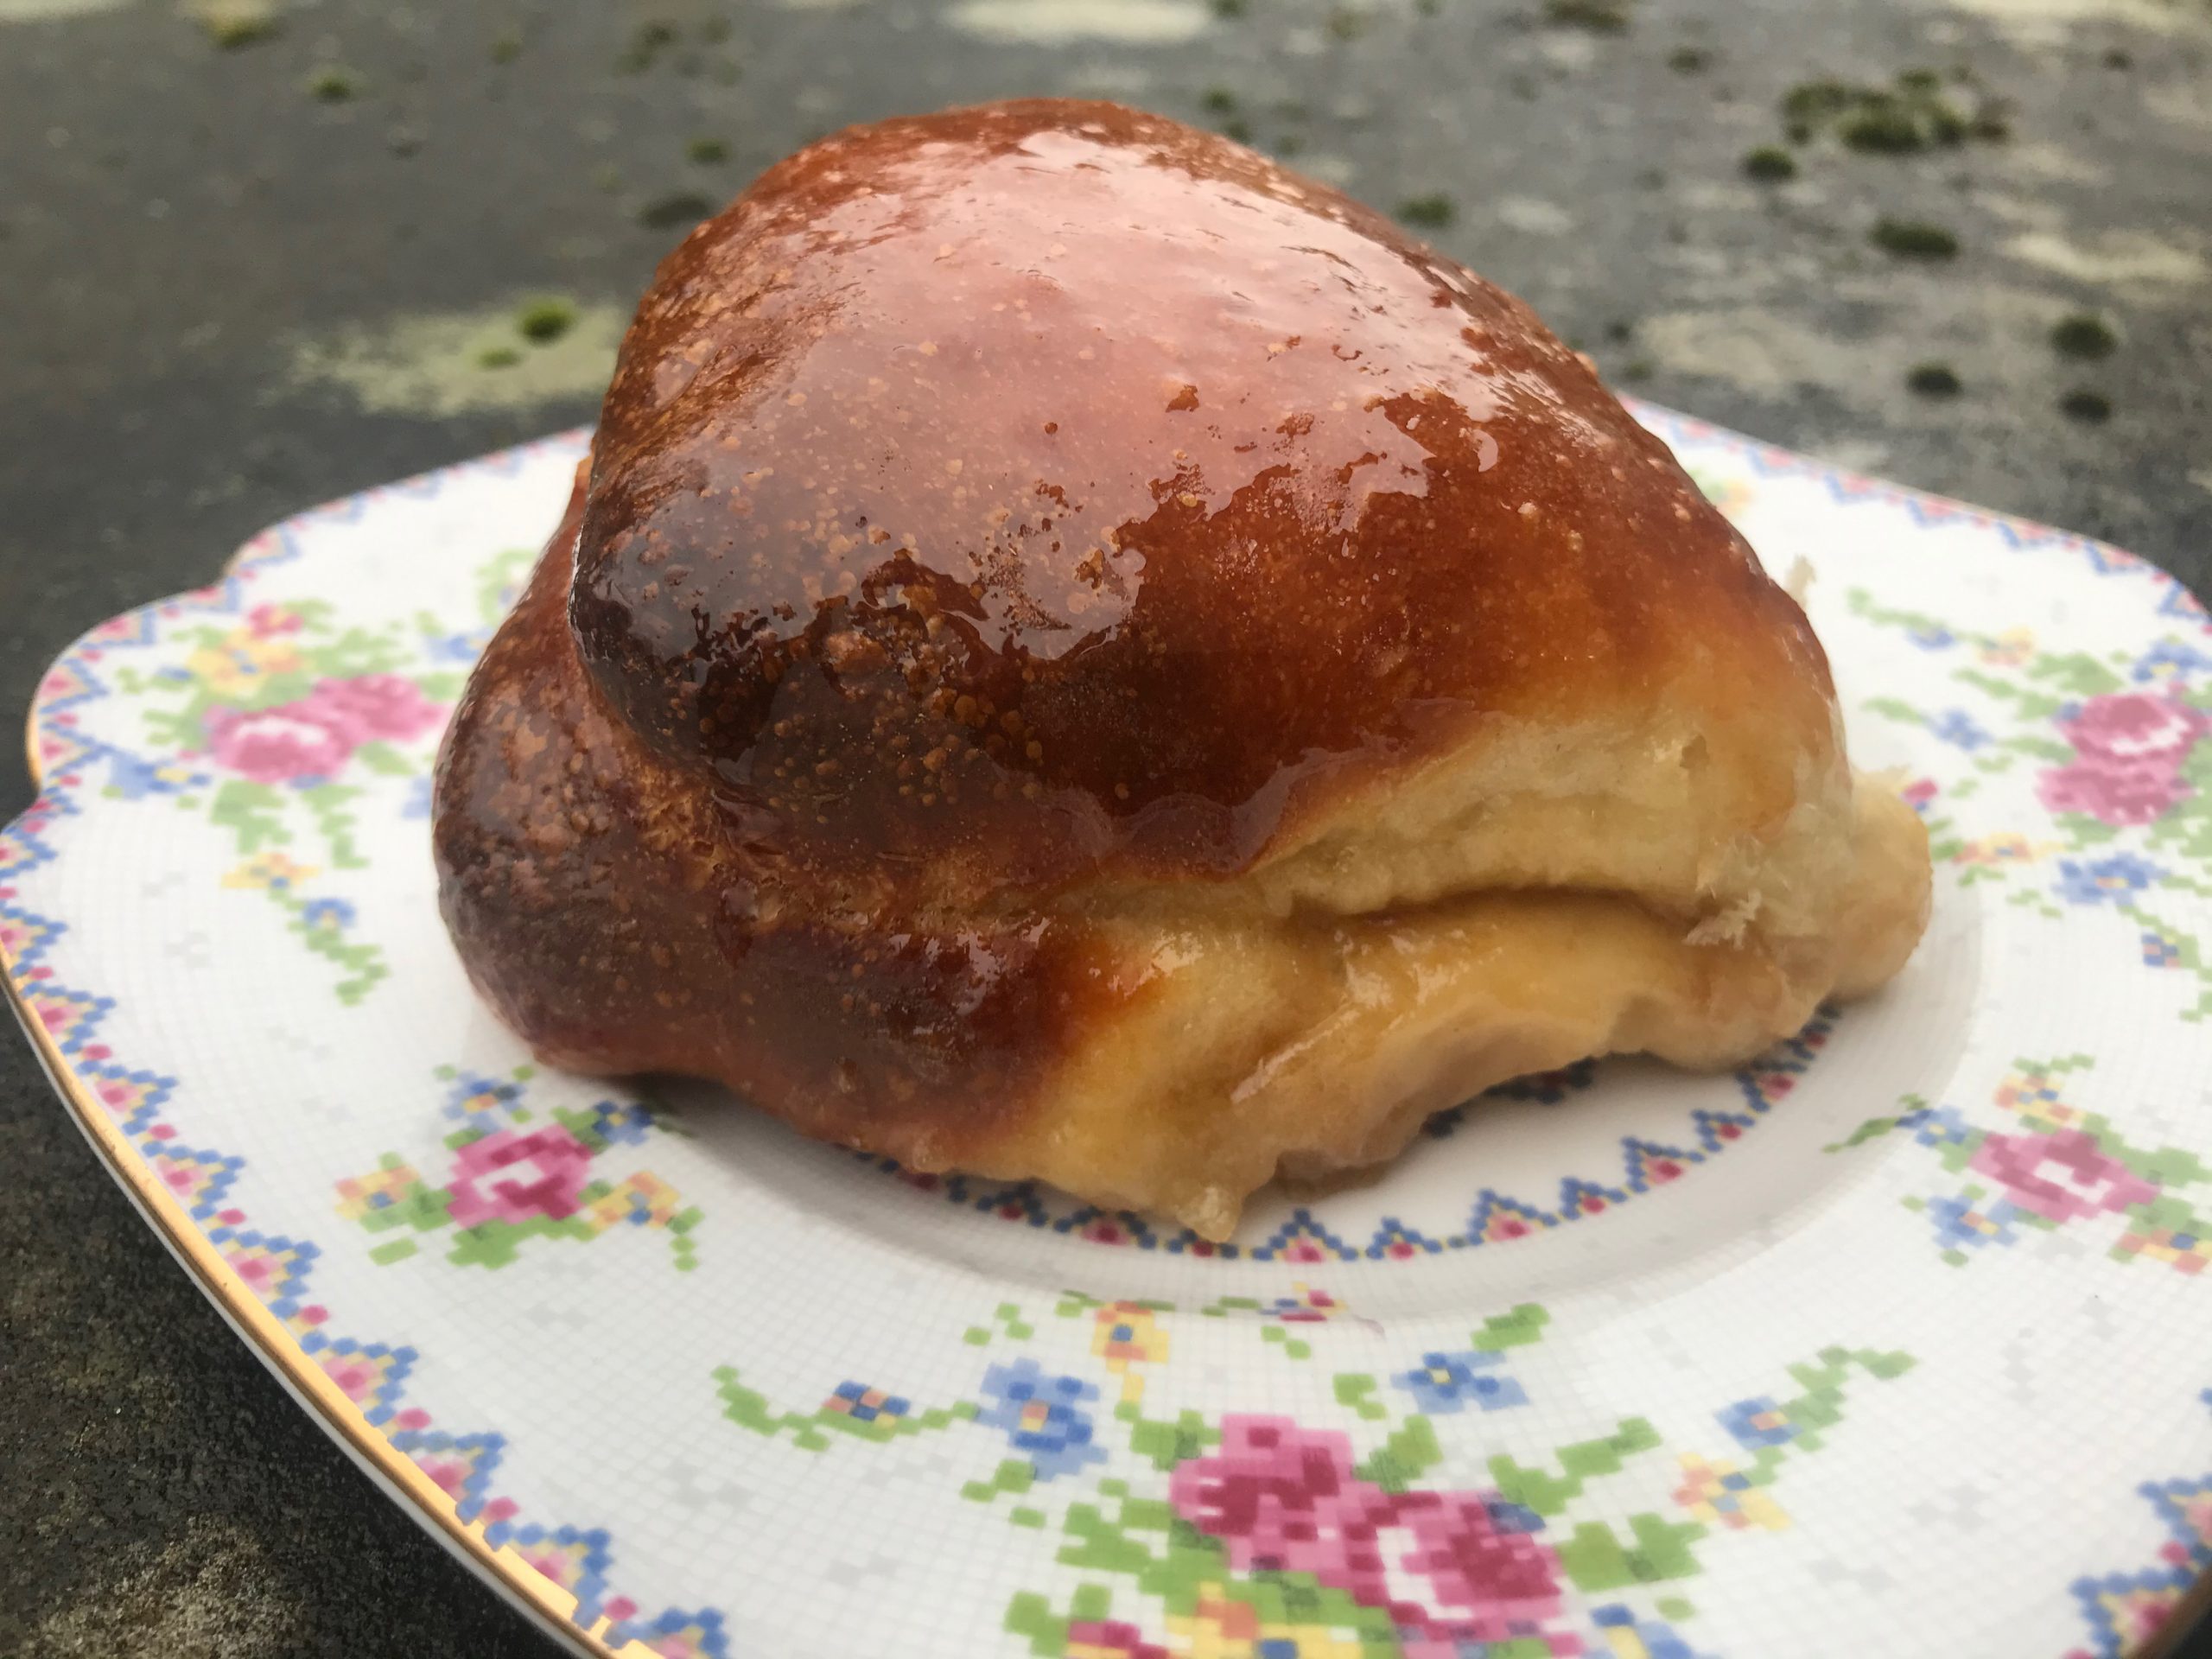
As soon as they come out of the oven brush them with the simple syrup glaze generously and leave them on the tray for 10 minutes to soak up any excess butter and allow the treacly toffee to stick to the bun. Finish cooling on a wire rack and eat the toffee bits stuck to the tray as a cook’s bonus.

Try both this recipe and my version and let me know which one you prefer or which one brings back happy memories of enjoying butter buns.


Edit: Edward has been in touch to give additional information “Just two small points I would like to offer to make things easier. First, after making the dough balls cover them with a cloth and give them about 10 minutes bench rest. This will make them easier to roll and prevent pull back. The second is the glaze which is improved by the addition of a spoonful of golden syrup which makes the glaze more viscous and offers better coverage with less risk of the glaze being absorbed. Finally a sprinkle of caster sugar used to be added for presentation.”

Shropshire Butter Buns #2 Read More »

Marmite Bread

Marmite bread

I have already published this on my blog at Veg Patch Kitchen, but I wanted to make sure I shared it here too as it is too good not to. This recipe was inspired by James Morton from his book Brilliant Bread, now of my favourite books on the subject (you can read about my other favourites here) and is a bread that people can choose to make on my full-day Bread Basics course. Obviously, the very idea of Marmite bread makes some people shudder with horror. If this includes you I urge you to try it at least once, you can reduce the Marmite to 30g for a more subtle flavour that just lends a delicious savoury edge to your loaf which is wonderful with soups and stews and then for an extra bonus it makes wonderful toast, that you can spread with extra Marmite.

Note of caution though – Marmite is salty so reduce the salt that you would normally add otherwise the loaf will be too salty. Also, don’t do what I did once and overdo it on the marmite front. I got cocky in a class one day and added two spoonfuls instead of my usual one spoonful and whilst everyone else’s loaves rose beautifully mine remained as flat as a pancake. The saltiness of the Marmite will kill the yeast if you go overboard. Lesson, well and truly learned.

500g strong white flour or you could replace 100g with 100g wholemeal or 50g rye & 50g wholemeal
5g easy bake/ instant yeast or 15g fresh yeast (remember that you can reduce the yeast and allow the bread to rise longer)
5g fine salt
40g Marmite
340-380g water (depending on flour choice)

Place the flour, salt and yeast in a large bowl and mix together. Weigh the Marmite out in a jug and pour over 100g hot water and stir to dissolve. Allow to cool a little and then add to the flour. Add another 200g of warm or cool water (if you use cool water your dough will take longer to prove which improves the texture and flavour). Start to mix, adding splashes of water in until you get a dough that is soft and slightly sticky. Make sure that there are no dry bits in your dough. Leave to rest for at least ten minutes or up to an hour depending on how your day is going.

Knead your dough or use the stretch and fold method as I demonstrate in this video.

Cover well and leave to prove until airy, remember it will take longer for it to prove if you used less yeast or cooler water. You can also pop it in the fridge at this point for several hours or overnight if that fits better into your day.

Shape your dough. I show you how to shape for a loaf tin or as a batard/ bloomer in this video.

Cover with clingfilm or similar, remember to oil it well so it doesn’t stick to the loaf and deflate it. Allow to prove, again this can happen overnight in the fridge if it suits you.

Preheat the oven to 220 degrees centigrade, gas mark 7 or use the floor of the roasting oven of the Aga. Steam the oven well as you put your loaf in, I like to use a plant mister to do this, spraying several times (avoiding the glass door and light). Bake for 30 minutes, check that it is baked by tapping on the bottom, it should sound hollow or insert a temperature probe and check that it reaches 90 degrees centigrade. Leave to cool completely on a wire rack and I promise you will love it even if you hate Marmite.

Marmite Bread Read More »

Wild garlic pull-apart loaf

Wild garlic pull apart loafNow that the wild garlic season is in full swing we have been having this bread quite a bit.  It is very garlicky and buttery, with each ball of dough filled with garlic butter.  If you are looking for something less buttery then have a look at my other wild garlic loaf which just makes use of the garlic leaves in the dough.

We have a lot of wild garlic in our garden and the surrounding area. It is fairly easy to identify and the smell of garlic gives it away but if you are unsure what you are looking for check out the Woodland Trust’s page to make sure you know what you are picking.

These loaves are destined for today’s local community lunch along with a seeded spelt and a white loaf for those that prefer their breath not tainted by garlic at lunchtime.

You only need a generous handful of garlic leaves for this recipe. Make sure they aren’t picked from the side of paths where a passing dog might have, well you know, passed. Because there is so much of the stuff near here I am not shy about picking it as close to the ground as possible and pulling up 1 or two cloves as well. The garlic fragrance is stronger nearer the base of the plant and in the clove. You can control the garlic-y-ness of your loaf by choosing to include more green leaves for a more delicate taste or including more white stem for a more knock-out taste.  I also include the flowers because they bring another taste dimension to it as well. I add a bit of garlic to the bread dough because the garlic taste transfers during fermentation. You can miss this step out if you prefer.

Always wash your wild garlic well before using.

To make one pull-apart loaf:
For the bread:
500g white strong bread flour
1 sachet of easy bake yeast or 15g fresh yeast
5-10g of fine sea salt
320-350g water (it will depend on your flour how much you need so add 320g to begin with and then add more carefully as you mix. You want to have a softly sticky dough rather than a dry dough or a wet dough.)
20g wild garlic chopped finely (optional)

For the garlic butter
A large handful of wild garlic, finely chopped (how much you use is up to you taste wise)
50g softened unsalted butter
a large pinch of flaked sea salt

Method
Make the garlic butter by combining all of the ingredients and then popping it in the fridge.

For the bread, place the flour, yeast (if using fresh yeast crumble it into the flour until the pieces are fairly small), salt (keep the yeast and salt separate as salt will kill yeast on contact) and chopped wild garlic in a large bowl. Add 320g of water and using one hand start to mix and squeeze the dough. Carefully add more water until the dough comes cleanly away from the bowl, there are no dry bits, and the dough feels on the wetter side. I describe it as softly sticky.  Cover with clingfilm (or a large inflated bag) and allow to rest for at least ten minutes.

Remove clingfilm. Keep the dough in the bowl and grab the bit furthest away from you, stretch up and fold over the remaining dough. Turn the bowl a quarter turn and repeat the stretch and fold. Repeat this about 6-10 times until you feel the dough starts to resist you. Cover with clingfilm again and leave to rest for at least ten minutes. You will need to repeat the stretch and fold procedure and then rest period in full as described above at least twice more. You can go for a third if you have the time. Once you have completed the stretches and folds cover your dough and you can either place in the fridge overnight or leave at room temperature for the dough to get airy and double in size.

Take the dough and turn it onto a lightly floured work surface.  Cut the dough into about 20 pieces.  Take each piece, flatten slightly, place a large knob of garlic butter in the centre and wrap the dough around the butter to encase it completely to make a small roll of dough. Place each roll into a 2lb loaf tin.

The rolls ready to prove

Cover the loaf tin with cling film or a large inflated bag and leave to prove for about 30 minutes at room temperature, or longer in the fridge. In the meantime preheat your oven to its highest setting and place a baking tray on the centre shelf. Bread benefits from being placed onto a hot solid surface.

When the rolls have risen and look airy, place tin the oven. Mist the bread with water several times using a plant mister (avoid the light and glass door). This creates steam and helps the bread achieve maximum oven spring. Turn the oven down to 220°c, gas mark 6 and bake for about 30 minutes until the bread is golden.  Turn onto a wire rack to cool.

Wild garlic pull-apart loaf Read More »

Mincemeat Swirls

Mincemeat swirl

I am running a Christmas Breads course in November at Acton Scott Farm and Museum so I have been planning which breads we will be cooking during the day.  I wanted to do a range of sweet and savoury so that there will be a bread to cover every occasion over the busy Christmas period.  I was thinking about sweet buns and which one we should make. At a Christmas breads course last year we made St Lucia buns, they were quite tasty and appealed because of the story about them being handed out whilst the girls in Scandinavian towns and villages dress in white with a candle crown and walk through the streets. But they are not buns that I would write home about.  I love a Chelsea bun and all of its fruity stickiness so I began to think about replacing the fruit, butter and sugar mixture with mincemeat and it works beautifully.  Whilst I was making them Mr OC commented on the Christmassy smells emanating from the kitchen – so they were deemed perfect for the Christmas breads course, along with a date and walnut loaf and a blue cheese focaccia. All suitably Christmassy and with the advantage of using up the bit of mincemeat left in the jar, the bowl of walnuts and the inevitable bit of cheese that escaped the crackers.

Mincemeat Swirls
For the enriched dough:
300g strong white flour
250g plain white flour
1 sachet of easy bake yeast or 10-15g of fresh yeast
10g fine sea salt
50g caster sugar
150ml whole milk
150ml water
50g unsalted butter
1 egg
For the filling:
5-6 tablespoons (about half a jar) of mincemeat
For the glaze:
50g caster sugar
50ml water
For the icing:
50g icing sugar
squeeze of orange juice 0r use water

Method
To make the dough:
Heat the milk  and butter in a small pan until the butter has melted, add in the tepid water and check with a clean finger that the liquid isn’t too hot. If it’s too hot it will kill the yeast, so leave it to cool for a while.

Measure the flours, salt, sugar and yeast (keeping the salt and yeast separate as the salt will kill the yeast too) into a large bowl, pour in the liquids and add the egg.

Using a clawed hand mix the ingredients together until they come together in a shaggy mass.  If the mixture has any dry bits of flour add a splash more water. You want it to feel on the wet side rather than the dry side. Cover with clingfilm, a large plastic bag or a shower cap and leave to stand for ten minutes.  Uncover and using one hand stretch half of the dough furthest away from you and fold it over the other half. Turn the bowl a quarter turn and repeat this stretching and folding. Repeat the action for a further 8-10 times. The dough should start to resist you as you do these stretch and folds. This is the gluten developing.  Cover the bowl again. Leave to rest for at least ten minutes and repeat the stretch and folds. Stop stretching and folding when the dough becomes difficult to pull. You will have done enough. Rest for at least another ten minutes and repeat the stretch and fold.  Cover and leave until the dough has doubled in size (about an hour in a warm kitchen).

Preheat your oven to 200°c, gas mark 6, or use the roasting oven of the Aga. Place a solid shelf or tray in the centre of the oven or use the floor of the roasting oven of the Aga. All bread benefits from being cooked on a solid tray rather than a wire shelf.

Lightly flour the work surface and tip the dough onto the flour.  Roll into an oblong roughly 40cm x 30cm. Spread spoonfuls of the mincemeat evenly over the surface. Mincemeat swirls

Roll up from the long end, like a Swiss roll.

Rolling up mincemeat swirls

Once fully rolled up cut into 8-9 pieces, depending on how big or small you want your buns to be. Place the buns, swirl facing up, in a square or round cake tin, that measures about 20cm. You want the buns to be touching slightly so that they batch bake (that way you get the lovely soft side when ripped apart).

Mincemeat swirls in tin

Flatten each bun slightly with the palm of your hand.  Cover with clingfilm, a large inflated plastic bag or a shower cap and leave to rise until they look nicely risen and slightly puffy (about half in a warm kitchen).

Place in the centre of the oven and bake for 20-25 minutes until golden and burnished.  If you poke the middle with your finger you should feel very little resistance.

Just before the buns are due to be ready place the sugar and water for the glaze in a small pan and bring to a simmer over a gentle heat. Simmer for about two minutes.

When cooked place the tin on a wire rack and brush the sugar glaze over the buns.  Leave them in the tin for about ten minutes and then remove and place on the wire rack to cool completely.

Mix the icing sugar and enough orange juice or water to make a pourable icing and decorate the top of your buns to your heart’s content.

Baked mincemeat swirls

Mincemeat Swirls Read More »

Bara Brith – the yeasted version

Yeasted bara brith
Sliced whilst warm because I couldn’t resist (naughty!)

It’s funny how much life can change in four years. I last wrote about Bara Brith in 2013. In that post I said that I hadn’t enjoyed the yeasted version as much as the cake version of this traditional Welsh treat because of the denseness of the yeasted version.  The Bara Brith started life as a yeasted loaf, a treat that was made to cook in the dying heat of the traditional wood fired bread ovens. In latter years the cake version has become more prominent.

Since 2013 I have become obsessed with yeast cookery, to the extent of setting up a cookery school to teach others the joy of making your own bread at home. A friend mentioned Bara Brith to me in the school playground and it set my brain whirring with memories of that experiment that I staged back in 2013. I started to wonder why I hadn’t enjoyed the yeasted version as much as the cake.

I revisited the recipe that I used back in 2013 for the yeasted version and now with experience of baking wholemeal breads it occurred to me that it would benefit from being mixed a lot wetter than the original recipe specifies. Instead of the ¼ pint or 150ml of warm milk specified, I added ½ pint or 250ml milk to the flour. I also used a mix of wholemeal and white flour to lighten it up further. As an aside I used freshly milled Shropshire Soissons grain, because I am also obsessed with using my Komo mill at every opportunity, but I do realise that not everybody is as obsessed as me, so any wholemeal flour will be fine, although stoneground is always a better choice.

I am happy to report that this new experiment has proved that the yeasted Bara Brith can outclass the cake version every time. So, this recipe will get added to my Croissants and sweet dough class that I have on Saturday, I hope my students enjoy it as much as I do (NB. It’s even had the thumbs up from my girls!).

300g wholemeal flour (I used bread flour, but if you don’t have it then don’t worry)
250g white bread flour
1 sachet of easy bake yeast or 15g fresh yeast
8g (or 2 scant tsp) of fine sea salt
50g sugar (you can use caster or dark brown, whichever you have to hand, the dark brown sugar will make a richer loaf)
1 tsp mixed spice
25oml milk
75g butter
150g dried mixed fruit

Glaze:
40g caster sugar
40g water

Method
Place the flours in a large bowl. If using fresh yeast crumble it into the flour like you would butter into pastry. If using easy bake yeast just mix it in the flour. Add the sugar, salt and mixed spice and stir in.

Cut up the butter and add it to the milk in a small pan and warm to tepid, so that the butter is just melted.

Mix to a softly sticky dough. Cover with clingfilm and leave to stand for ten minutes.  Uncover and use the fold and stretch method to improve the gluten. To do this take half the dough, stretch it up and fold it over the top of the rest of the dough. Turn the bowl a quarter turn and repeat the stretch and fold. Keep repeating this until the dough starts to resist you or threatens to tear. Cover again and let rest for another ten minutes. Repeat the stretching  and folding. Cover and rest for ten minutes and then do one last round of stretching and folding. Also feel free to knead the dough however suits you best (but don’t flour the surface) or use a stand mixer.

Cover the dough and let rise until doubled in size.  Add the dried fruit and fold in until evenly distributed.

Butter a loaf tin. Turn the dough onto a floured surface and press gently into a rectangle with your fingers. Roll down from the longest edge, seaming the dough as you roll. Place the dough, seam side down, into the loaf tin. Cover with oiled clingfilm or a large inflated bag and leave to rise until it has proved. To test press a finger gently into the dough, if it comes back within two seconds it is ready for the oven.

Once you have shaped your loaf, preheat the oven, with a baking tray on the shelf to 200°c.

Place the loaf on the preheated baking sheet in the oven, mist with a few sprays of water (using a plant mister). Bake for 15 minutes, turn the oven down to  180°c and continue to bake for another 25-30 minutes until it sounds hollow when tapped on the base.

Whilst the loaf is cooking make the glaze. Put the sugar and water in a small pan and heat gently until the sugar is dissolved, then bring to the boil and simmer for three minutes until syrupy.

As soon as the loaf comes out of the oven, brush all over with the glaze. Leave the loaf to cool completely before enjoying spread with butter.


Bara Brith – the yeasted version Read More »

Wild Garlic Bread

Wild garlic bread

Wild garlic loaf sliced

We are lucky enough to be surrounded by wild garlic as far as the eye can see at this time of year. It has been whirring round my mind about how it might taste in a loaf. So we popped our wellies on and went a walk. We could have picked it out of our very own garden borders but we have two dogs… So I wanted to find a corner which might be unadulterated.  (I still gave it a good rinse though, just in case).

Wild garlic is fairly distinctive, so get yourself a field guide and if you are unsure then the strong garlic smell gives it away. Always follow the rules of foraging. Be sure what you are picking. Ask permission of the landowner. Only pick something that is prolific and not protected. Only take what you need for your personal use. Give it a good wash before eating it.

When I was mixing and handling the uncooked dough, the garlic smell was very strong and I was worried that I had perhaps overdone it a bit. However, once cooked the garlic had mellowed and imparts a subtle and surprisingly sweet hit of garlic. It makes a delicious loaf, that is very good with soup or, in fact, anything that you happen to have for your dinner.

Makes 1 loaf

500g white bread flour
5g easy bake yeast
8-10g sea salt
320g water
20g olive oil
a couple of handfuls of wild garlic, chopped

Method
Place the flour, yeast and salt in a large bowl (keeping the yeast and salt separate, as the salt will kill the yeast). Add the water and olive oil and mix with a clawed hand until well mixed. Cover with a large bag or clingfilm.  Leave to rest for twenty minutes. This allows the flour to absorb the liquid and start to make gluten before you have to get involved. The dough should be softly sticky, if it isn’t add a bit more water. Don’t be tempted to add more flour. A wetter dough is better than a dry dough.

Leave the dough in the bowl and holding the bowl with one hand, stretch some of the dough up and over the rest of the dough. Turn the bowl a quarter turn, and repeat the stretching and folding. Repeat this for about 10-12 folds.  Cover the bowl again and leave for another twenty minutes. Repeat the stretching and folding motion again.  If the dough starts to resist then stop stretching, if it starts to break then stop stretching. Leave to rest again for another twenty minutes and then fold again. It will need less folding this time and it will feel lovely and stretchy, smooth and satiny.  Cover and leave the dough to prove for at least an hour until it has risen, is domed and has plenty of aeration.

Lightly flour your work surface and turn your dough out of the bowl.  Add in the chopped garlic leaves and fold the dough over the leaves. Shape into a round and place on a floured tray or into a proving basket or if you prefer into a greased loaf tin. Cover with a large bag or oiled clingfilm and leave to prove again.  It might need twenty minutes, it might need an hour. It will depend on the temperature of your dough and the temperature of the room.

Preheat the oven to 230°c and place a baking tray on the oven shelf to heat up with the oven, or use the floor of the roasting oven of the Aga.

To test if your loaf is ready to bake, flour or oil your finger and press lightly onto the surface of the loaf. If it springs back slowly within 2 seconds it is ready to put in the oven.

Place the loaf on the hot baking tray, spray the oven walls with water using a plant mister (avoiding the glass door and light). This will create steam, so that the loaf has a chance to do its last rise before the crust forms. Bake for about 30-40 minutes until the loaf is dark golden and sounds hollow when tapped. Leave to cool completely on a wire tray before slicing and enjoying.

If you would like to perfect your bread making skills you could always join me for a bread making course at Veg Patch Kitchen.

Wild Garlic Bread Read More »

Elderflower scented Belgian buns

Elderflower Belgian buns

I am testing the ovens in my new kitchen before classes commence and these were my test subjects. As I walk towards my chickens in their pen I have been struck with the delicious scent of the elderflowers growing on the tree there this last week. The smell is difficult to describe but it almost fizzes in the air, it reminds me of the Refresher sweets that I used to enjoy as a child. It is so wonderful but also fleeting, in the next week or so, the fragile blossoms will be on the floor and the berries will start to form. I decided I must use them before they are gone. I was making these buns and so thought I could add the scent to the icing. It is subtle and was missed by most of my family, in their greed to eat the bun, but I knew it was there and enjoyed it very much. You can, of course, make these buns without the elderflower syrup, but if you can, then do.

The dough for these buns is made with my enriched dough standard recipe that I use for most of my sweet buns – iced fingers, chelsea buns, hot cross buns etc. It’s adaptable, so go ahead and have a play around adding flavourings and ingredients to suit you.

For the buns:

300g strong white flour
250g plain white flour
50g white sugar
5g easy bake yeast or 10g fresh yeast mixed with a little of the water
10g fine sea salt
150ml warm milk
150ml warm water
50g softened butter
1 egg
50g mixed dried fruit or use just currants
20g softened butter

Place the flours, sugar, yeast and salt (keeping the yeast and salt separate) in a large bowl. Add the milk, water, butter and egg (you may not need all the water so hold some back) and mix with your hands or with an electric dough hook until you have a soft, slightly sticky dough. Knead for about ten minutes until smooth and elastic. Shape into a ball and place in the bowl and cover with clingfilm or a large plastic bag. Leave to rise for about two hours. The time needed will depend on the warmth of your kitchen.

Tip your dough onto a lightly floured surface and roll into a rectangle that is 2-3 cm thick. Spread the softened butter into the rectangle and sprinkle over the dried fruit.
Belgian buns Roll up from the long end, like a swiss roll and cut into 10 even slices. Place these onto a buttered baking tray. Cover with oiled clingfilm or a large plastic bag and leave to rise for another thirty minutes or so.

Preheat your oven to 180°c and bake your risen buns in the centre of the oven for 20-25 minutes until golden brown. Cool on a wire rack.

Whilst the buns are cooking make the elderflower syrup. It’s very easy and you will have some left over for drinking as a cordial or adding to a glass of bubbly, should the mood strike you.

Pick 5-6 elderflower heads carefully, You want to preserve as much of the pollen as you can as this is where the wonderful scent is contained. Check for insects and bird poo (those blinking pigeons!).

Measure 200g sugar and 200g (or ml) of water into a saucepan and place on a medium heat. Stir until the sugar has dissolved and then allow to simmer for a few minutes. Add your elderflower heads and take off the heat. Allow to infuse for twenty minutes and then strain the syrup through muslin, a clean tea towel or kitchen paper sitting in a colander and into a bowl. Allow to cool.

Measure 200g icing sugar and add a tablespoon of the elderflower sugar syrup. Stir and if needed add a little more sugar syrup until you get a good consistency. Spread this onto your cool buns in a more artful way than I can manage.

Elderflower scented Belgian buns Read More »

Harvest Bread

On Sunday we had a little trip out to Acton Scott Historic Farm. It’s a wonderful place, not least because the Bailiff’s Cottage has the traditional bread oven still in place and still in use. They were having their harvest festival on Sunday and using the oven to bake their harvest loaves. I was very excited to talk to the Bailiff about his use of faggots to get the oven up to temperature and to find out that you can cook up to 18 loaves in the capacious oven.  Whilst I was in heaven talking to the Bailiff about his oven, our 11 year old was doing what 11 year old’s do best; muttering under her breath wondering how her mother could possibly find any of this interesting. One day, she will understand. The nearly 9 year old though still has a year or so before the proper disdain for her mother’s interests sets in, so she was quite interested. On Monday she asked me to make a dough the following day so that she could make a harvest loaf when she got home. I was more than happy to oblige. I have always been a bit put off from making one as they look like you might need an artistic eye and patience, neither of which describe me. But in we ploughed.

It took us about an hour and a half to put together. I was ridiculously pleased with the result of our work and kept taking pictures and telling the youngest how brilliant it was.

For the instructions on how to a make the harvest loaf take a look at Daniel’s brilliant blog Bread, Cakes and Ale. He has made one too and has given detailed instructions as to its construction. Even if you don’t want to make the loaf pop over to his blog anyway for a good read.

And here is a picture of the loaf I was so proud of.

Harvest Loaf

Harvest Bread Read More »

Butter Buns

Butter buns

Update January 2020 – I have kindly been given the recipe from an old local bakery and so have made a video demonstrating the recipe for these buns. You can watch the video below or on my YouTube channel. You can also find the alternative filling in this post.

These are the buns that I dream of. I do actually dream about them. When I was young you could buy these from an Italian family bakery that had shops in Shrewsbury and other local towns. They were my all time favourite cake and one that I would choose every time I saw them on their stainless steel platter. The memory of the taste has stayed with me and when the café doors were closed for the final time, it remained just that, a memory. Many times in recent years I have thought about how I might go about making them, but I couldn’t get my head around how you might layer the bun and enclose all that buttery goodness.

A few weeks ago a lady contacted me asking if I had the recipe for the Shrewsbury Butter Bun. Before she contacted me it never occurred to me that  the butter bun was a local phenomenon. Of course, now I realise it is.  A few weeks prior to this I found out that a friend’s husband had family connections with the café and I was considering whether she might think I was mad if I asked her if he knew the secret to the butter bun. The two things happening so close together felt like fate and I knew that it was time I got my act together and found out how I could go about making the butter bun.

Learn to make the Shropshire Butter Bun and other delicious buns on my online course

I haven’t asked my friend’s husband. I thought it best not to ask him to reveal family secrets. But I did find an entry for butter buns on the internet which revealed the folding technique. At last, the answer to all my dreams. I can’t find the link again, which is frustrating, but if I do I will post it here. I have used the recipe that I teach for all my enriched dough recipes on the bread making course. It’s a recipe that can be adapted for a fruit bun, chelsea bun, iced finger etc.

I have trialled these twice now, with success each time. I was frustrated with the first batch that all the sugary butteriness oozed out during the baking. With the second batch I tried sealing the bun with a little milk to prevent the leakage. I now realise that you just can’t seal them, and this is the point. All that sugary, butteriness gathers in the tray and encrusts the bottom of the butter bun. May it ooze for all its worth, enough of the filling manages to stay in to create the delicious buttery layers.

These little beauties are now going to be one of the choices for students to make during the enriched dough part of the bread making course so that I can share the butter bun love with as many people as possible. I urge you to get out your flour and make some as soon as you possibly can.

Makes 10 buns

Lightly grease two baking trays. Oven temperature, 220°c, gas mark 7 or the floor of the roasting oven of the Aga.

For the buns
300g strong white flour (bread flour)
250g plain white flour
10g fine salt
7g easy bake yeast (instant yeast) or 10g fresh yeast (the fresh yeast can be dissolved in a little of the warm water that you will be using for the recipe)
50g caster sugar
150ml warm milk
150ml warm water ( I add boiling water to cold milk and that way both get warm, just make sure that the liquid is only hand hot or you will kill the yeast)
50g butter
1 egg

For the filling
150g softened butter
150g caster sugar
½ tsp vanilla paste or extract

For the glaze
50 ml milk or water
50g caster sugar

Method

In a large bowl mix together the flours, salt, yeast and sugar. Pour in the water, milk, egg and add the cubed butter. Mix together well ( I use my hands like a claw) and then tip out onto a work surface (no extra flour needed) and knead for about 10 minutes until feeling smooth and elastic or you can use the stretch and fold method or use your stand mixer. The dough will be sticky during the kneading process, which is fine. Better sticky than dry.

Form the dough into a ball, and place into a bowl and leave to rise until double the original size, covered with a large bag or lightly oiled clingfilm. With all of the sugar, milk, egg and butter this dough will take longer to rise than a bread dough. In a cool kitchen expect this to be about two hours, less in a warm kitchen.

In a bowl mix together the softened butter, caster sugar and vanilla paste for the filling.

Place the sugar and milk or water for the glaze in a small pan and heat gently to dissolve the sugar. Increase the heat to medium and bring to the boil. Set aside.

Once the dough has doubled in volume, take it carefully out of the bowl onto a lightly floured surface. Roll into a sausage shape and cut into ten equal pieces. Roll each piece into a ball. Take one ball and roll out thinly into a circle. Place a teaspoon of the filling mixture in the middle of the circle. Fold over the circle to create a semi-circle. Flatten the dough over the butter and press the seam down well. Place a second teaspoon of the filling in the middle of the semi-circle. Fold the dough over to create a triangle. Flatten again and press the seam well (See pics below). Place onto a lightly greased tray and repeat with the other balls of dough. Leave to rise for 20 -30 minutes. Place on the floor of the roasting oven of the Aga, or onto the middle shelf of an oven preheated to 200°c, gas mark 6 for 15 minutes until golden.  Glaze the buns whilst hot with the sugar and milk using a pastry brush. Leave to settle on the tray for ten minutes, in this time they will have sucked back up some of the sugary butteriness that has oozed out, and then lift onto a wire rack to cool completely.

Butter bun fold, stage 1
Butter bun fold, stage 2
Butter bun fold, stage 3

Butter Buns Read More »

Honey and almond buns

It’s Real Bread Week this week and this is something close to my heart. The difference between real bread, made with those four ingredients of flour, yeast, salt and water and the bread that you get in the supermarket with all the added emulsifiers, fast proving and bland fluffiness are a world apart. I urge you to bake your own bread or if that doesn’t appeal (although please give it a go, just once, and I promise you will be hooked) then try to find a bakery that makes bread that meets the Real Bread Campaign’s standards.

Most of my days are consumed with the making of bread, the trialling of new recipes or the teaching of bread baking to others.  In celebration of Real Bread Week I thought I would make these beauties.

Honey and almond buns
Honey & Almond Buns

These were inspired by a free sample of Manuka Honey I was sent to review by Manuka Doctor. Manuka honey is reputed to have many health benefits, with its antibacterial properties.  Now I cannot vouch for its ability to cure you of your ills, but I can tell you that it is very tasty. It has a creamy, smooth consistency and is really quite delicious, and not as strong tasting as some Manuka honey that I have tasted in the past. I ummed and erred about whether I should cook with it, as Manuka honey is expensive and is probably better spread on your toast or added to your peppermint tea (and most of my jar has been used for both of these purposes) than used so extravagantly as I do in this recipe. However, I was sent a jar to review and this is a cooking blog and would you really be interested in a picture of my honey spread on a bit of my toast? If you are making these buns at home then I recommend you use a very good local honey (and check the jar carefully to make sure it is local honey and not just packed locally) and save your Manuka for your toast and to sweeten your tea or smoothie.

This recipe is the enriched dough recipe I use in my baking classes, but with the sugar swapped for honey and it really does ring the changes, making a deliciously sticky and aromatically sweet bun.

Honey and Almond Buns

Ingredients

300g strong white flour
250g plain flour
10g salt
10g fresh yeast or 5g easy bake yeast
1 egg, beaten
150ml milk
150ml water
50g butter
50g honey

For the filling:
50g melted butter
50g flaked almonds
75g ground almonds
100g honey

For the glaze:
1-2 tbsp honey
Flaked almonds

Method

Place the flours, and salt in a large bowl, mix well. If you are using easy bake yeast then add this to the flours. If you are using fresh yeast crumble into a small bowl or cup. Heat the milk and the water over a gentle heat until just warm to the touch. Pour a little over the yeast and stir well to dissolve. Add all the liquid and yeast to the flours. You don’t have to wait for the yeast to bubble.  Melt the butter with the honey over a gentle heat and add to the flour with the egg.  Mix well together until there are no dry bits remaining. Cover the bowl and leave to rest for about 30 minutes. Do the first round of stretch and fold as shown in the video. Leave to rest for 10-30 minutes. Do another round of stretch and fold and repeat rest and a final round of stretch and fold. You can also knead the doughy hand for 10 minutes or use a use the dough hook in a free standing mixer, with the mixer on speed 1 and for about 3 to 5 minutes.

Shape the dough into a ball, place into a bowl and cover with a large bag or lightly oiled clingfilm and leave to prove for about an hour to an hour and a half. With all of the egg, milk and butter in this dough it may take longer to rise. So use your judgement and when it looks like it has doubled in size it is ready for the next stage.

Make the filling by melting the butter and honey together in a small pan and then stir in the flaked and ground almonds.

Lightly flour your work surface and turn the dough out. Roll the dough into an oblong measuring 20cm x 40cm. Spread the filling evenly over the dough.

Roll up from the long end like you would a swiss roll. Cut into nine equal pieces.

Line a square 20cm tin with baking parchment and place the buns in.. Using your palm to flatten slightly so that when they have proved they will all be joined together in a batch. This will mean you have that lovely soft sides to your bun when you tear the nine buns apart once cooked (see pic below). Cover again with a large plastic bag or lightly oiled clingfilm and leave to prove for about thirty minutes, or longer if your kitchen is cold. They will have grown and merged together.

Preheat your oven to 200ºc, gas mark 6, 390f or use the roasting oven of the Aga with a grill rack set on the floor of the oven. Remove the bag or clingfilm and place in the oven and bake for about 25 -30 minutes until the buns are golden. Drizzle over another 1-2 tablespoons of honey whilst the buns are still warm and sprinkle over some more flaked almonds. Leave in the tin for ten minutes and then turn out onto a wire rack to cool completely.

honey and almond bun

Are you ready to learn more?

My Bread Made Easy Membership is designed to help you master bread making. You get access to all of my online bread courses and you can join me for a monthly live demo and bread chat.

Bread Made Easy Membership

Honey and almond buns Read More »